

Two rules govern all the tools for campers I’ve ever carried into the backcountry.
First: a tool that fails in the field isn’t just useless it’s a liability. Second: the best gear in the world degrades into junk without basic maintenance. I’ve watched $200 multi-tools fail because the pivot screws were never tightened. I’ve seen $400 tents leak through seams that needed 15 minutes and $12 worth of sealant. The gear didn’t fail. The owner failed the gear.
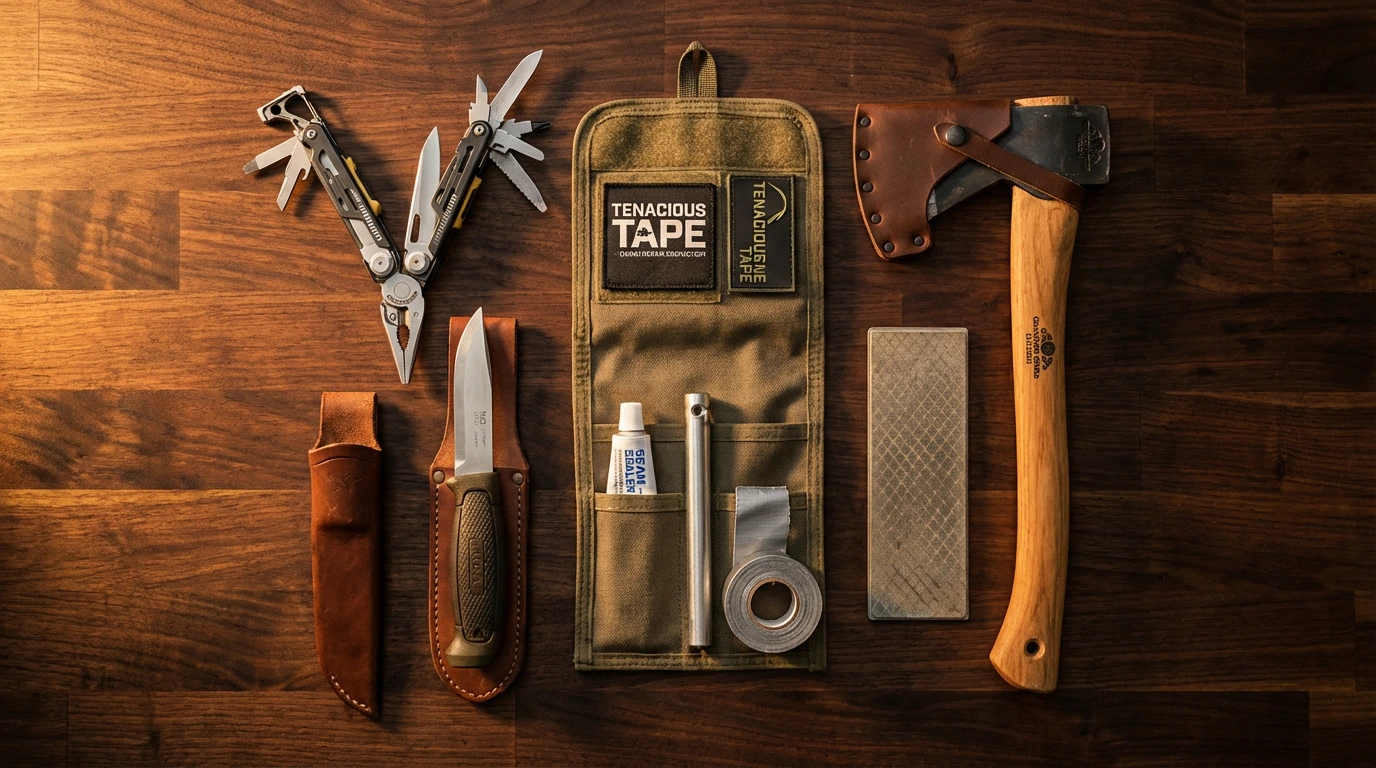
This guide covers both sides of that equation: what cutting tools and multi-tools actually belong in your kit, and how to maintain every piece of gear you own so it performs on trip 50 the same way it did on trip one. No gimmicks, no gadget worship just what works.
The Cutting Tools You Actually Need
Let’s establish something immediately: you don’t need a tactical survival blade that costs $300 and looks like it belongs in a movie. You need sharp, reliable cutting tools sized appropriately for the tasks you’ll actually perform.
The Camping Knife: One Tool, Many Jobs
A fixed-blade or folding knife is the single most-used tool at any campsite. Food prep, cutting cordage, opening packages, carving tent stakes, first aid applications a quality knife touches virtually every activity in camp.
For most campers, a 3.5 to 4.5-inch blade handles 95% of camp tasks without becoming unwieldy. The steel matters more than the shape. 420HC stainless offers excellent corrosion resistance for wet environments and sharpens easily in the field the Mora Companion at around $20 runs this steel and outperforms knives costing ten times as much for everyday camp cutting. D2 and 154CM tool steels hold an edge longer between sharpenings but require more effort to reprofile if you take damage in rocky terrain.
The fixed-blade versus folding debate comes down to application. Fixed blades are stronger no pivot to fail, no mechanism to gum up with sap or food. Folding knives are more compact and pocket-friendly for trips where you’re not primarily using the knife for heavy work. For backpacking, a lightweight folding knife saves pack weight. For base camp or ranger work, I always carry a fixed blade.
What to avoid: serrated-only blades (useless for food prep and carving), tanto tips (designed for piercing, not camp work), and anything with so many secondary features built into the handle that the ergonomics are compromised.
Multi-Tools for campers: The Honest Assessment
I’m skeptical of gadgets by nature. But a quality multi-tool has earned a permanent spot in my kit not because it does any single thing brilliantly, but because it does 15 things adequately when you have no alternative.
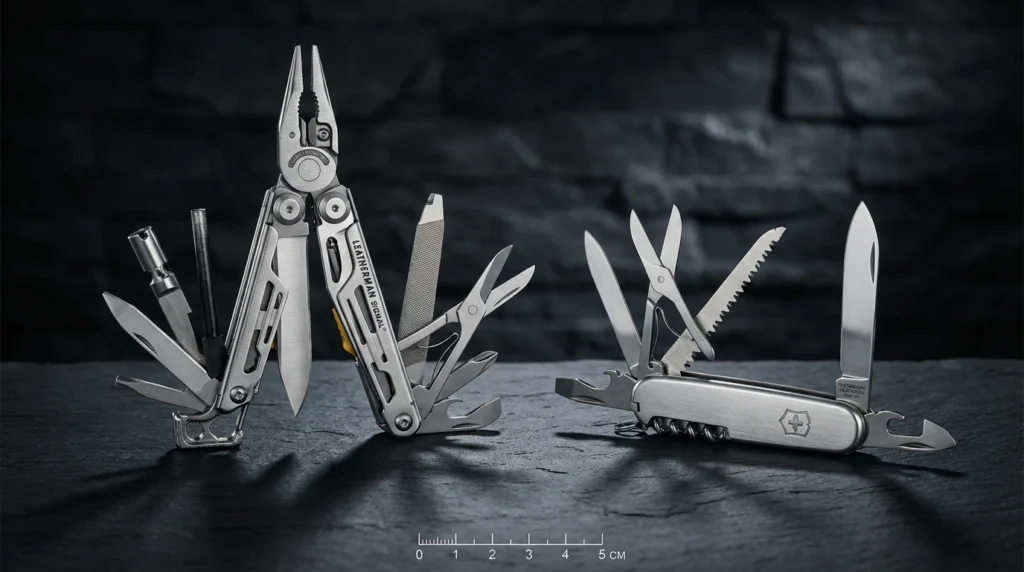
The Leatherman Signal is specifically engineered for outdoor use, which makes it meaningfully different from office-carry multi-tools. It includes a ferro rod, emergency whistle, diamond-coated file for sharpening hooks and blades, and wire cutters that actually close at the tip a feature Leatherman competitors frequently get wrong. At around $120, it’s the tool I’d recommend without hesitation to campers who want one versatile option.
The Leatherman Wave Plus is the workhorse if you use pliers frequently heavier than the Signal but with all tools accessible from the outside without opening the handles. For car camping where weight isn’t a constraint, it’s arguably the most capable all-round option available.
The Victorinox Huntsman (Swiss Army) takes a completely different approach: lighter, simpler, no pliers, but with scissors, a can opener, saw, and multiple blades in a package that weighs almost nothing. For backpackers prioritizing weight, the Huntsman at $55 covers the practical needs of most trips.
What to avoid: multi-tools with more than 20 tools. Beyond that number, you’re paying for features you’ll never use and carrying weight for functions that dedicated tools would perform better. The SOG PowerPoint at around $40 to $50 is the budget option that punches well above its price reliable spring-action pliers, quality steel, and a practical tool selection.
Hatchets: When You Actually Need One
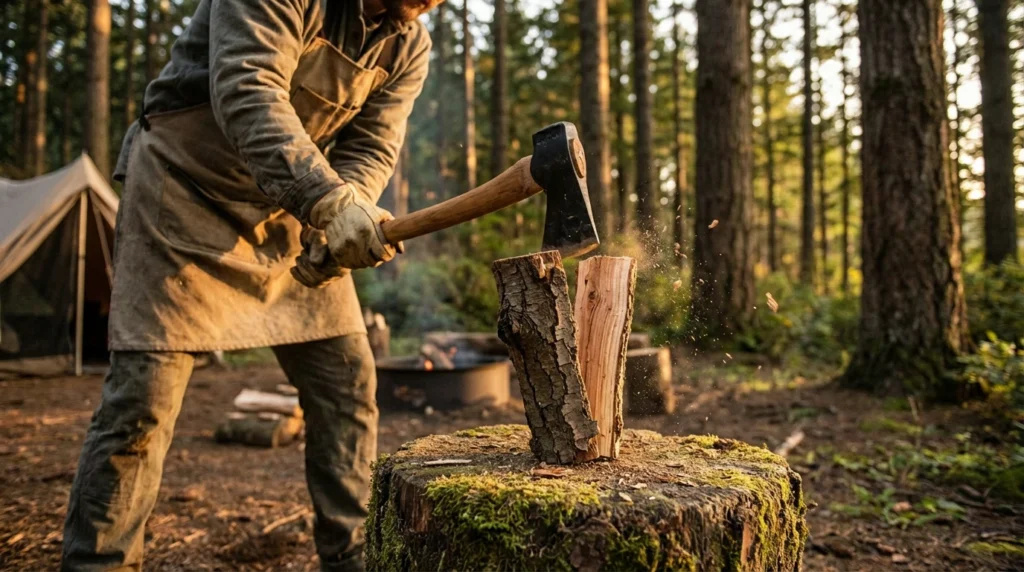
Here’s the honest truth most gear lists won’t tell you: the majority of backpacking trips don’t require a hatchet. If you’re car camping at a site with firewood provided, you don’t need one either. A hatchet earns its weight specifically when you’re processing your own firewood at a base camp or in genuinely remote wilderness where shelter-building materials need processing.
When you do need one, blade geometry and handle material define performance.
The Gransfors Bruks Wildlife Hatchet (1.375 lbs, $130) is the benchmark for quality: hand-forged Swedish steel with a hickory handle that can be replaced in the field if it breaks. The edge geometry produces clean splits and carving cuts that budget alternatives simply don’t match. The CRKT Chogan at $40 represents exceptional value for light camp use capable of splitting small diameter wood cleanly and light enough for trail carry at 1.5 lbs.
For handle material, hickory remains the most field-repairable option a broken hickory handle can be replaced with a shaped branch if necessary. Fiberglass handles are virtually indestructible but cannot be repaired in the field if they fracture at the head. Rubber-overmolded handles provide the best grip in wet conditions but are permanent parts of the tool.
Sharpening is non-negotiable. A dull hatchet bounces off wood rather than biting in, requiring more force and dramatically increasing the risk of a glancing strike to the leg. Keep a diamond file in your kit and touch the edge up before and after every extended use session.
Repair Kits: Field Surgery for Your Gear
This is the section most campers skip entirely and then regret deeply at 11 PM in the rain. A proper field repair kit weighs almost nothing and has saved more camping trips than any single piece of premium gear I’ve ever tested.
Tent Repair: The Three Failure Points
Tents fail at three places with overwhelming regularity: seams, the floor, and poles. Each requires a different repair approach.
Seam Failures
Seam tape the factory-applied adhesive strip covering interior seams on PU-coated tents delaminates over time through UV exposure, compression in stuff sacks, and simple age. Once it starts peeling, water enters at every stitching point in that seam.
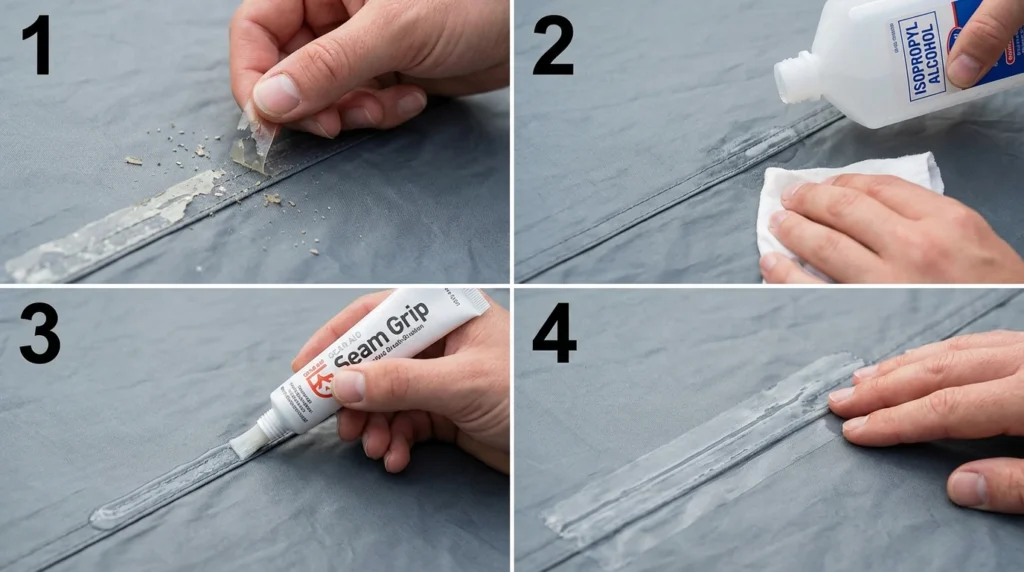
Resealing is straightforward but requires the correct product matched to your tent’s coating type this distinction matters critically. PU-coated tents (the majority of synthetic tents) require polyurethane-based sealants like Gear Aid Seam Grip WP. Silicone-coated fabrics (Silnylon, Silpoly tarps, most ultralight shelters) require silicone-based sealants polyurethane sealants will not bond to silicone-treated fabric regardless of how carefully you apply them.
The process: pitch the tent in a dry, well-lit space. Clean failing seams with isopropyl alcohol and allow to dry completely. Remove peeling tape sections but leave intact sections in place. Apply sealant with the included brush in a thin, even coat, working it into the stitch holes. Allow full cure per manufacturer instructions 2 to 8 hours depending on product and temperature. Rushing the cure produces a sealant layer that peels within weeks.
For in-field tent repairs, Gear Aid Tenacious Tape is the non-negotiable kit item. It bonds to both nylon and polyester without primer, works in wet conditions, and creates repairs that regularly outlast the original fabric around them. I’ve seen Tenacious Tape patches survive three full seasons on rainflies.
Floor Damage
Groundsheet holes from rocks, sticks, and stakes happen inevitably. In the field, a Tenacious Tape patch applied to the outside of the floor fabric (not inside, where boot traffic would peel it) handles the immediate repair. At home, a proper patch using compatible fabric and seam sealant around the edges creates a permanent repair.
Pole Failures
Carry a pole splint sleeve a short aluminum tube slightly larger in diameter than your tent poles. When a pole section cracks or breaks, slide the splint over the damaged section and tape it securely with duct tape. This repair handles the remainder of any trip without compromising the shelter’s structural integrity.
Fabric and Gear Waterproofing: DWR Restoration
Every synthetic outer layer in your kit tent rainfly, rain jacket, stuff sacks, backpack relies on a Durable Water Repellent (DWR) coating for initial water shedding. That coating degrades with use, washing, and UV exposure. When water stops beading and starts soaking into the face fabric instead of rolling off, your DWR is spent.
Nikwax TX.Direct Wash-In and Grangers Performance Repel are the two most reliable restoration products available. Wash the garment or fly with a technical cleaner first (Nikwax Tech Wash, never standard detergent) to remove contaminants blocking the remaining DWR, then apply the replenisher. Tumble dry on low heat heat reactivates the polymers and dramatically improves performance over air-drying alone.
This single maintenance step extends the functional life of a $400 rain jacket by years. It costs $15 and takes 90 minutes.
Sharpening: The Most Neglected Maintenance Skill
A dull knife is more dangerous than a sharp one it requires more pressure, slips unpredictably, and produces ragged cuts that are harder to control.
In the field, a pocket diamond rod or ceramic stone handles touch-up sharpening adequately. The goal isn’t reprofile it’s restoring the working edge between major sharpening sessions. Five to ten light strokes on each side at the blade’s existing bevel angle brings most edges back to functional sharpness quickly.
At home, a whetstone progression (400 grit to reprofile, 1000 grit to refine, 2000 to 3000 grit to finish) produces the best edge quality. For campers without sharpening experience, a pull-through ceramic sharpener (like the Lansky QuadSharp) produces acceptable results quickly, though it removes more metal per stroke than whetstone work. Consistent maintenance using any method outperforms occasional perfect sharpening by a wide margin.
Hatchet sharpening uses a different technique: a bastard file or coarse diamond paddle drawn along the edge at the original bevel angle. Move the file into the edge (not away from it) to avoid burrs. Finish with a fine diamond paddle and strop on leather if available. A sharp hatchet bites into wood with noticeably less effort the difference is immediately apparent.
Gear Cleaning: The Longevity Multiplier
Most gear failures I’ve investigated weren’t caused by design flaws or bad luck. They were caused by storage practices that destroyed the materials quietly over months between trips.
Tents: Never store a tent wet or even damp. Mold degrades nylon, polyester coatings, and seam tape within weeks in storage. After every trip, pitch the tent in the yard or across furniture and allow it to air dry completely before stuffing. Store loosely a tent crammed repeatedly into its smallest possible stuff sack fatigues the fabric at compression points faster than years of field use. A large mesh bag or loose storage sack preserves fabric life significantly.
Sleeping bags: Same principle applies with additional emphasis on loft preservation. Compressing a down bag in a stuff sack for months destroys the down clusters that create insulation. Store sleeping bags loosely in a large cotton storage sack or hanging in a closet.
Backpacks: Empty all pockets completely after every trip forgotten food attracts pests and creates odor that permeates pack fabric permanently. Brush out debris from buckles and zipper tracks. Lubricate zippers with zipper wax (not oil, which attracts dirt) if they begin to stiffen. Hang to dry after wet trips before storing.
Cooking gear: Residual fats in cookware go rancid in storage and create odors that attract bears in the field. Clean thoroughly with biodegradable soap, dry completely, and store with lids off to allow any remaining moisture to escape. For cast iron, dry over heat and apply a thin oil coat to prevent rust.
The Essential Field Repair Kit
Everything below fits in a 4-inch by 6-inch zip pouch and weighs under 8 ounces:
- Gear Aid Tenacious Tape (nylon and clear patches)
- Gear Aid Seam Grip WP (PU sealant) or Silnet (for silicone fabrics)
- Tent pole splint sleeve sized to your poles
- 2 meters of duct tape wrapped around a pencil (saves space over a full roll)
- Spare buckle set (side release, 1-inch, matching your pack’s buckles)
- Speedy Stitcher awl with waxed thread (for fabric and webbing repairs)
- Needle and thread (curved needle for heavy fabric)
- Safety pins (three sizes)
- Isopropyl alcohol wipes (for cleaning surfaces before patching)
- Diamond sharpening paddle
This kit handles the field repair scenarios I’ve encountered across 15 years of backcountry use. It’s not exhaustive nothing is but it covers the failures that actually happen in real conditions.
The same systematic thinking that builds this repair kit applies to everything else in your outdoor setup. Your tent fabric and waterproofing choices determine which repair products you need. Your complete camp sleep system determines what needs to stay dry and functional in all conditions. The camping layering system you carry requires its own DWR maintenance protocols. Your backpack carrying system needs zipper care and buckle spares. And your camp kitchen essentials determine what cleaning protocols apply at the end of every trip.
Gear that’s maintained performs. Gear that’s neglected fails always at the worst possible moment, always somewhere without a hardware store.
Buy good tools. Maintain them relentlessly. Replace parts before they fail completely. That’s the entire philosophy, and it’s served me for 15 years without exception.