

The trip that almost broke me wasn’t the one with the worst weather or the most technical terrain. It was the one where I showed up at a trailhead with a tent zipper that had been failing for two months, a sleeping pad with a slow leak I’d been ignoring, and a camp stove with a partially clogged jet that I’d promised myself I’d clean “before the next trip.” That was three trips ago.
That weekend cost me two cold nights, one hungry morning, and a level of frustration that could have been completely avoided in about 45 minutes of pre-trip maintenance at home. A thorough camper maintenance checklist run before every major trip is not perfectionism. It is the single most effective way to guarantee that the gear you spent months researching and hundreds of dollars buying actually performs when you need it.
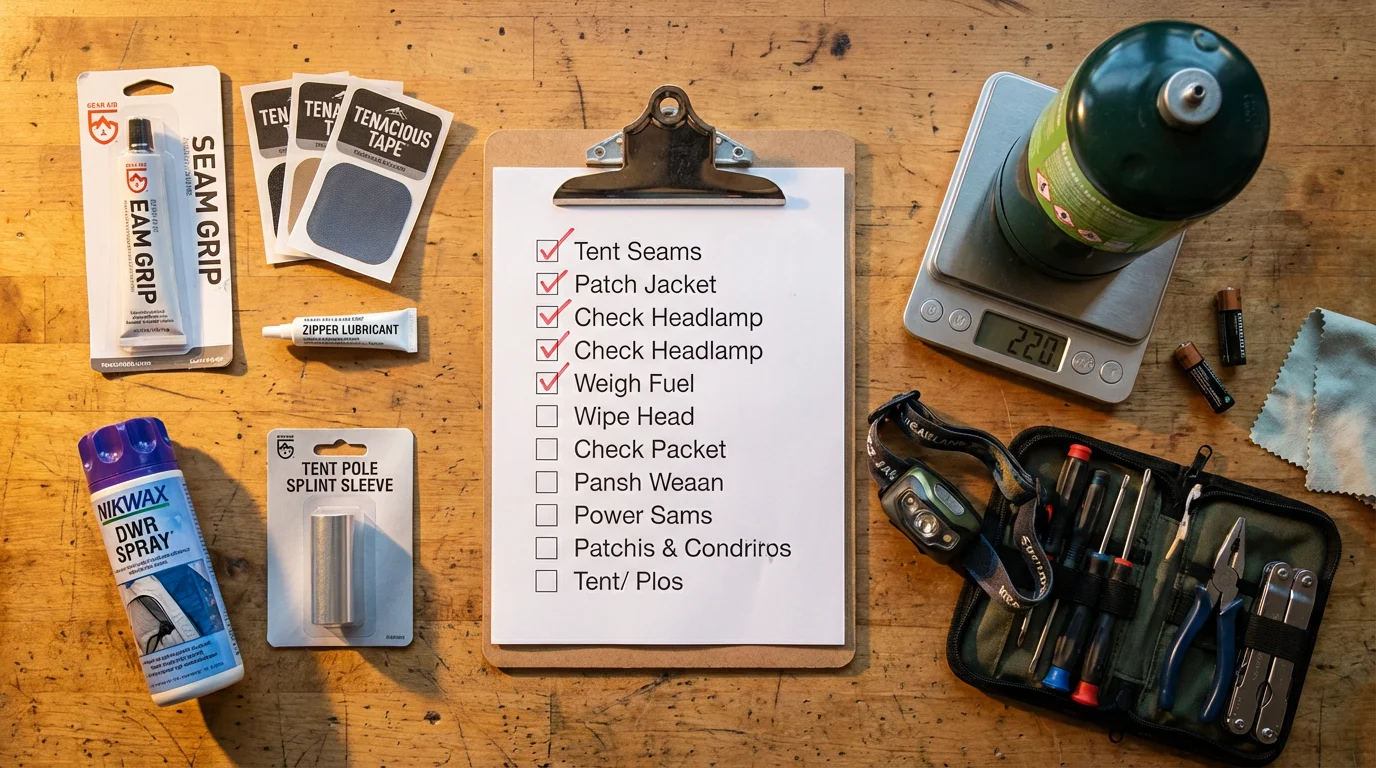
This complete pre-trip camper maintenance checklist covers 50 tasks across shelter, sleep systems, cooking, electronics, clothing, and vehicle preparation. Run through it before every major trip and you will eliminate the category of failures that ruin camping experiences most often: not dramatic gear failures, but small, predictable, preventable ones.
Why a Camper Maintenance Checklist Saves Every Trip
Most gear failures in the field are not random. They are the predictable endpoint of gradual degradation that was visible and addressable weeks or months before the trip.
A tent rainfly doesn’t fail on a stormy night because of bad luck. It fails because the seam tape was delaminating since last autumn and nobody ran a camper maintenance checklist that included checking it. A camp stove doesn’t run out of fuel at breakfast by accident. It runs out because nobody weighed the canister before packing. A sleeping pad doesn’t develop an irreparable crease at camp. It developed that crease because it was stored folded under heavy gear for six months.
The camper maintenance checklist framework works because it forces systematic review before stress is applied to any system. At home with adequate light, tools, and replacement parts nearby, a failing zipper pull takes 30 seconds to replace. At camp in the dark with cold fingers, it takes the rest of your patience and none of your dignity.
For backpackers, this pre-trip discipline also connects to the full system thinking covered in the camping layering system guide, where every component’s performance depends on every other component being functional. One failed layer compromises the system above and below it.
Section 1: Shelter and Tent Maintenance (Tasks 1-10)
This is the highest-priority section of any camper maintenance checklist. Your shelter is your primary weather protection. Its failure has the most immediate consequences of any gear category.
Task 1: Pitch the tent completely in your yard or living room. Do this every single time, without exception. Problems invisible in a stuff sack reveal themselves immediately under tension. A broken pole tip that doesn’t engage the sleeve properly, a grommet that has pulled away from the floor fabric, a zipper that catches at one specific point in its track: all of these appear at home during a five-minute pitch and disappear into frustration at camp during a rainstorm.
Task 2: Inspect every zipper along its full travel. Run each zipper from fully open to fully closed and back. Feel for catches, resistance, or sections where the teeth separate behind the slider. A zipper that skips teeth needs a zipper slider replacement or McLube treatment before the trip. Apply Gear Aid Zipper Lubricant or a wax-based zipper treatment to every zipper track while you’re doing this inspection.
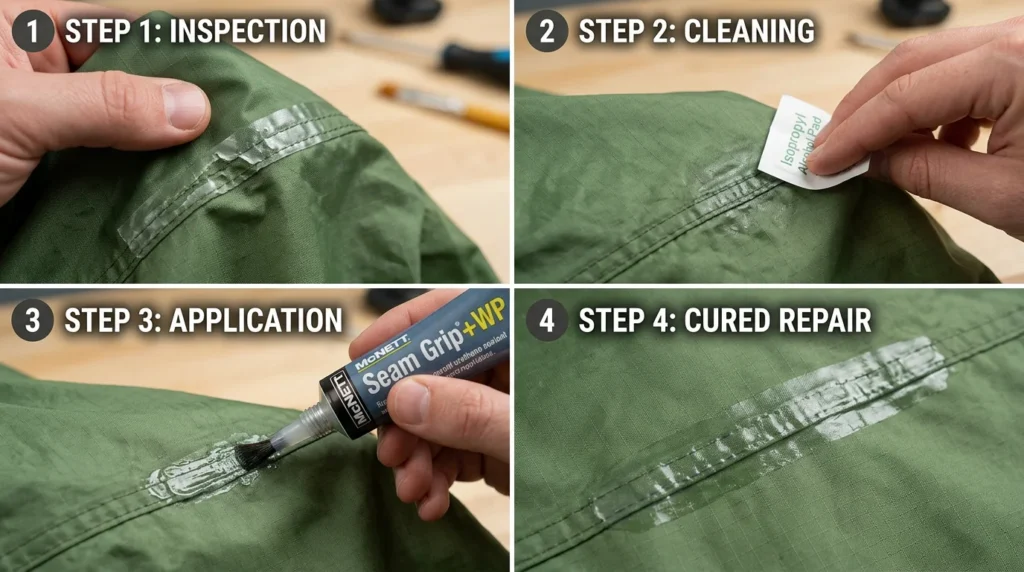
Task 3: Check all seams for delaminating tape. Run your fingers along every interior seam, pressing gently. Tape that has separated from the fabric feels loose, bubbled, or crinkly rather than flat and adherent. Any delaminating section needs to be removed and resealed with the correct product for your tent’s coating type before the trip.
Task 4: Identify the coating type before resealing. PU-coated tents require polyurethane sealants like Gear Aid Seam Grip WP. Silicone-coated fabrics (Silnylon, Silpoly) require silicone-based sealants like McNett Silnet. Using the wrong product on the wrong fabric produces a sealant that will not bond regardless of application effort. The full protocol for matching sealant to fabric is covered in the tools and maintenance guide.
Task 5: Inspect every pole section for cracks, dents, and ferrule fit. Flex each pole section gently and check where the ferrule (the metal end connector) meets the next section. Loose ferrules allow the pole to shift under tent stress and create stress concentration points that cause complete pole failure. Carry a pole splint sleeve sized to your poles.
Task 6: Check all guy line attachments and replace frayed cordage. Guy lines that have been repeatedly tied and untied develop kinks and weak points. Any guy line showing fraying, significant kinking, or weakened attachment loops should be replaced with 2mm Dyneema or equivalent cord before the trip.
Task 7: Test every stake with a mallet on representative terrain. Stakes that bent or twisted on the last trip need replacement before this one. The correct stake type for your terrain matters: V-shaped aluminum stakes for hard soil, wide-blade stakes for soft or sandy soil, and titanium shepherd’s hook stakes for ultralight rocky terrain where stakes are placed in cracks rather than driven in.
Task 8: Check the tent floor for punctures, abrasion thinning, and delamination. Hold the tent floor up to bright light and look for pinhole punctures from previous camping on rocky ground. Areas of the floor that appear shinier or thinner than surrounding fabric are areas where the PU coating is wearing through. Apply a thin coat of floor sealant to any thinning areas before the trip.
Task 9: Inspect the rainfly attachment system. Check every buckle, hook, and clip that secures the rainfly to the tent body. Plastic buckles crack in cold temperatures and UV exposure over time. A buckle that shows visible cracking or stress whitening around stress points should be replaced before the trip, not after it fails at camp.
Task 10: Apply DWR restoration to the rainfly if water is no longer beading. Spray the pitched rainfly with water. If droplets bead and roll off cleanly, the DWR is functional. If water spreads flat and soaks into the face fabric (wetting out), the DWR is depleted and needs restoration with Nikwax TX.Direct or Grangers Performance Repel before the trip. A wetted-out rainfly soaks through under sustained rain regardless of seam condition.
Section 2: Sleep System Maintenance (Tasks 11-18)
Your sleep system is the most critical safety equipment in your camping kit, and it is the category most commonly neglected between trips. Every task in this section of your camper maintenance checklist has a direct consequence for overnight safety in cold conditions.
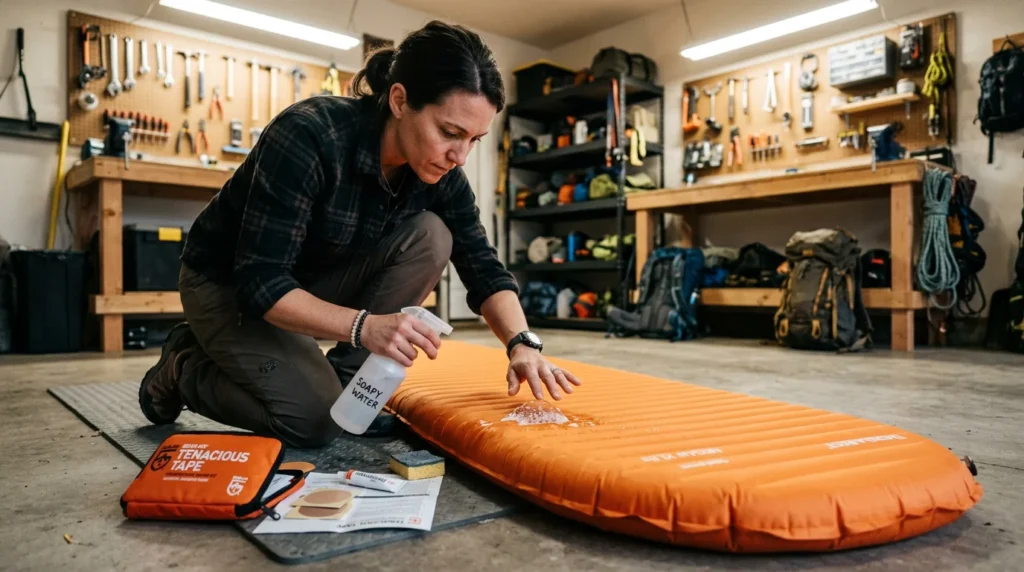
Task 11: Inflate your sleeping pad completely and leave it under pressure for one hour. Any slow leak will reveal itself as a measurable pressure loss. Find the leak by inflating fully, applying soapy water to the entire surface, and identifying the bubble source. Repair field-side with Tenacious Tape or use a dedicated pad repair kit for a permanent fix at home.
Task 12: Check the sleeping pad’s valve mechanism. Valves that don’t seal completely cause overnight deflation. Test by inflating to full pressure, closing the valve, and applying light pressure to the pad surface. Any air escaping around the valve rather than through it indicates a worn valve o-ring that needs replacement.
Task 13: Remove your sleeping bag from compressed storage. A sleeping bag stored in its stuff sack for months between trips develops permanent loft-reducing compression in the down or synthetic fill. Transfer it to a large cotton storage sack or hang it at least two weeks before your trip to allow full loft restoration before packing.
Task 14: Smell your sleeping bag and inspect for mold. A sleeping bag stored while even slightly damp develops mold in the fill material. Any musty smell indicates mold presence requiring immediate washing. Wash with Nikwax Down Wash for down bags or a technical cleaner for synthetic, in a front-loading machine only, and fully dry before packing.
Task 15: Check sleeping bag zipper function along full travel. Apply zipper lubricant to the full track if any resistance is felt. A sleeping bag zipper that catches or separates in the middle of a cold night is a safety inconvenience that a 60-second maintenance step at home completely prevents.
Task 16: Inspect your sleep liner for tears, elastic failure, and odor. Liners develop small tears at seam points and elastic waistband failure over time. A torn liner doesn’t perform its warmth-adding function correctly. Wash before the trip if any odor is present.
Task 17: Verify your sleeping bag’s temperature rating against forecast lows. This sounds obvious and gets skipped constantly. Pull up the forecast for your camping destination, identify the overnight low, and confirm your sleep system’s rated performance covers it with an appropriate margin. For the complete framework on building a system that covers multiple temperature scenarios, the 4-season sleep system guide covers every variable.
Task 18: Pack a dedicated sleep base layer. Wearing a clean, dry base layer to sleep in extends your sleeping bag’s usable life by preventing skin oil and sweat transfer into the fill material. A separate sleep-specific base layer should be part of every camper maintenance checklist for multi-night trips.
Section 3: Cooking and Water System Maintenance (Tasks 19-27)
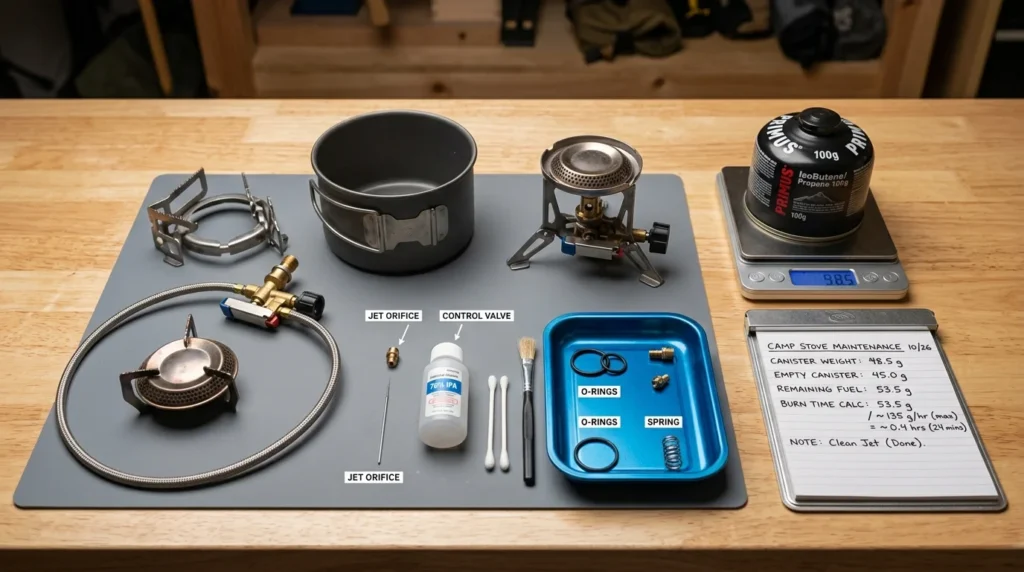
Task 19: Disassemble and clean your camp stove’s jet and burner assembly. Partially clogged jets produce uneven flames, reduced output, and ignition failures. Use the cleaning needle included with most stoves to clear the jet orifice. Wipe all surfaces clean of residual fuel deposits and food contamination.
Task 20: Test ignition on your stove with a fresh canister. Test both the piezo igniter and have a backup ignition source (lighter, matches in a waterproof container) confirmed functional before packing. Piezo igniters fail in cold temperatures and at altitude where air density changes affect spark gap performance.
Task 21: Weigh fuel canisters to estimate remaining fuel. A standard 110g canister weighs approximately 200g full and 90g empty. Weigh your partially used canisters and calculate expected cook time remaining using roughly 12 to 15g of fuel per 1-liter boil. Never estimate fuel by shaking the canister.
Task 22: Inspect all cookware for delamination and handle integrity. Non-stick coatings that are chipping or delaminating should be replaced before the trip. Titanium or stainless steel cookware with damaged handles or failed rivets should be repaired or replaced.
Task 23: Flush and inspect your water filter. Run clean water through the filter and verify flow rate is within normal range. A filter that runs slowly is partially clogged and needs backflushing or replacement per the manufacturer’s protocol. Check the filter housing for cracks that could allow unfiltered water to bypass the filter element.
Task 24: Check water filter freeze damage. Any filter exposed to freezing temperatures while wet is potentially damaged. Ice crystal formation in the ceramic or hollow fiber element creates microscopic fractures that allow pathogens to pass through. When in doubt, replace the element.
Task 25: Test water purification tablets for expiration. Iodine and chlorine dioxide tablets have expiration dates that are real performance thresholds, not conservative estimates. Expired tablets provide unpredictable and potentially inadequate purification.
Task 26: Inspect all cookware seals, lids, and pour spouts. Leaking cookware lids waste fuel through heat loss. Cracked O-rings on water bottles and hydration bladder connections cause leaks that wet gear in your pack.
Task 27: Clean the interior of your hydration reservoir. Hydration bladders accumulate mold in the tubing and bite valve when stored with residual moisture. Use a hydration cleaning kit with brushes sized for the tube and reservoir before the trip.
Section 4: Lighting and Power Maintenance (Tasks 28-33)
This section of your camper maintenance checklist mirrors the full system thinking covered in the camp lighting and power gear guide, where each lighting and power component functions as part of an interdependent energy system.
Task 28: Charge all rechargeable headlamps and power banks to full capacity. Check actual output after charging to verify full capacity is being reached. A power bank that charges to 100% indicator but delivers only 60% of its rated capacity has degraded cells that need replacement before a trip depending on the power bank.
Task 29: Check all headlamp O-ring seals. On headlamps with battery compartment O-rings, inspect the ring for cracking or flattening that would allow water infiltration. Apply a thin coat of silicone grease to maintain seal elasticity.
Task 30: Test every lighting mode on every headlamp. Red light mode failure is common on lights that are rarely used in that mode. A headlamp that works on white mode but has a failed red LED board needs replacement before a trip where night vision preservation matters.
Task 31: Check battery terminals for corrosion. White or green corrosion on battery terminals causes intermittent contact failures that make batteries appear dead when they retain significant charge. Clean terminals with a pencil eraser or fine sandpaper, then apply a thin coat of petroleum jelly to prevent future oxidation.
Task 32: Test solar panel output with a multimeter or charge indicator. Panels with cracked cells or delaminating laminate layers produce significantly reduced output. Testing before the trip identifies panels that need replacement before you depend on them at a base camp.
Task 33: Verify all charging cables are functional and undamaged. USB-C cables with damaged insulation or bent connector pins charge intermittently or not at all. Test every cable by connecting to a known-functional device before packing.
Section 5: Clothing and Layering Maintenance (Tasks 34-39)
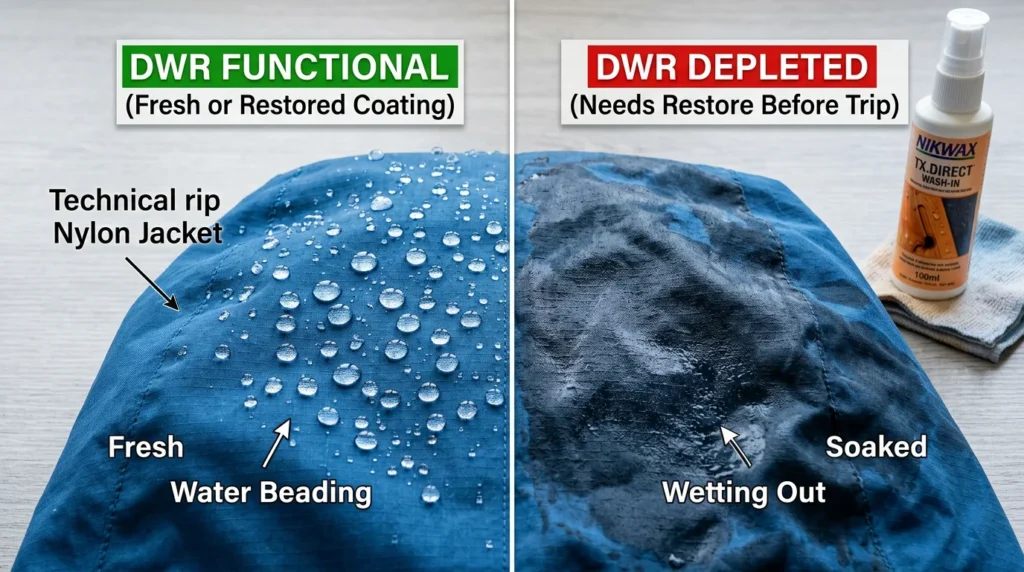
Task 34: Test DWR performance on every rain layer. Wet out the fabric and observe whether water beads or spreads. Any outer layer where water wets out rather than beading needs DWR restoration before the trip. Apply Nikwax TX.Direct Wash-In after washing with Nikwax Tech Wash, then tumble dry on low heat to reactivate the polymer.
Task 35: Inspect all down and synthetic insulation layers for fill migration and baffle failure. Spots where fill has migrated to create dense clusters and bare spots indicate torn baffles requiring repair. Cold spots in a down jacket on a cold morning are exactly this failure mode.
Task 36: Check all garment zippers for function and lubrication. Apply zipper lubricant to any zipper showing resistance. Check that pit zip zippers open and close fully without catching on inner fleece or base layer material.
Task 37: Inspect boot waterproofing and outsole bonding. Apply a waterproofing treatment appropriate for your boot upper material (wax for leather, spray or wash-in for synthetic). Check that the outsole is fully bonded to the midsole with no separation at the heel or toe box. Separated soles delaminate completely in wet conditions.
Task 38: Verify sock inventory and inspect for heel and toe wear. Thin spots in hiking sock heels and toes create direct friction hot spots against boot seams. A pair of socks with worn-through padding is a blister source on a long hiking day. This connects directly to the footwear principles covered in the hiking boots vs trail runners guide.
Task 39: Test all base layers for wicking performance. Spray a small amount of water on the interior face of each base layer. Water should spread and absorb quickly rather than beading. Beading on a base layer interior indicates wicking treatment failure from fabric softener contamination or general degradation. For the complete base layer care framework, the best base layers for camping guide covers the full washing and performance restoration protocol.
Section 6: Navigation and Safety Equipment (Tasks 40-44)
Task 40: Download offline maps for your entire trip area. Cell service is unreliable in wilderness areas. Download maps to apps including Gaia GPS, AllTrails, or CalTopo before leaving service range and verify the download completed by putting your phone in airplane mode and testing map access.
Task 41: Check satellite communicator battery and subscription status. Garmin inReach, SPOT, and similar devices require both charged batteries and active subscription plans. A lapsed subscription means the device cannot initiate an SOS regardless of its charge status.
Task 42: Test your first aid kit for expired medications and used supplies. Ibuprofen, antihistamines, and antibiotic ointments have expiration dates that affect efficacy. Supplies used on previous trips need replacement. Check that adhesive bandages still have functional adhesive and haven’t dried out.
Task 43: Verify compass function and map alignment. Bring a baseplate compass on every trip regardless of digital navigation tools. Test against a known bearing before the trip. Compasses can be magnetized by proximity to strong magnets in gear including some buckles and pack frames.
Task 44: Test emergency whistle and signal mirror. These weigh nothing and take 30 seconds to test. A whistle with a cracked pea insert or a signal mirror with delaminated reflective coating provides significantly reduced signal range.
Section 7: Pack and Carrying System Maintenance (Tasks 45-50)
Task 45: Inspect all pack shoulder straps and hip belt foam for compression set. Foam that has permanently compressed under heavy loads no longer provides adequate load transfer. Press the hip belt foam firmly with your thumb. Foam that doesn’t rebound within a few seconds has set and needs replacement padding.
Task 46: Check all pack buckles for cracking and full engagement. Cold-cracked buckles fail under load with no warning. Test each buckle by engaging and loading it with your full body weight before the trip. Any buckle that flexes excessively or shows surface cracking needs replacement.
Task 47: Lubricate all pack zippers and inspect for broken teeth. A single broken tooth on a main pack zipper causes complete zipper failure as the slider reaches that point. Inspect every tooth along the full zipper track. Replace zipper sliders that no longer create a consistent seal behind them.
Task 48: Check hipbelt and sternum strap adjustment systems. Adjustment buckles that slip under load shift weight incorrectly and cause hip and shoulder fatigue. Test each adjustment buckle by loading the pack and attempting to pull the strap through. Any buckle that slips under moderate force needs replacement.
Task 49: Inspect all compression straps for fraying and hardware integrity. Compression straps that fail while hiking cause load shifts that are both uncomfortable and potentially dangerous on technical terrain.
Task 50: Weigh your complete loaded pack before leaving home. Actual loaded weight versus estimated weight is frequently surprising. A pack that feels manageable at home may exceed your comfortable carry weight on a steep trail. This final task closes the camper maintenance checklist by confirming your total system is within your physical capacity for the planned terrain.
The Printable Camper Maintenance Checklist: Quick Reference
| # | Task | Category | Time Required |
|---|---|---|---|
| 1-10 | Pitch, inspect, seal, and test tent system | Shelter | 30 to 45 min |
| 11-18 | Test pad, inspect bag, verify sleep system | Sleep | 20 to 30 min |
| 19-27 | Clean stove, test water system, check fuel | Cooking/Water | 20 to 25 min |
| 28-33 | Charge, test, and inspect power/lighting | Electronics | 15 to 20 min |
| 34-39 | DWR test, inspect insulation and footwear | Clothing | 20 to 30 min |
| 40-44 | Download maps, test safety equipment | Navigation/Safety | 15 to 20 min |
| 45-50 | Inspect pack, test buckles, weigh loaded | Carrying System | 15 to 20 min |
| Total | 50 tasks across all systems | All Categories | 2 to 3 hours |
Two to three hours at home runs this complete camper maintenance checklist. Two to three hours prevents the failure that ruins a weekend, a week, or in serious backcountry scenarios, something more significant than that.
Frequently Asked Questions About Camper Maintenance Checklists
Q: How often should I run a complete camper maintenance checklist?
Run the full 50-task camper maintenance checklist before every major trip of two nights or longer. For single-night trips to familiar terrain, a shortened version covering shelter, sleep system, and safety equipment is sufficient. After any trip involving significant rain, river crossings, heavy use, or extreme cold, run a post-trip maintenance review as well, because deterioration that begins on one trip fails on the next.
Q: What are the most commonly missed items on a camper maintenance checklist?
In 15 years of guiding and maintenance consultation, the four most consistently skipped tasks are: seam inspection (nobody notices until it leaks), sleeping pad inflation test (slow leaks are invisible until you wake up on the ground), fuel canister weighing (people always estimate high), and DWR restoration on rainflies (waterproofing degrades gradually and invisibly). These four tasks alone prevent the majority of trip-ruining gear failures.
Q: What tools do I need to run this camper maintenance checklist?
A small kit handles everything: a seam sealer matched to your tent’s coating type, Gear Aid Tenacious Tape for fabric repairs, zipper lubricant, DWR restoration spray, a headlamp battery test device or voltmeter, a kitchen scale for fuel canister weighing, and soapy water in a spray bottle for leak detection. Total cost under $60, and most items last through multiple camping seasons.
Q: How do I know which seam sealant to use on my tent?
Check your tent’s documentation for the coating type. PU (polyurethane) coated tents require polyurethane sealants. Silicone-coated fabrics require silicone-based sealants. Mixing them up produces a sealant bond that fails. If you’re unsure, test a small amount in a hidden seam area and check adhesion after curing before applying broadly.
Q: Can I do this camper maintenance checklist the night before a trip?
Technically yes, but practically no. Several tasks require drying time, including seam sealing (2 to 8 hour cure time), DWR restoration (requires washing and drying), and sleeping bag loft restoration (requires days to fully recover from compression). Run the full camper maintenance checklist at least one week before departure so any repairs or replacements have time to cure, ship, or be sourced locally.
Q: Is this camper maintenance checklist appropriate for RV and van camping?
The shelter, sleep system, cooking, electronics, clothing, and safety sections apply directly to RV and van camping. RV-specific additions include: generator oil and filter check, tire pressure and tread inspection, water pump and grey tank valve function, propane regulator and line inspection for leaks, slideout mechanism lubrication, and roof seal inspection for delamination around seams and penetrations. A dedicated RV pre-trip checklist builds on this foundation with vehicle-specific mechanical items.
Q: How does gear maintenance affect how long my camping gear lasts?
Dramatically. A tent that is seam-sealed annually, DWR restored when needed, and stored dry lasts 10 to 15 years. The same tent neglected until it leaks and stored damp after trips lasts 3 to 5 years. Down sleeping bags maintained with annual washing and loose storage last 15 to 20 years. Compressed and unwashed, the same bag loses functional loft within 5 to 7 years. A consistent pre-trip camper maintenance checklist is the single most cost-effective gear investment you can make.