

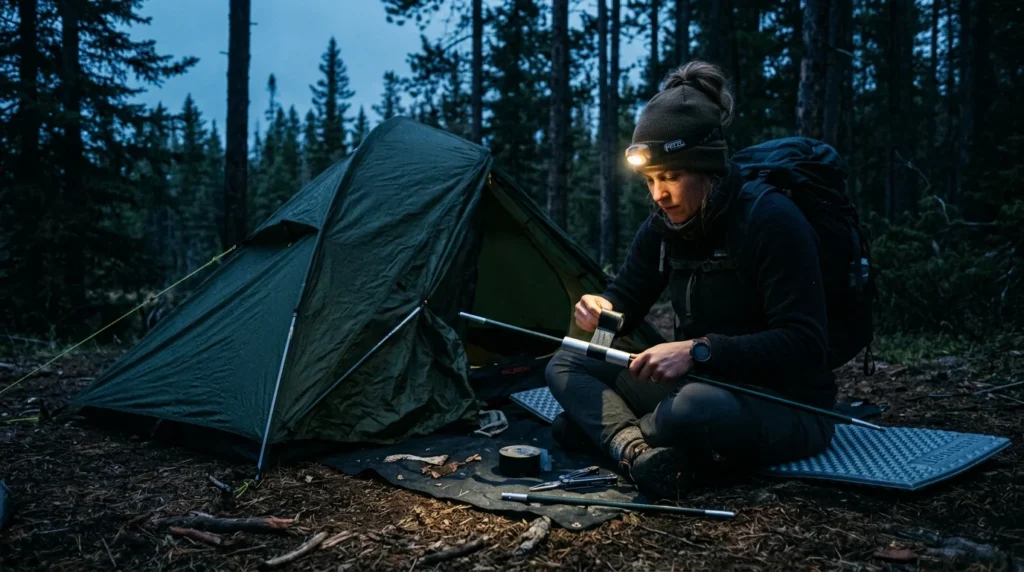
Three hours into a solo overnight on the Olympic Peninsula, a gust caught the edge of my rainfly and snapped a pole section clean at the ferrule. Temperature dropping, rain incoming, nothing but forest for miles in every direction.
I had the tent back up and fully functional in eleven minutes. Not because I’m exceptionally talented at emergency shelter repair, but because I carry the right hand tools for tent camper repairs in a pouch that weighs less than 6 ounces and lives permanently in the top lid of my pack. The repair cost me nothing but time. Without those tools, it would have cost me the night.
Every tent camper eventually faces a field repair scenario. Zippers fail. Poles crack. Fabric tears. Seams leak. The difference between a minor inconvenience and a trip-ending emergency is almost entirely determined by what you’re carrying when it happens. This guide covers every essential hand tool for tent camper repairs, why each one earns its weight, and how to use them when conditions are genuinely difficult.
Why Tent Campers Need a Dedicated Repair Tool Kit
The outdoor gear industry has invested enormous effort in making tents, shelters, and fabric gear lighter, more packable, and more sophisticated. What it has not done is make that gear failure-proof.
The reality of camping with fabric shelters is that every component is subject to mechanical failure through normal use. Zippers bind and skip teeth from grit contamination. Pole sections crack from stress concentration at ferrule points, particularly in cold temperatures where aluminum becomes brittle. Tent floor fabric develops punctures from sharp rocks that weren’t fully cleared from the site. Seam tape delaminates from UV exposure and compression in stuff sacks. DWR coatings deplete and allow moisture infiltration.
None of these failures are unusual. All of them are addressable with the right hand tools for tent camper repairs, carried proactively rather than scrambled for reactively.
The key distinction for tent campers specifically is that your repair kit needs to be self-contained, genuinely portable, and usable with cold or wet hands in low-light conditions. The hand tools for tent camper repairs that work at home under ideal conditions but require steady hands, good light, and dry surfaces are not the right tools for the field. Every tool in this guide was selected partly on the criterion of usability under adverse conditions, which is when you will actually need them.
Building a proper field repair capability is part of the complete gear management philosophy covered in the camper maintenance checklist guide, where pre-trip inspection and field repair readiness are treated as two sides of the same preparedness investment.
Seam Sealers: The Most Critical Tool in Your Kit
If you carry only one hand tool for tent camper repairs, it should be a seam sealer matched to your tent’s fabric coating type. No other single item prevents as many trip-ruining scenarios as a properly applied seam sealant at the right moment.
Tent seams are the primary entry point for water infiltration in fabric shelters. Factory seam tape provides initial protection, but that tape delaminates over time through UV exposure, compression cycling in stuff sacks, and simple age. Once tape begins peeling, every stitch hole in that seam becomes a direct water infiltration point. A rainstorm that the tent body would otherwise handle completely becomes a slow drip into your sleeping bag and across your sleep system.
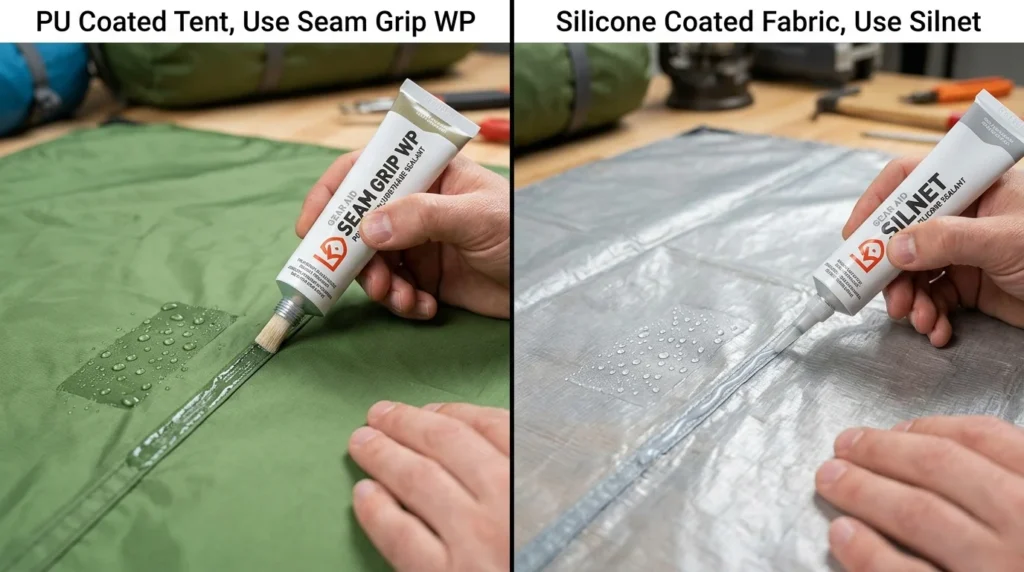
Understanding the coating type on your tent is the foundational knowledge that makes seam sealer selection correct rather than random. The two primary categories are polyurethane-coated fabrics and silicone-coated fabrics, and they require completely different sealant chemistry to bond correctly.
For PU-coated tents (the large majority of synthetic tent fabrics including most nylon and polyester models from major brands), the correct product is a polyurethane-based seam sealant. Gear Aid Seam Grip WP is the most widely available and field-proven option, applying with a brush applicator that allows precise coverage along stitch lines. It cures in 2 to 8 hours depending on temperature and creates a flexible, waterproof bond that survives repeated tension and compression cycles.
For silicone-coated fabrics (Silnylon, Silpoly, most ultralight tarps and shelters from brands including Zpacks, Hyperlite Mountain Gear, and Six Moon Designs), the correct product is a silicone-based sealant. Gear Aid Silnet or McNett Silnet bonds to silicone-treated fibers where polyurethane sealants will not adhere regardless of application effort or quantity. Using the wrong sealant on silicone fabric produces a peel-off film rather than a bond.
For the field, carry a 1-ounce tube of the sealant appropriate for your tent’s coating type. At home, apply it to all seams before the first use and annually thereafter. In the field, use it to address any seam that shows active infiltration by pitching under shelter if possible, allowing the surface to dry minimally, and applying a thin coat directly over the problem area. Field-applied seam sealant won’t cure to full strength overnight, but it provides meaningful reduction in infiltration rate that makes the difference between a manageable situation and a wet camp.
The complete seam sealing protocol, including surface preparation, coat thickness, and curing requirements, is covered in detail in the tools and maintenance guide, which addresses the full range of fabric repair scenarios beyond what field conditions allow.
Pole Repair Sleeves: The Structural Fix
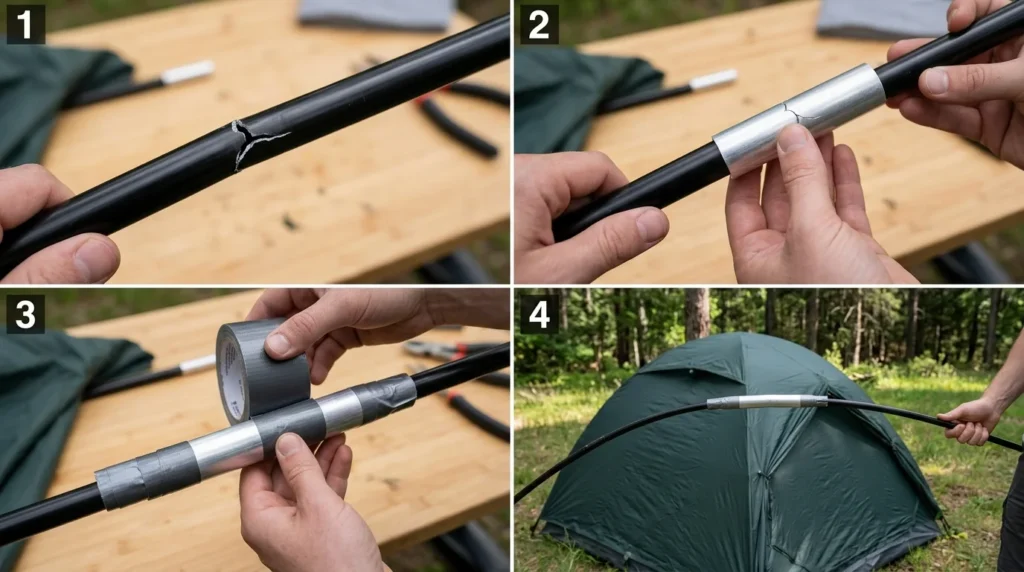
A tent pole failure without a repair sleeve turns a functional shelter into a collapsing fabric pile. A tent pole failure with a repair sleeve is a ten-minute repair.
Pole repair sleeves are short aluminum tubes, typically 4 to 5 inches long, with an inner diameter slightly larger than your tent pole diameter. When a pole section cracks, splinters, or breaks at a ferrule point, the sleeve slides over the damaged section and provides the structural continuity that allows the pole to bear tent tension again. Secured with two wraps of duct tape at each end, a sleeve repair holds through days of continued use with no meaningful reduction in structural performance.
The critical purchasing decision is diameter matching. Repair sleeves that are too narrow won’t slide over the damaged section. Sleeves that are too wide allow the pole to flex inside them rather than being fully supported. Measure your pole diameter before buying: most backpacking tent poles run 8.5mm, 9mm, or 9.5mm outer diameter. The Easton and DAC poles used in most quality tents are typically 8.5mm or 9mm. Check your tent’s documentation or measure directly before purchasing a sleeve.
For backpackers running multiple tent models, carry two sleeves in different diameters rather than one in a single size. Two sleeves together weigh under 0.5 ounces and take up negligible space. The additional coverage is worth the marginal weight and cost.
The best practice many experienced backpackers follow is to carry one sleeve per pole section for critical shelters, meaning a two-pole tent carries two sleeves. This seems excessive until you realize that pole failures on one trip in three conditions often happen at the same stress points across multiple poles simultaneously, specifically at ferrule junctions during high-wind events that impose lateral loads.
In the absence of a dedicated pole sleeve, a section of stiff branch with appropriate diameter, wrapped tightly with duct tape, provides a functional emergency repair on a single-night basis. This improvised solution requires more tape and more care in application than a purpose-made sleeve, but it works when the sleeve was forgotten.
Duct Tape: The Universal Hand Tool for Tent Camper Repairs
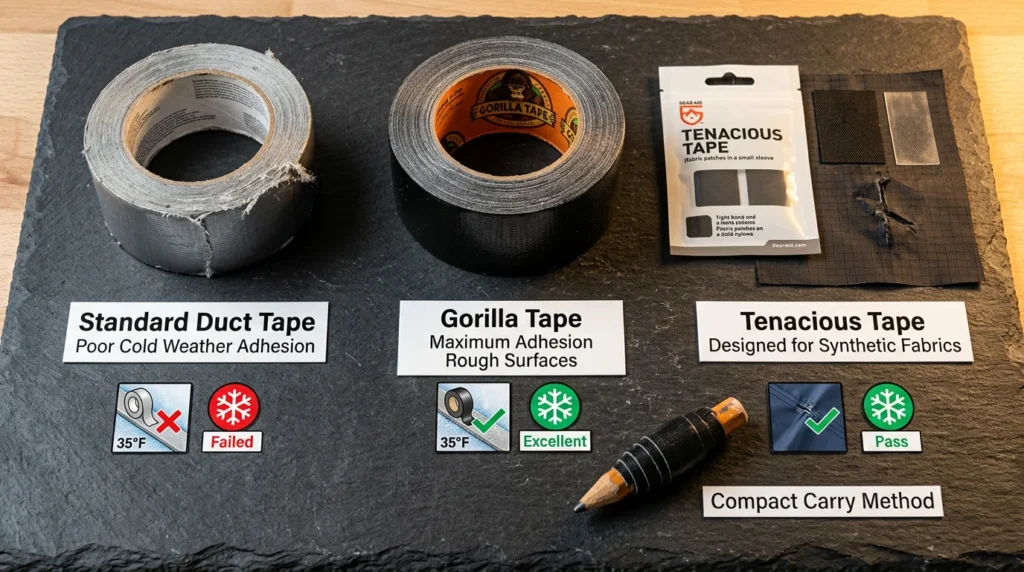
Duct tape is both the most underestimated hand tool for tent camper repairs and the most misused one. The version sitting in your garage is probably not what you should be carrying into the backcountry.
Standard household duct tape performs poorly in outdoor conditions. The adhesive loses effectiveness in cold temperatures (below 50°F, adhesion drops significantly), in wet conditions (water compromises the adhesive layer rapidly), and under UV exposure (the backing degrades and becomes brittle). It also weighs significantly more per running inch than purpose-made outdoor repair tapes.
For tent camper repairs specifically, the correct options are Gorilla Tape (standard outdoor use, maximum adhesion on rough surfaces) and Tenacious Tape (designed specifically for outdoor fabric repairs, bonds to nylon and polyester without primer, maintains adhesion in wet and cold conditions). Tenacious Tape in the 1.5-inch width is the more versatile option for fabric repairs, as its adhesive chemistry is matched to the synthetic fabrics of tent bodies, rainflies, and stuff sacks.
The carry method that experienced backpackers use: wrap 2 to 3 meters of tape around a stubby pencil or a section of a cut-down tent stake. This creates a compact tape roll that weighs under 0.5 ounces and doesn’t require carrying the entire heavy roll. Unwrap as needed, re-wrap the unused portion around the pencil.
Effective duct tape repair technique for tent fabric: surfaces must be as dry as possible, warmed with body heat in cold conditions (hold the tape patch against your skin for 30 seconds before application), and the patch must extend at least 1.5 inches beyond the tear in every direction for adequate adhesion margin. Apply firm pressure for 30 seconds after placement to ensure full adhesive contact with the fabric surface.
For floor repairs specifically, apply the tape patch to the exterior floor surface rather than the interior. Interior patches experience boot traffic and sleeping pressure that peels the patch from the inside. Exterior patches on the tent floor bond to a surface that experiences only ground contact, which is far less mechanically demanding on the adhesive.
Needle, Thread, and Awl: When Tape Isn’t Enough
Fabric tears that extend into seam areas, webbing attachments that have pulled through the fabric, and zipper tape separations from the tent body all require needle-and-thread repair rather than tape. Tape handles clean cuts and punctures in field fabric well. Structural fabric failures at seam intersections and attachment points require stitching to restore mechanical strength.
A Speedy Stitcher awl is the most useful hand tool for tent camper repairs in the stitching category. It uses a locking stitch mechanism similar to a sewing machine but operated entirely by hand, allowing you to drive waxed thread through multiple layers of heavy fabric and webbing without a thimble or mechanical advantage beyond your fingers. The waxed thread is inherently water-resistant and resists UV degradation better than standard thread.
For field use, the Speedy Stitcher handles: webbing loop reattachment where a guyline attachment point has pulled through tent fabric, zipper tape reattachment to tent body fabric where the tape has separated, and pole sleeve fabric repairs where tape alone provides insufficient structural support. These repairs are not difficult but require some patience and reasonable light to execute correctly.
Complement the Speedy Stitcher with a curved upholstery needle and a length of dental floss as backup. Dental floss is remarkably strong (most varieties test at 30 to 50 pounds of tensile strength), UV resistant, and takes up no meaningful space. In the absence of waxed thread, it handles emergency stitching repairs adequately.
A flat rubber thimble weighs less than 2 grams and allows you to drive needles through heavy fabric layers without injuring your fingertips. After one repair session on a heavy nylon floor without it, you will never leave it behind again.
Zipper Repair Tools: The Most Common Failure Point
Tent zippers are the most frequently failing component in fabric shelters, and they fail in two distinct ways that require different hand tools for tent camper repairs.
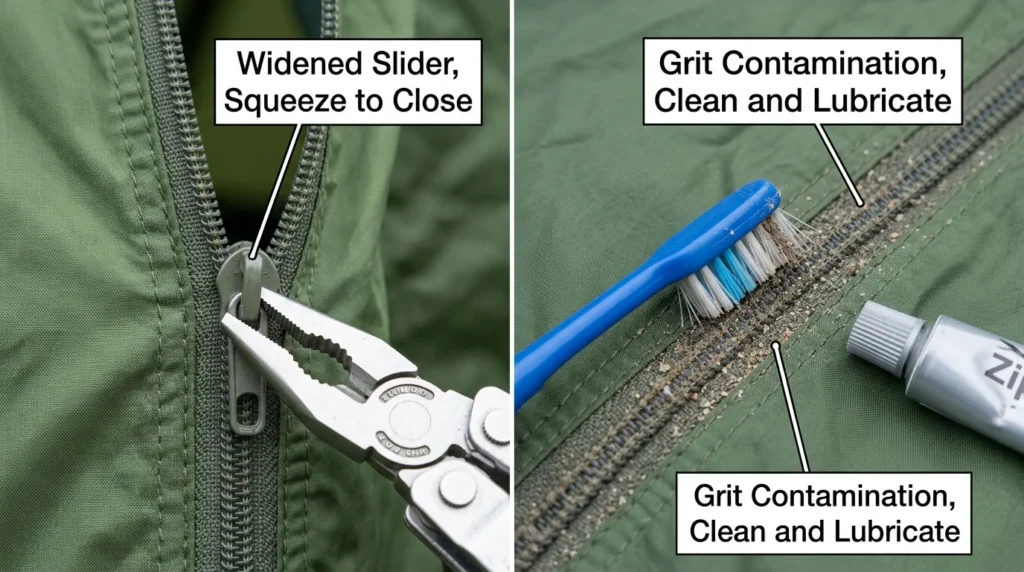
The first failure mode is a zipper that separates behind the slider, leaving the two sides of the zipper open after the slider has passed. This typically indicates a slider that has widened through wear and no longer closes the zipper teeth with enough force. The field fix: pliers or a multi-tool’s flat jaw, carefully and gently squeezing the slider body from both sides to close the gap very slightly. This repair requires care because over-squeezing causes the slider to bind and stop traveling entirely. Make tiny adjustments and test between each squeeze until the zipper closes correctly.
The second failure mode is a zipper that binds, catches, and moves with great difficulty or not at all. This typically indicates grit contamination in the teeth, a damaged tooth, or a dry slider. Apply Gear Aid Zipper Lubricant or, in the field, a wax-based lubricant (a section of candle wax, beeswax from a lip balm, or even bar soap) along the full tooth track. Work the slider back and forth after application to distribute the lubricant. For grit contamination, brush the teeth with a toothbrush before lubricating.
A replacement zipper slider in the correct size for your tent zippers is the most decisive hand tool for tent camper repairs in the zipper category. Sliders are standardized in size categories (typically #5 or #8 for tent zippers, with #5 being most common in backpacking tents). A $3 replacement slider resolves the widened-slider failure permanently rather than temporarily. Carry two sliders and one small pair of pliers as the complete zipper repair kit.
Mallets and Stake Drivers: The Overlooked Efficiency Tool
The relationship between mallet choice and tent stability is something most campers discover by camping in hard soil with their bare hands, battered and ineffective, before accepting that a purpose-made tool is worth carrying.
For most backpackers and tent campers, a dedicated mallet is not a standard kit item, but the circumstances where you wish you had one are consistent and predictable: rocky soil where stakes must be driven into cracks and won’t pound straight with a flat rock, frozen ground where significant impact force is required, and high-wind setups where stakes need to be driven to full depth and angled correctly for maximum hold.
The MSR Stake Hammer at 2.6 ounces represents the practical ultralight solution, with a machined aluminum head sized to drive standard tent stakes and a rubber grip section that absorbs impact vibration in cold conditions. At this weight, it earns its place in any kit where rocky or hard soil is anticipated.
For car campers and base camp setups where weight is not a constraint, a rubber mallet (12 to 16 ounces) drives wide-blade stakes in sandy or loose soil without deforming the stake head and allows precise stake angle adjustment without stake damage.
The stake selection for different soil types is the other half of this equation. V-stakes for firm soil. Wide-blade or Y-stakes for sandy or loose soil. Ultralight shepherd’s hook titanium stakes for rocky terrain where placement is in cracks. Having the right stake type for your terrain is as important as having the right tool to drive it, and both together determine whether your shelter stays anchored in the conditions you’re actually camping in.
Seam Grip Fast vs Silnet: Making the Right Choice
The seam sealant decision deserves a dedicated section because it is the single most consequential material choice in the hand tools for tent camper repairs kit and the one where mistakes have the most immediate consequences.
Gear Aid Seam Grip WP (formerly Seam Grip+WP) is a polyurethane-based sealant that cures to a slightly flexible, permanently waterproof film. Application temperature affects cure time significantly: above 70°F, full cure takes 2 hours. Below 50°F, cure time extends to 8 hours or more. In cold field conditions, apply in the early afternoon and allow to cure overnight before stressing the seam.
Gear Aid Silnet is a silicone-based sealant for silicone-coated fabrics. It applies more thinly than Seam Grip WP, requires adequate ventilation during application due to solvent content, and takes 8 to 12 hours to cure regardless of temperature. Its bond to silicone-treated fabric is secure where Seam Grip WP simply sits on the surface without bonding.
Gear Aid has also introduced Seam Grip FC (Field & Camp), a faster-cure formula that reaches functional waterproofness in 1 hour for urgent field repairs. The trade-off is slightly lower long-term durability compared to the original Seam Grip WP. For field emergency use specifically, the 1-hour cure is a significant practical advantage.
A third option worth knowing for fabric repairs that extend beyond seams: Gear Aid Aquaseal FD (Flexible Repair Adhesive) works on fabric, rubber, and neoprene with a cure time of 8 to 12 hours and creates the most durable and flexible patch bond of any consumer-grade fabric repair adhesive available. For floor repairs in high-wear areas, Aquaseal FD with a fabric patch overtop and Tenacious Tape as a protective cover creates a repair that regularly outlasts the surrounding original material.
Understanding which sealant serves which purpose is part of the comprehensive gear maintenance knowledge that the tools and maintenance guide covers across all gear categories, from tent fabric to sleeping bag baffles to waterproof boot treatments.
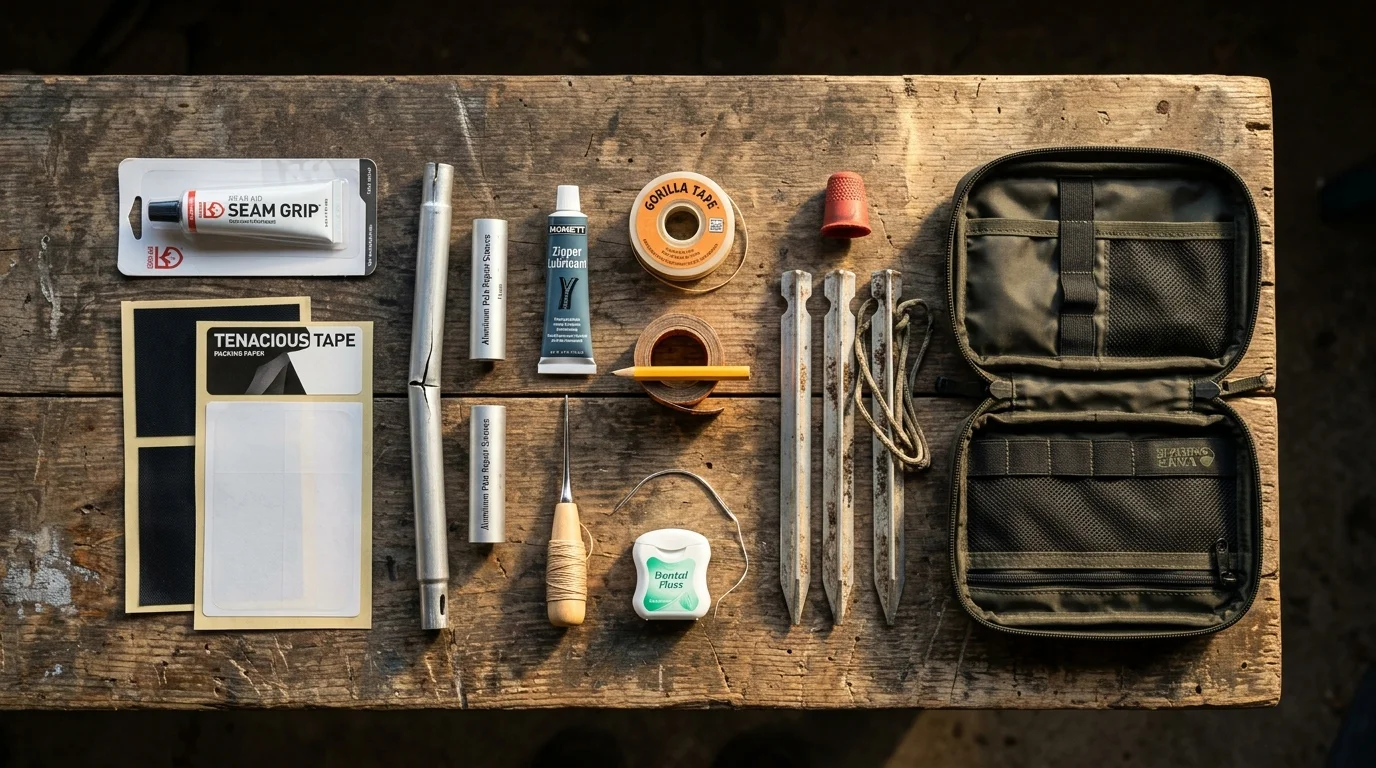
The Complete Field Repair Kit: Weight and Contents
Everything below packs into a 4-inch by 5-inch zippered nylon pouch and weighs under 6 ounces complete.
Seam Grip WP or Silnet (matched to tent coating type), 1-ounce tube. Tenacious Tape, six pre-cut patches in 3-inch by 5-inch size. Two pole repair sleeves in your tent’s pole diameter. Zipper lubricant, 0.5-ounce travel tube. Two replacement zipper sliders in #5 size. Speedy Stitcher awl with one bobbin of waxed thread. Curved upholstery needle and 2 meters dental floss. 2.5 meters Gorilla Tape wrapped around a pencil. Flat rubber thimble. Six spare tent stakes in appropriate type for your terrain. One spare buckle in the size matching your tent’s rainfly attachment.
Total weight: under 6 ounces. Total cost: under $50. Trips saved: every one where a failure would otherwise have forced early exit or a miserable night in a compromised shelter.
This kit addresses every field failure scenario that tent campers realistically encounter across a full camping season. It doesn’t address every possible failure, but it addresses the ones that actually happen with meaningful frequency.
Pairing this field repair kit with proper pre-trip inspection habits closes the gap entirely. The camper maintenance checklist guide walks through every pre-trip inspection task that catches failures before they happen in the field, making the repair kit the backup system rather than the primary defense.
Your shelter’s performance also depends on how well your other systems are functioning. A 4-season sleep system that stays dry depends on your tent seams being correctly sealed. The best base layers for camping you’re wearing inside your sleeping bag depend on the tent keeping external moisture out. The camp lighting and power gear you’re relying on for illumination during a field repair depends on the same systematic preparation mindset that builds a proper hand tools kit.
Field Repair Kit at a Glance
| Tool | Weight | Primary Use | Cost |
|---|---|---|---|
| Seam Grip WP or Silnet (1 oz tube) | 1.2 oz | Seam sealing, fabric waterproofing | ~$8 |
| Tenacious Tape (6 pre-cut patches) | 0.5 oz | Fabric tears, floor punctures | ~$7 |
| Pole repair sleeves (2) | 0.4 oz | Cracked or broken pole sections | ~$6 |
| Zipper lubricant (travel size) | 0.4 oz | Stiff or binding zippers | ~$5 |
| Replacement zipper sliders (2) | 0.1 oz | Widened slider failure | ~$4 |
| Speedy Stitcher with thread | 1.0 oz | Structural fabric and webbing repair | ~$12 |
| Curved needle and dental floss | 0.1 oz | Emergency stitching backup | ~$1 |
| Gorilla Tape (2.5m on pencil) | 0.8 oz | Universal adhesive repair | ~$3 |
| Rubber thimble | 0.1 oz | Needle driving protection | ~$2 |
| Spare stakes (6) | 1.2 oz | Bent or lost stakes | ~$8 |
| Spare buckle (1) | 0.1 oz | Cracked rainfly attachment buckle | ~$2 |
| Total Kit | Under 6 oz | All field repair scenarios | ~$58 |
Frequently Asked Questions About Hand Tools for Tent Camper Repairs
Q: What is the single most important hand tool for tent camper repairs?
If you carry only one item, make it Tenacious Tape. It handles more field scenarios than any other single tool: fabric tears, floor punctures, pole sleeve reinforcement, zipper backing repairs, and temporary seam coverage. It bonds to wet fabric, works in cold conditions, and creates repairs that regularly outlast the surrounding original material. Every other tool is additive to this foundation.
Q: How do I know which seam sealant to use on my tent?
Check your tent’s care label or product page for coating type. The terms “PU coated,” “polyurethane coating,” or “Sil/PU” on the floor (indicating a silicone outer layer and PU inner layer) indicate which sealant chemistry to use. PU coating requires Gear Aid Seam Grip WP. Pure silicone coating requires Gear Aid Silnet. A mixed Sil/PU coating is common on tent floors and requires Silnet on the outer silicone surface and Seam Grip WP on the inner PU surface.
Q: How heavy is a complete hand tool kit for tent camper repairs?
The complete 11-item kit described in this article weighs under 6 ounces. In the context of a backpacking kit where base weight is carefully managed, this is roughly equivalent to one pair of liner gloves or a single energy bar. The weight-to-value ratio of a field repair kit is the best in any gear category, because the 6 ounces it costs can preserve the full investment of every other item in your pack.
Q: Can I use regular super glue instead of Seam Grip for tent repairs?
For temporary field repairs on fabric tears without structural significance, cyanoacrylate (super glue) creates an immediate bond that holds for a limited period. It is brittle when cured, cracks under fabric flex cycles, and does not provide waterproofing. It is also damaging to some synthetic fabrics at high concentrations. As a temporary 24-hour fix for a clean tear while better materials are unavailable, it is acceptable. As a replacement for Seam Grip or Tenacious Tape in a prepared kit, it is inadequate.
Q: Do I need a mallet as part of my hand tools for tent camper repairs?
For backpacking, a mallet is an optional addition that earns its weight in rocky or hard-soil environments. For car camping or base camp setups, a mallet is a straightforward efficiency tool that makes proper stake placement easier and prevents stake deformation from improvised driving with rocks. The MSR Stake Hammer at 2.6 ounces is the right choice for backpackers who want one. A standard rubber mallet is the right choice for car campers.
Q: How do I repair a tent zipper that separates behind the slider?
The separated-behind-slider failure indicates a widened slider that is no longer closing the teeth with adequate force. Using a multi-tool’s flat jaw, apply very gentle squeezing pressure to the slider body from both sides simultaneously, making micro-adjustments and testing the zipper between each squeeze. Over-squeezing binds the slider and stops travel entirely. The goal is just enough compression to make the teeth close cleanly. If the slider is too far gone for adjustment, a replacement slider in the correct size resolves the problem permanently in about 5 minutes with pliers.
Q: Should I carry field repair tools even on a one-night trip?
Yes, with a simplified version of the kit. A one-night trip minimum kit is: three Tenacious Tape patches, one pole repair sleeve, and a small length of Gorilla Tape on a pencil. This weighs under 1.5 ounces and handles the most likely single-night failure scenarios. The full 6-ounce kit earns its place on trips of two nights or longer.