

You know what the most expensive two words in RV ownership are? “We’ll see.” As in: “There’s a small soft spot near the rear AC unit, but we’ll see if it gets worse.” It always gets worse. Water infiltration in an RV roof does not pause, does not self-correct, and does not wait politely while you finish the camping season. It migrates laterally through foam insulation, tracks along structural members into wall cavities, and quietly destroys thousands of dollars of substrate material while you’re busy having a good time.
The good news is that the underlying cause of nearly every major RV water damage event is a sealant failure that was visible and repairable before it became a structural problem. Annual RV roof maintenance costs about $60 in materials and half a day of your time. Ignoring that half day costs anywhere from $2,000 to $15,000 in structural repairs, depending on how long the infiltration ran unchecked.
This complete annual RV roof maintenance guide covers every roof type: TPO (thermoplastic polyolefin), EPDM (ethylene propylene diene monomer), and fiberglass. It walks through the correct inspection sequence, the right cleaning protocol for each material, the specific sealant chemistry matched to each roof type, and the application techniques that actually create lasting waterproof bonds in real-world conditions.
Why Annual RV Roof Maintenance Is Non-Negotiable
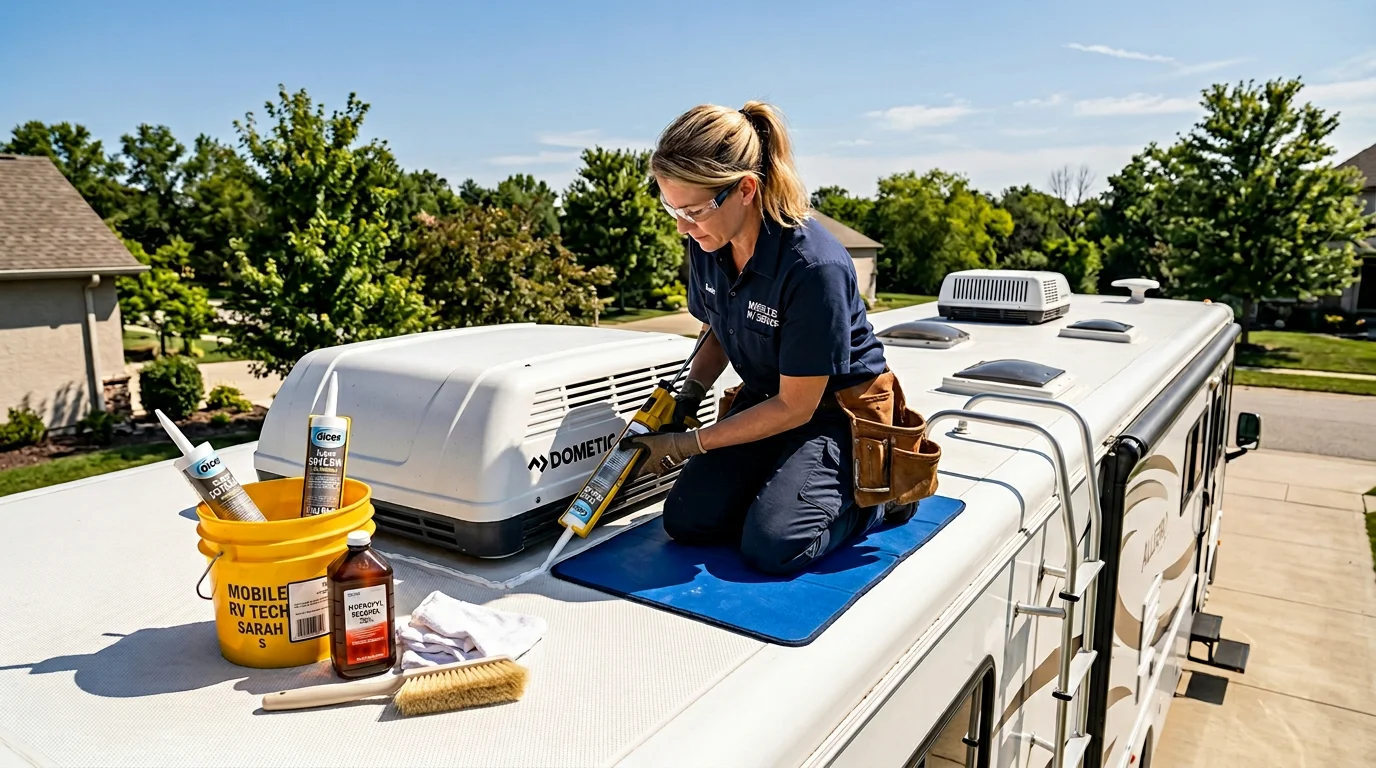
An RV roof is not a static structure. It expands and contracts with temperature cycling, flexes over road vibrations across tens of thousands of miles, and is penetrated by more hardware than most people realize: air conditioning units, roof vents, refrigerator exhaust vents, solar panel mounting hardware, antenna mounts, ladder attachments, and perimeter edge trim. Every one of those penetrations is sealed with a flexible sealant compound that has a finite service life.
Most RV factory sealants are rated for 1 to 5 years of effective weathering, depending on the sealant type and UV exposure conditions. An RV stored in Arizona sees more UV degradation in one year than the same unit stored in Minnesota sees in three. Sealant that looks visually intact but has lost elasticity through UV polymerization is no longer performing its waterproofing function, it is simply providing a cosmetic appearance of protection over an infiltration pathway.
The annual RV roof maintenance inspection catches this category of failure before water moves. A cracked, brittle sealant bead around an AC unit gasket does not leak on a dry Tuesday. It leaks on the first heavy rain event after it cracks, and it leaks invisibly into the substrate above your headliner where you won’t see it for six to twelve months after infiltration begins.
For RV owners who also run a comprehensive pre-trip mechanical and systems review, the annual RV roof maintenance inspection fits naturally into the broader gear and vehicle preparation framework covered in the camper maintenance checklist guide, where roof condition sits alongside battery systems and structural hardware as a pre-season priority check.
Identifying Your RV Roof Type Before Starting
Annual RV roof maintenance requires different products and different techniques for each of the three primary roof membrane types. Using the wrong product on the wrong membrane produces an adhesion failure that is sometimes worse than no sealant at all, because it creates a false confidence while providing no actual waterproofing.
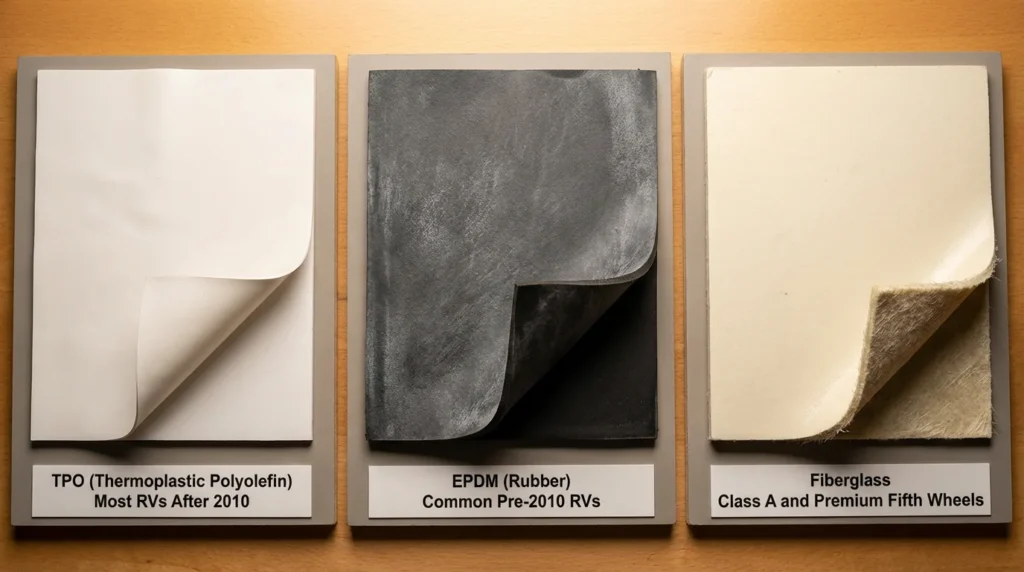
TPO (Thermoplastic Polyolefin) is the current standard on most RVs manufactured after 2010. White or light gray in color, with a slightly smooth surface texture and a plastic-like feel. TPO is heat-weldable and requires TPO-compatible sealants and cleaners. It is resistant to UV, ozone, and chemical exposure and has relatively high puncture resistance. Common brands producing TPO membrane systems for RV applications include Dicor, Eternabond, and Proguard.
EPDM (Ethylene Propylene Diene Monomer) is a synthetic rubber membrane common on RVs manufactured between the 1990s and mid-2000s, and still used on some current-production units. Dark gray to black in color, with a slightly textured rubber surface that can develop a chalky oxidation layer over time. EPDM requires rubber-specific cleaners and lap sealants, and different adhesive chemistry than TPO. EPDM cleaners designed for TPO can damage the rubber membrane surface.
Fiberglass roofs appear on higher-end fifth wheels, Class A motorhomes, and some toy haulers. Typically white or cream, with a hard, rigid surface that is clearly non-flexible to the touch. Fiberglass roofs do not have the membrane infiltration concerns of TPO or EPDM, but they develop stress cracks at flexion points, and their penetration sealants fail through the same UV polymerization process as rubber and TPO membranes.
Check your RV owner’s manual for the roof membrane type, or contact the manufacturer with your VIN. Misidentifying your roof type and purchasing the wrong sealant is the most common and most consequential mistake in annual RV roof maintenance.
The Complete Annual Inspection Sequence
Annual RV roof maintenance inspection should be performed at least once per year, and ideally twice: once in spring before the camping season begins and once in fall before storage. The spring inspection catches any damage from winter weather or storage conditions. The fall inspection catches the cumulative UV and travel damage from the camping season and allows repairs to cure before winter.
Step 1: Physical safety setup. Work on a stable ladder or use a roof access system appropriate for your RV’s roof load capacity. Most RV roofs support distributed walking weight when stepped on structural members (ribs), but not on unsupported membrane spans between ribs. Walk on the ribs. If you’re unsure of rib location, access the roof interior and mark rib positions with tape from below before climbing up.
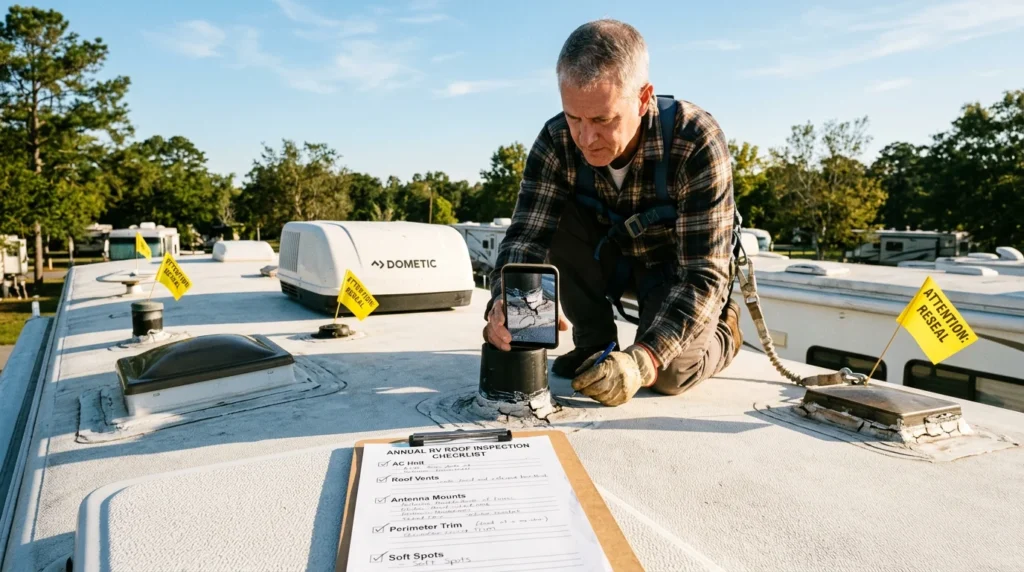
Step 2: Full visual scan from each corner. Begin your inspection at one corner and walk the full perimeter of the roof examining the edge trim and perimeter sealant before moving to penetrations. Take photographs of every penetration point and every linear foot of perimeter trim before cleaning anything. Pre-cleaning photographs capture sealant condition in its most diagnostic state, including crack patterns, separation from substrates, and bubbling that cleaning sometimes obscures.
Step 3: Inspect all penetration sealant beads. Systematically check every point where any hardware passes through the roof membrane: both AC unit base gaskets and all four corner mounting bolts, every vent cover base plate (refrigerator vent, furnace exhaust, bathroom fan), all solar panel mounting hardware, antenna base plates, and every ladder attachment through the rear wall or roof. Press the existing sealant with your thumb. Sealant that is still functional flexes elastically and springs back. Sealant that has polymerized beyond its service life feels hard and brittle, resists pressing, and may show surface cracking under light pressure.
Step 4: Probe soft spots. Using your thumb or a blunt tool, apply moderate pressure across the roof surface in a systematic grid pattern moving from front to back in 2-foot intervals. Substrate that sounds hollow under light tapping or compresses measurably under moderate thumb pressure indicates delaminated or water-damaged decking below the membrane. Document all soft spots with photographs and measurements from a fixed reference point. Soft spots require professional assessment to determine whether they represent delaminated but dry substrate (repairable) or actively rotting decking (requiring structural replacement).
Step 5: Inspect seams, laps, and factory-applied tape. TPO and EPDM roofs have factory-applied seams and lap joints sealed at manufacture. These seams can separate at the adhesive bond line from thermal cycling and UV degradation. Press firmly along every seam for its full length. Any section that lifts or separates from the substrate under moderate pressure has lost adhesion and requires re-bonding before it provides an infiltration pathway.
Step 6: Check slide-out toppers and awning attachment points. Slide-out roofs and awning attachment hardware are high-movement zones that experience the greatest sealant stress from operational cycling. Inspect sealant at every awning arm attachment point and along the full length of slide-out topper track attachment to the RV body.
Cleaning Each Roof Type Correctly
Cleaning is not optional preparation for annual RV roof maintenance sealant work. Sealant applied to a dirty, oxidized, or contaminated surface fails adhesion regardless of sealant quality. The cleaning step is the primary determinant of how long your resealing work holds.
Cleaning TPO roofs requires a TPO-safe cleaner that removes road grime, oxidation, algae, and mold without attacking the membrane surface chemistry. Dicor RP-RC-1GL Rubber Roof Cleaner is TPO compatible and widely used. Apply with a soft-bristle brush (never a wire brush or abrasive pad), scrubbing in 4-foot sections and rinsing thoroughly before the cleaner dries on the membrane. Work from front to back on a cloudy day or in the early morning to prevent the cleaner from drying before rinsing, which can leave a residue that interferes with sealant adhesion.
After cleaning, apply a TPO roof treatment or protectant to restore UV resistance. Protone Roof Coating or Dicor Rubber Roof Conditioner applied annually after cleaning restores the surface’s elastomeric properties and significantly slows future UV degradation. This is the step most DIY annual RV roof maintenance guides omit, and its absence is visible in membranes that chalk and crack within two to three years of installation.
Cleaning EPDM roofs follows a similar sequence but requires EPDM-specific rubber cleaners. Thetford Premium RV Rubber Roof Cleaner and Camco Pro-Strength Rubber Roof Cleaner are correctly formulated for EPDM chemistry. EPDM develops a white chalky oxidation layer over time that must be fully removed before sealant adhesion is possible. The oxidation layer is visually similar to white paint and requires more aggressive scrubbing than TPO cleaning. After cleaning, apply an EPDM conditioner like Camco Rubber Roof Treatment to restore surface elasticity and UV protection.
Cleaning fiberglass roofs allows the use of standard RV wash and a mild abrasive compound for oxidation removal. The hard surface tolerates scrubbing that would damage softer TPO or EPDM membranes. After removing oxidation and cleaning residue, apply a fiberglass oxidation remover and polish if the surface shows significant chalking, then follow with a UV-protective wax appropriate for fiberglass RV surfaces.
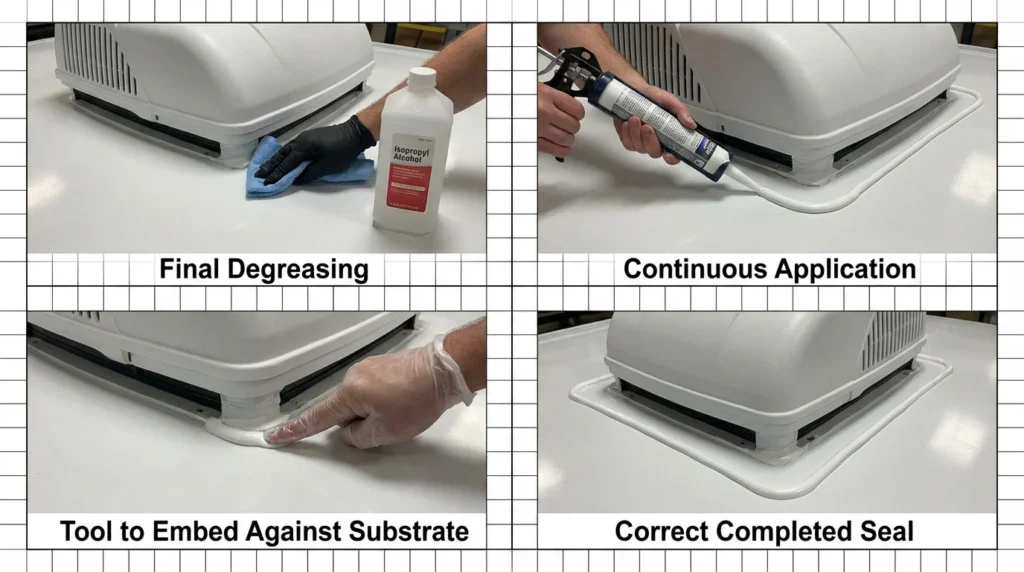
After cleaning any roof type, wipe all penetration areas and seam edges with isopropyl alcohol on a clean cloth immediately before sealant application. This final degreasing step removes any cleaner residue, skin oils from handling, or surface contamination that the wash didn’t address and provides the cleanest possible bonding surface for the incoming sealant.
Sealant Selection: Matching Chemistry to Roof Type
Sealant selection is the most technically consequential decision in annual RV roof maintenance, and it is the category where the greatest number of errors occur. Using the wrong sealant chemistry produces adhesion failure times ranging from days to months, all of which eventually result in the same outcome: a sealant bead that is sitting on the surface rather than bonded to it.
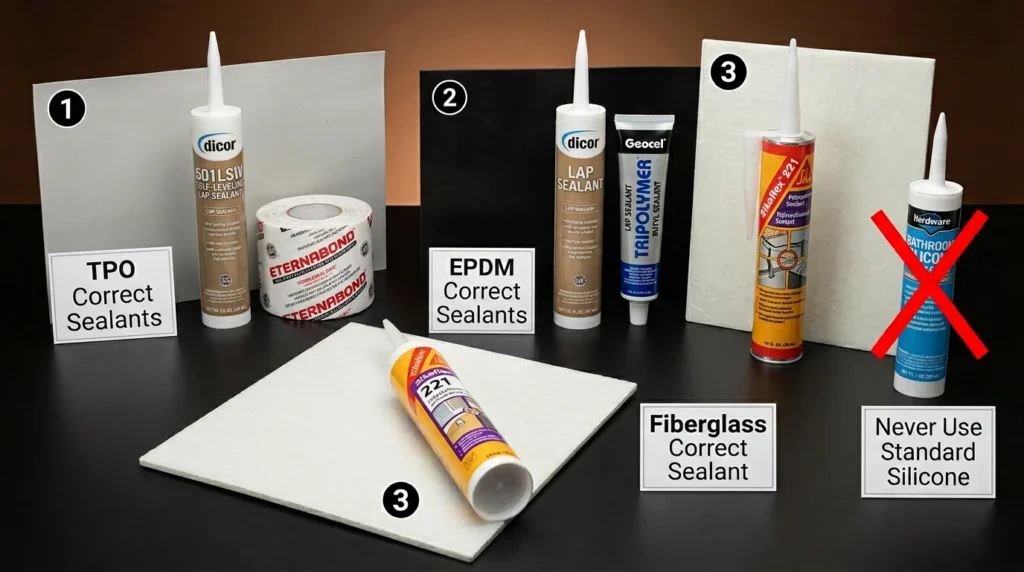
For TPO roofs, use a self-leveling silicone-based lap sealant for horizontal surfaces (Dicor 501LSW or equivalent) and a non-sag formulation for vertical surfaces and penetration work (Dicor 501LSB). These are specifically formulated to bond to TPO chemistry. Eternabond RoofSeal Tape is an excellent supplementary option for horizontal seam work and repairs, providing a fully bonded tape repair that outlasts conventional caulk sealants at high-movement joint locations.
For EPDM roofs, use an EPDM-specific lap sealant (Dicor 501LSW is also compatible with EPDM when surfaces are properly prepared) or a butyl-based sealant for areas requiring maximum flexibility. Butyl sealants like Geocel Tripolymer remain flexible for longer service lives than acrylic-based alternatives in high-UV and high-movement applications. Eternabond tape also bonds effectively to EPDM surfaces when applied to clean, dry membrane.
For fiberglass roofs, use a two-component polyurethane sealant or a high-quality silicone sealant for penetration work. Sikaflex 221 or 3M 5200 Marine Adhesive/Sealant provides the adhesion strength and flexibility needed at hardware penetration points through rigid fiberglass panels. Standard acrylic caulks fail within one to two seasons on fiberglass RV roofs due to the combination of UV exposure and thermal movement.
What to avoid regardless of roof type: never use standard silicone bathroom caulk on any RV roof surface. Standard silicone cannot be painted over, degrades faster than purpose-made RV sealants under UV, and does not maintain adhesion to the primer-free surfaces present on most RV roof penetration hardware. Never use silicone-based sealant over an existing sealant bead that is not silicone, as mixed sealant chemistry produces adhesion failure at the interface layer.
Application Techniques That Create Lasting Bonds
The application technique for annual RV roof maintenance sealant work determines whether your repair lasts one season or five. Correct application is straightforward but has specific requirements that must all be met simultaneously.
Temperature window: apply all RV roof sealants when the ambient temperature is between 50°F and 90°F, and when no rain is forecast for 24 hours minimum. Below 50°F, most RV sealants fail to wet out the substrate surface properly, producing poor adhesion regardless of surface preparation quality. Above 90°F on a dark RV roof, the surface temperature can exceed 140°F, causing sealant to skin over before it can properly bond. Work in the early morning on hot days to access the correct temperature window.
Tool preparation: use a standard caulking gun with a smooth-rod drive rather than a ratchet drive, which provides better flow control for uniform bead application. Cut the caulk tube tip at a 45-degree angle sized to produce the bead width you need, typically 3/8 to 1/2 inch for most penetration work. Have isopropyl alcohol and clean rags immediately accessible for tool cleaning and surface final prep.
Application sequence for penetrations: begin 2 to 3 inches before the penetration hardware on the up-slope side, apply a continuous bead with no interruptions around the full perimeter of the hardware base, and terminate 2 to 3 inches past the hardware on the down-slope side. Never start or stop a bead directly at a corner or at the most vulnerable point of the perimeter. Smooth the applied bead with a wet finger or a sealant tool to embed it against the substrate and eliminate air pockets.
Overlap existing sealant correctly: when applying new sealant over existing sealant that is still marginally functional, do not scrape off the existing material if it is firmly bonded. Clean it thoroughly with isopropyl alcohol, apply a fresh bead directly over and extending beyond both edges of the existing bead, and tool smooth. Applying fresh sealant narrowly on top of existing sealant without extending to bare membrane on both sides creates a new adhesion line at the edge that fails faster than the original repair.
Minimum cure time before rain exposure: self-leveling silicone RV sealants skin over in 20 to 30 minutes and cure to handling strength in 24 hours. Full cure for water exposure is typically 48 to 72 hours depending on temperature and humidity. Do not travel or expose to rain within 24 hours of application. A fresh sealant bead subjected to road vibration before full cure can crack at the substrate interface before it has developed any elastic memory.
The application protocols for RV roof sealants share the same material science principles as tent fabric seam sealing, where surface preparation, sealant-to-substrate chemistry matching, and cure conditions determine repair durability. The broader framework for field and home fabric repair is covered in the tools and maintenance guide.
AC Unit Maintenance Within the Roof Inspection
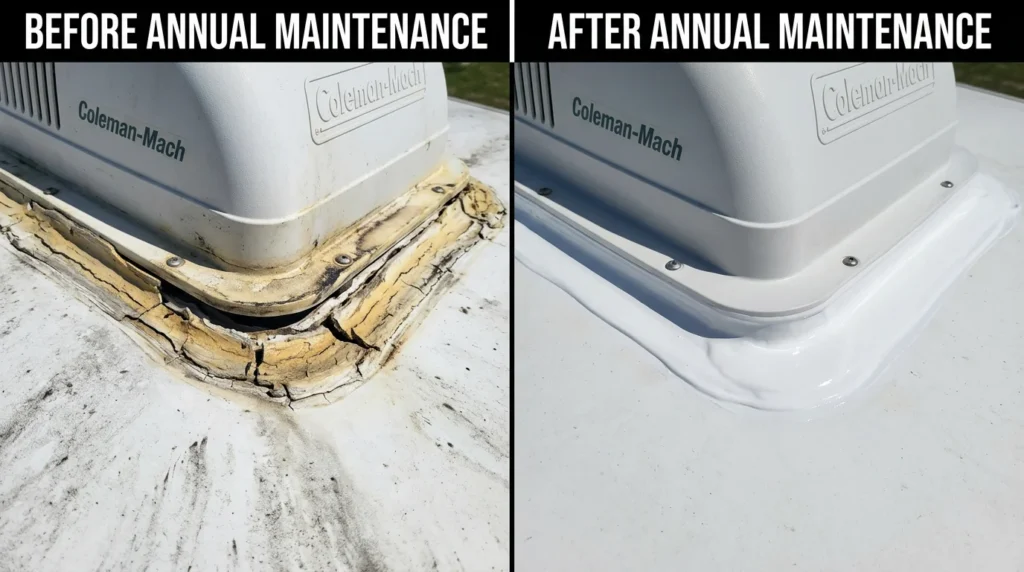
The air conditioning unit is simultaneously the largest roof penetration on most RVs and the most common source of water infiltration in the annual RV roof maintenance inspection, for two distinct reasons.
First, the AC shroud creates a large surface area that channels rain toward the unit’s base perimeter, increasing water pressure at the mounting gasket compared to smaller penetrations. Second, the AC unit mounting bolts penetrate directly through the roof membrane and decking, creating four individual water infiltration points at each corner bolt in addition to the gasket perimeter.
During annual RV roof maintenance inspection, remove the interior AC ceiling assembly cover and inspect the foam gasket that creates the seal between the AC unit base and the roof surface. This gasket is compressed between the unit and the roof by the four mounting bolts and is the primary barrier against infiltration. Gaskets that are compressed flat (no longer providing spring-back when pressed), cracked, or showing visible gaps between the gasket and roof surface need replacement before resealing.
Torque all four AC mounting bolts to the manufacturer’s specification (typically 25 to 35 ft-lbs for most residential-style RV AC units) after gasket inspection. Bolts that have vibrated loose create a gap between the gasket and roof surface that sealant alone cannot bridge effectively.
After gasket inspection and bolt torque check, apply a fresh bead of appropriate lap sealant (matched to your roof type) around the full perimeter of the AC unit base where it meets the roof membrane, plus individual beads around each corner mounting bolt where it penetrates the membrane. This double-redundancy approach, gasket plus perimeter sealant plus bolt sealant, addresses all three infiltration pathways simultaneously.
Vent and Penetration Hardware: The Most Frequent Failure Points
Beyond the AC unit, annual RV roof maintenance inspection should give specific attention to the smaller penetration hardware that fails more frequently because it is lower-profile and easier to overlook.
Refrigerator exhaust vents require both the vent cover base perimeter sealant and the screws or bolts securing the cover to the roof surface, each individually sealed. The refrigerator exhaust vent is often located at the rear roof area and is exposed to high heat from the refrigerator exhaust, which accelerates sealant polymerization faster than equivalent hardware in other roof locations.
Roof vent covers (bathroom fans, kitchen exhaust fans) on most RVs are mounted with four to six screws through a base flange. Each screw requires individual sealant at the roof penetration point, in addition to the continuous perimeter bead around the base flange. The base flange perimeter seal and the individual screw seals operate at different movement amplitudes during road travel, meaning one can fail while the other remains intact. Inspect both independently.
Plumbing vent pipes through the roof (gray tank, black tank, and fresh water tank vents on most RVs) are small-diameter pipes with rubber pipe flashing boots similar to residential plumbing vents. Inspect the rubber boot for cracking and the boot-to-membrane adhesion at the base. These fail less frequently than hardware mounts but are rarely inspected because they’re visually unobtrusive.
Antenna mounts and satellite dish hardware have become increasingly common on RV roofs. Any antenna base that was added after manufacture by a dealer or owner, rather than factory-installed, should be inspected with extra scrutiny during annual RV roof maintenance, as after-market installations frequently lack the factory-applied lap sealant coverage that surrounds OEM hardware.
Long-Term Roof Protection Between Annual Inspections
Annual RV roof maintenance is the primary maintenance interval, but several habits between annual inspections extend roof membrane and sealant life significantly.
Wash the roof every one to two months during active use to prevent biological growth from establishing. Algae, moss, and mildew colonies on TPO and EPDM membranes accelerate degradation by physically colonizing sealant beads and releasing acids that attack polymer chemistry. A simple rinse with a garden hose and occasional soft brush scrub prevents the established growth that annual cleaning must work harder to remove.
Park under cover or use an RV cover during extended storage periods. UV exposure is the primary aging mechanism for both roof membranes and sealants, and storage under cover removes UV exposure almost entirely. An RV stored outdoors without cover in the American Southwest or similar high-UV environments ages roof materials 3 to 4 times faster than the same unit stored under cover.
Trim overhanging tree branches away from parking areas. Branches that contact the roof surface during wind abrade the membrane and create sealant damage at impact points. Tree debris accumulating in corners and around penetrations holds moisture against sealant and membrane, accelerating biological growth and sealant degradation at contact points.
Inspect after any hail event or impact damage. Hail damage to TPO and EPDM membranes may not be immediately obvious as punctures but creates stress damage in the membrane structure that allows moisture infiltration under subsequent loading. After any hail event significant enough to leave marks on painted vehicle surfaces, perform an immediate inspection rather than waiting for the scheduled annual RV roof maintenance window.
Frequently Asked Questions About Annual RV Roof Maintenance
Q: How often should I perform RV roof maintenance?
The minimum is once annually, ideally in spring before the camping season. The optimal schedule is twice annually: spring inspection, cleaning, and resealing before the season, plus a fall inspection before storage to address any damage from the summer’s travel and UV exposure. RVs stored outdoors in high-UV environments (Southwest, Florida, high altitude) benefit most from the twice-annual schedule because sealant degradation happens faster in these environments than the annual maintenance cycle addresses.
Q: How do I know which sealant to use on my RV roof?
Identify your roof membrane type first (TPO, EPDM, or fiberglass, from your owner’s manual or manufacturer with your VIN), then match the sealant to the membrane chemistry. TPO roofs require TPO-compatible lap sealants like Dicor 501LSW. EPDM roofs require EPDM-compatible or butyl-based sealants. Fiberglass penetrations require polyurethane or marine-grade silicone. Using the wrong chemistry produces adhesion failure within one to two seasons regardless of application quality.
Q: Can I use Flex Seal or similar spray products for RV roof maintenance?
Not as a primary sealant for annual RV roof maintenance, no. Spray rubberized coatings like Flex Seal do not provide reliable adhesion to RV roof membrane surfaces and lack the long-term UV resistance of purpose-made RV lap sealants. They are not compatible with most membrane chemistry and can trap moisture under the coating layer. They may provide temporary emergency coverage to reduce infiltration rate until proper materials are available, but they are not a substitute for correct sealant application.
Q: What does a soft spot in my RV roof mean?
A soft spot under your feet when walking the roof, or visible deflection under thumb pressure, indicates either delaminated roof decking (where the structural layers have separated but remain dry) or water-damaged decking (where infiltration has caused rot or delamination in the structural substrate). Delaminated but dry decking is repairable. Water-damaged and rotting decking requires structural section replacement. Have any soft spot professionally assessed promptly. A soft spot that gets larger between inspections is actively receiving water and needs immediate attention.
Q: How do I know if my RV roof has a leak before I see interior damage?
The most reliable pre-symptom detection method is the annual RV roof maintenance inspection itself: checking sealant elasticity and adhesion at every penetration before water has moved through the failure. Beyond scheduled inspection, watch for: light brown staining at the edges of ceiling panels (the first visible sign of infiltration tracking through substrate), soft or springy feel to ceiling laminate when pressed, and any musty smell in enclosed spaces. All three symptoms indicate infiltration that has been running for weeks to months.
Q: How long does RV roof sealant last?
Quality purpose-made RV lap sealants like Dicor 501LSW are rated for approximately 5 years of service life under normal UV exposure conditions. In high-UV environments or at high altitude, expect 3 to 4 years of effective service. Factory-applied sealants from new-construction manufacturers are typically the same or similar products. Annual RV roof maintenance inspection allows you to identify sealant that has polymerized beyond its service life before it fails under rain load, regardless of its rated life.
Q: Should I coat my entire RV roof with a coating product?
Elastomeric roof coatings (Dicor EPDM Roof Coating, Proguard Roof Coating) applied over the full membrane surface extend membrane and sealant life by adding a UV-protective layer and filling micro-cracks before they become infiltration pathways. This is a more intensive step than standard annual RV roof maintenance but provides meaningful additional protection for older roofs showing widespread oxidation or for units stored outdoors year-round. Apply over a thoroughly cleaned membrane and properly cured sealant work. Allow 24 to 48 hours of cure time before rain exposure.