

Rust doesn’t announce itself. It starts in the places you never look, under the chassis where road salt accumulates in crevices, behind the entry steps where moisture pools after every rain, inside the exterior storage compartment hinges where paint chipped on a gravel road six months ago and nobody noticed. By the time rust is visible on an RV or camper exterior, it has already been working for months beneath the surface.
Preventing rust on a camper is not a dramatic undertaking. It does not require expensive professional treatments or specialized equipment beyond what any serious camper should already have in their maintenance kit. It requires systematic attention to the right locations, the right products applied in the right sequence, and the right inspection intervals that catch surface oxidation before it becomes structural corrosion.
This guide covers every aspect of preventing rust on a camper: the chemistry of corrosion and why campers are specifically vulnerable, the inspection sequence that finds problems early, the correct tools and products for each metal substrate and location, and the ongoing maintenance schedule that keeps metal components functional for the full lifespan of your vehicle.
Why Campers Are Exceptionally Rust-Prone
Preventing rust on a camper is a more demanding challenge than preventing rust on a standard passenger vehicle, and understanding why makes the maintenance protocols make sense rather than feeling like arbitrary busywork.
A camper or RV operates in a wider range of corrosive environments than almost any other vehicle type. It travels through coastal air with high salt humidity, across desert terrain with alkaline dust that holds moisture, and through winter road conditions where magnesium chloride and sodium chloride road treatments are applied in quantities that make automotive rust protection engineers nervous. It then sits in storage, sometimes for months, in conditions where moisture trapped under the chassis has no opportunity to dry.
The structural complexity of an RV also creates more rust-vulnerable geometry than a simple monocoque vehicle body. Frame rails with C-channel cross-sections trap debris and moisture in their interior channels. Entry step assemblies are typically welded steel structures with multiple inside corners that hold water after every rain event. Exterior storage compartment frames are mounted in configurations that direct runoff water directly into the frame-to-compartment junction. Landing gear and stabilizer jack assemblies are chrome-plated or painted steel exposed directly to road debris and ground moisture.
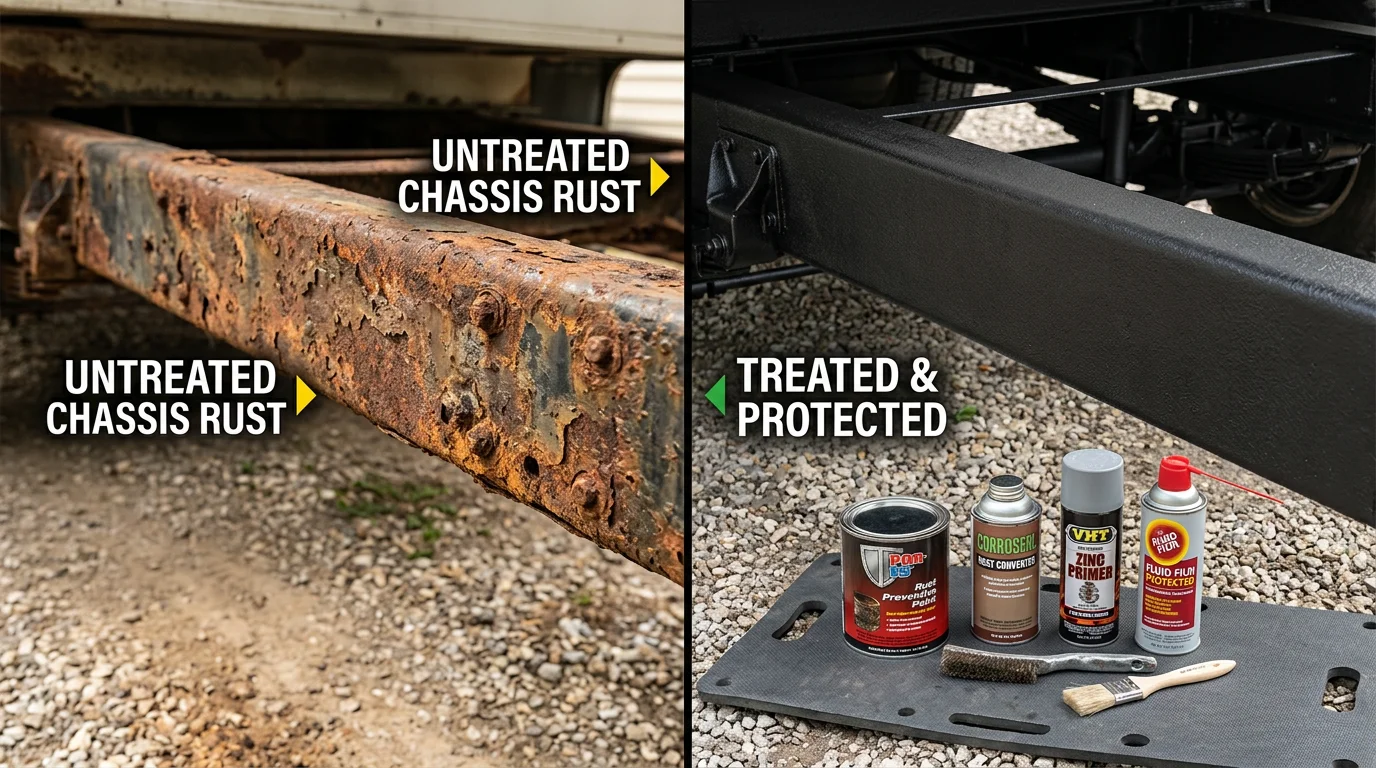
Factory corrosion protection on most production RVs is adequate for normal conditions with normal maintenance. It is not engineered to survive neglect, and it is not designed to protect in the most corrosively aggressive conditions without supplemental treatment. Preventing rust on a camper beyond the factory baseline is the owner’s responsibility, and it is a responsibility with a very clear cost-benefit ratio: a $60 annual treatment prevents repairs that regularly cost $2,000 to $8,000 when structural rust is allowed to progress to the frame, step, or compartment replacement threshold.
A thorough rust prevention program integrates naturally with the full pre-season inspection approach covered in the camper maintenance checklist guide, where chassis and metal component inspection sits alongside roof sealant, battery systems, and mechanical checks as a foundational annual task.
Understanding the Corrosion Process on Camper Metal
Preventing rust on a camper effectively requires understanding what rust actually is and why it progresses the way it does on vehicle metal specifically.
Rust is iron oxide, the product of an electrochemical reaction between iron (present in steel), oxygen, and an electrolyte (water or moisture containing dissolved minerals). The reaction requires all three elements simultaneously. Remove any one of them and the corrosion reaction stops. This is the fundamental principle behind every rust prevention technique: either separate the metal from oxygen, separate it from moisture, or neutralize the electrolyte chemistry that drives the reaction.
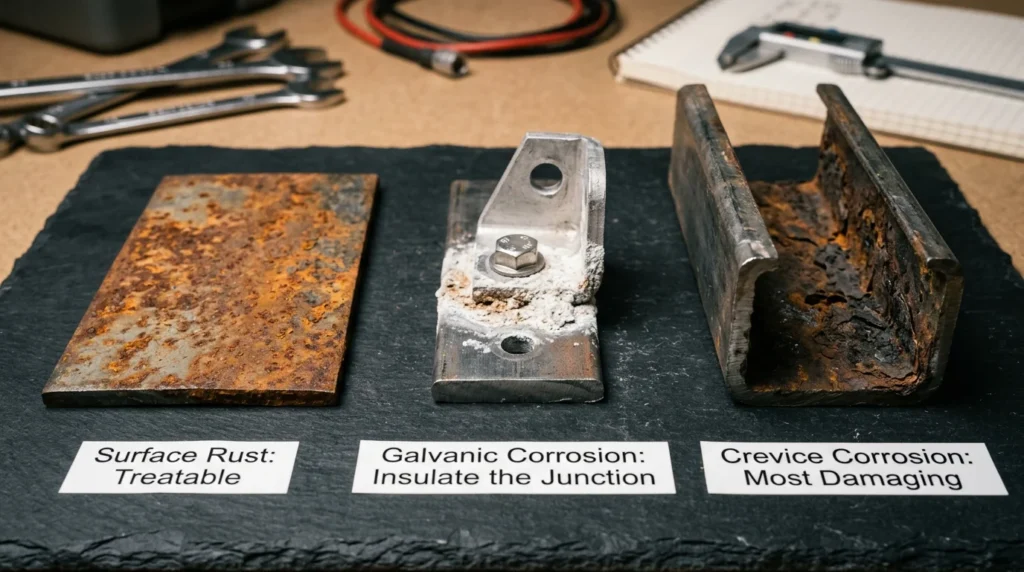
Galvanic corrosion is a distinct and often faster form of corrosion that occurs when two different metals are in electrical contact in the presence of an electrolyte. Aluminum compartment frames bolted to steel chassis members, stainless steel screws in aluminum tracks, and steel step brackets welded to aluminum body panels are all galvanic corrosion sites where the less noble metal (steel in most cases) corrodes at an accelerated rate driven by the electrochemical potential difference between the two metals. Preventing rust on a camper in these bimetallic junction locations requires an insulating layer between the metals, typically a zinc-rich primer or a physically non-conductive sealant, to break the galvanic cell.
Crevice corrosion is the form most commonly found in camper and RV applications and the one that causes the most structural damage before it is detected. It occurs in confined spaces where oxygen is limited (crevices, overlapping panels, under debris accumulation) where a differential aeration cell forms between the oxygen-depleted crevice interior and the oxygenated exterior. This differential drives rapid corrosion specifically at the crevice location, creating deep pitting that progresses into the metal cross-section much faster than open-surface rust.
Understanding these three corrosion mechanisms, general rust, galvanic corrosion, and crevice corrosion, explains why preventing rust on a camper requires different products and different approaches for different locations rather than a single universal treatment applied everywhere.
The Rust Prevention Inspection: Finding Problems Before They Grow
Annual inspection for preventing rust on a camper should cover every metal component in a systematic sequence, beginning with the highest-risk locations and working through every remaining metal surface. Like the roof inspection protocol covered in the annual RV roof maintenance guide, the value of inspection is catching failures before they require expensive structural intervention.
Chassis frame rails and cross-members are the highest structural priority in any rust prevention inspection. Crawl under the vehicle with a bright light and inspect every accessible frame surface. Surface rust (orange discoloration with no pitting or scale) on frame steel is a maintenance issue requiring treatment. Active rust with visible pitting, flaking scale, or visible metal cross-section reduction is a structural issue requiring professional assessment before further travel. Press along frame members with a flat screwdriver at any area showing heavy rust, metal that deflects under moderate hand pressure has lost structural integrity.
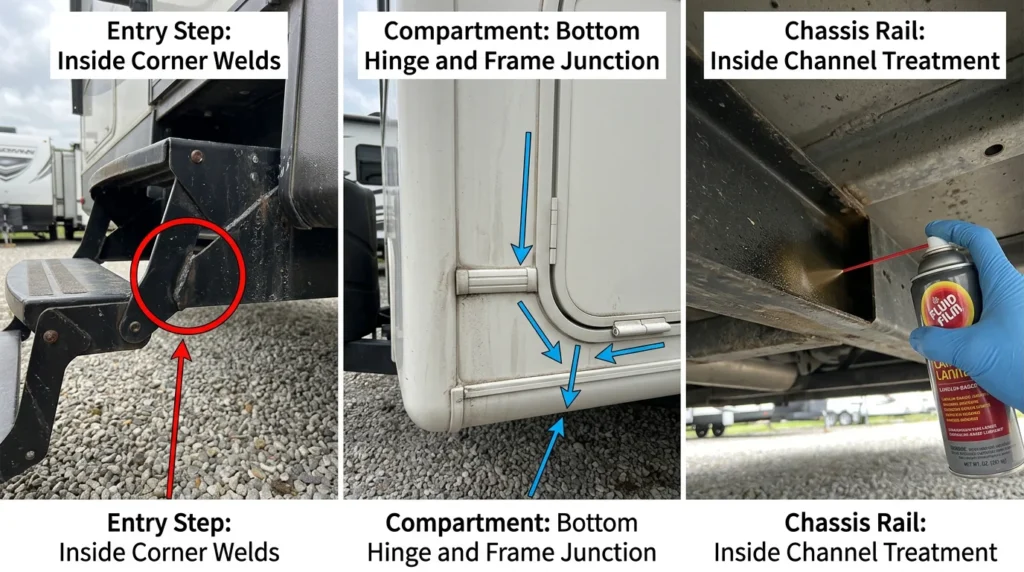
Entry steps and step brackets are among the highest-priority locations for preventing rust on a camper because they combine high moisture exposure (rain and foot traffic bring water directly to these surfaces), high mechanical stress (body weight loading on every entry and exit), and complex geometry (multiple inside corners and crevices that trap water). Inspect the full step assembly including the step tread surface, the structural brackets welded to the RV body, and the exposed bolt and fastener hardware.
Exterior storage compartment frames and hinges require inspection of both the compartment door frame (which often accumulates debris at the bottom hinge area) and the body-side mounting frame that receives the compartment door. Pay specific attention to the bottom corners of each compartment opening where water tracks down the interior wall and accumulates. A paint chip at this location that goes untreated typically develops into through-rust within one to two years in humid environments.
Underbelly components including gray and black tank mounting brackets, fresh water tank straps, electrical conduit brackets, and stabilizer jack mounting pads are all metal components in a high-moisture, high-contamination zone. Inspect annually during a dedicated underbelly inspection, ideally after the vehicle has been washed and the underbelly debris cleared.
Roof penetration hardware, ladder mounts, and awning attachment hardware are metal components at roof level that experience high UV and moisture exposure. Stainless steel hardware is standard at these locations on most quality RVs, but even stainless steel develops surface oxidation (tea staining) in coastal environments and can experience crevice corrosion at fastener penetrations through the roof substrate.
Document all rust findings with photographs and measurements. A photograph taken at the same angle annually allows direct comparison of whether a rust area is stable (surface oxidation not progressing) or active (increasing in area or depth year over year).
Surface Preparation: The Foundation of All Rust Treatment
No rust inhibitor, primer, or coating applied to a poorly prepared surface performs to its rated specification. Surface preparation is the step that the majority of DIY rust prevention efforts skip or underperform, and it is the primary reason DIY rust treatments fail in half the rated time.
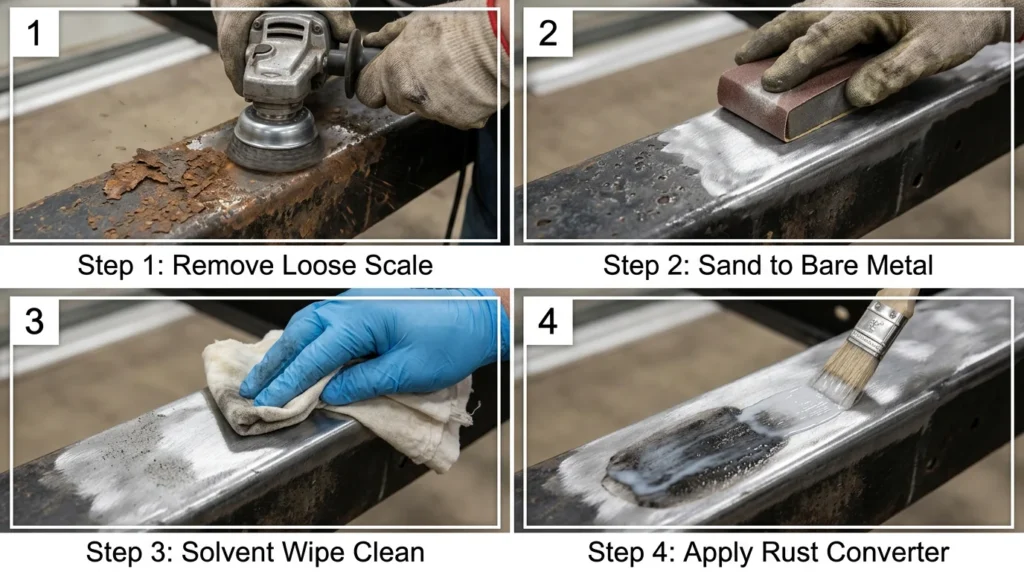
For surface rust without pitting, the correct preparation sequence is: wire brush or abrasive pad to remove loose scale and oxidation, followed by sanding to bare metal with 80 to 120-grit sandpaper, followed by solvent wipe (acetone or MEK) to remove all sanding dust, oils, and surface contamination. The goal is chemically clean bare metal before any treatment is applied.
For rusted areas with moderate pitting, the same wire brush and sanding preparation applies, followed by treatment with a phosphoric acid rust converter (more on this below) to chemically neutralize embedded rust in the pits that mechanical preparation cannot reach.
For heavily rusted areas with deep pitting or scale, angle grinder with a flap disc (36 to 60-grit for heavy scale removal, 80-grit for surface finishing) provides the mechanical aggressiveness needed for thorough preparation. All grinding and wire brushing generates sparks and metal particles that require eye protection (safety glasses are minimum, a face shield is better) and a dust mask.
Wire brushes for preventing rust on a camper surface preparation come in three forms: hand wire brushes for accessible flat surfaces, cup brushes for drill attachment for moderate-scale areas, and angle grinder wire cup brushes for heavy-scale, large-area preparation. All three have their place. The drill-attachment cup brush handles the majority of camper chassis preparation work efficiently and with less fatigue than hand brushing.
Avoid power wire brushing on thin sheet metal (typically under 1/16-inch thickness) where the chassis or body panels thin in this range. Aggressive power brushing on thin sheet metal can cause heat distortion and mechanical thinning that damages the metal surface before the treatment even begins.
Rust Converters: Chemistry That Works Where Brushes Can’t Reach
Rust converters are the most misunderstood product category in preventing rust on a camper, and they are also the most useful when applied correctly to the right situations.
A phosphoric acid-based rust converter reacts chemically with iron oxide (rust) to convert it to iron phosphate, a stable, adherent compound that does not continue the oxidation reaction and provides a primer-like bonding surface for subsequent coatings. The conversion reaction is visible: the rust turns from orange-brown to dark gray or black as the iron phosphate forms. This color change is the indication that the conversion is occurring correctly.
Rust converters are not a substitute for mechanical preparation. Loose, flaking, or heavily scaled rust must be mechanically removed before converter application. Rust converter penetrates into pitted metal and converts the embedded rust it contacts, but it cannot convert rust beneath loose scale because the chemistry cannot reach through the physical barrier. Apply converter after mechanical preparation to address the residual rust that brushing and sanding cannot fully remove from pits and crevices.
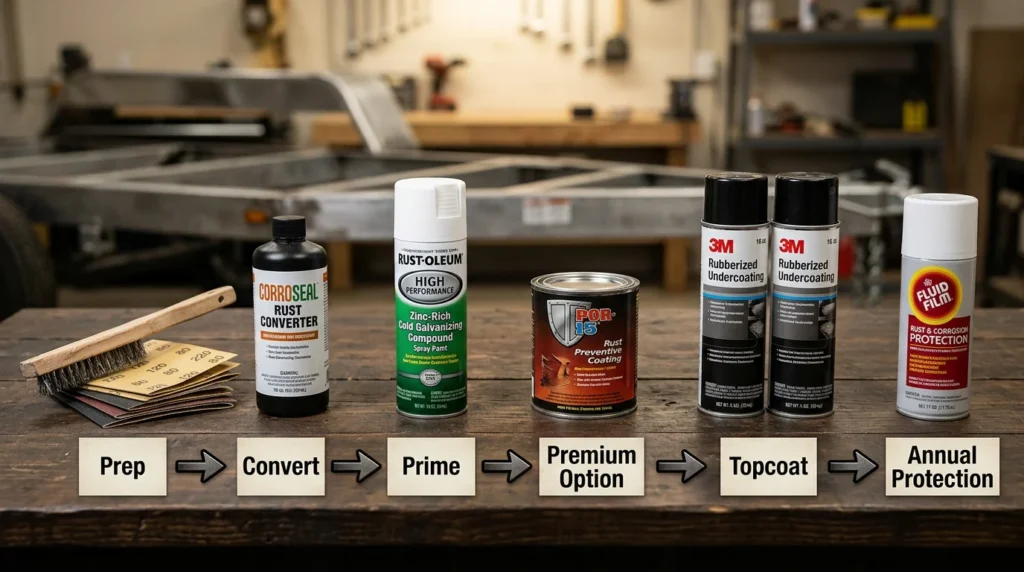
The Corroseal Water-Based Rust Converter is the most widely used product in the RV and marine maintenance communities for preventing rust on camper chassis components. It applies with a brush or roller, self-levels into pits and crevices, and converts rust within 24 hours in ambient temperatures above 50°F. The resulting iron phosphate surface is paintable directly without additional priming in most applications.
Ospho (phosphoric acid solution) is a more aggressive alternative that works faster and penetrates more deeply into pits than Corroseal, but requires more careful handling (it is a stronger acid formulation) and rinse protocols before topcoating. In field conditions or in heavily pitted areas where maximum penetration is needed, Ospho provides more complete rust conversion than brush-applied converter products.
Apply rust converter in temperatures between 50°F and 100°F and avoid application when rain is forecast within 4 hours. The phosphoric acid reaction requires a minimum dwell time of 20 to 30 minutes and should not be exposed to rain or water until the conversion has reached the black-gray color indication stage.
Rust Inhibitor Primers: The Foundation Coat
After surface preparation and rust converter application where needed, rust inhibitor primer is the second layer in a correctly built preventing rust on a camper coating system. Skipping primer and applying topcoat directly to bare metal or converted rust produces a coating system with significantly reduced adhesion and significantly shorter service life.
Zinc-rich primers are the standard recommendation for preventing rust on a camper chassis and structural components. Zinc provides cathodic protection to the steel substrate, meaning that even if the primer coat is scratched or chipped, the zinc chemistry continues to protect the exposed steel area electrochemically. This cathodic protection mechanism is why zinc-rich primers dramatically outperform non-zinc primers in field conditions where mechanical damage to the coating is inevitable.
Rust-Oleum Rusty Metal Primer is the most accessible zinc-rich primer for DIY applications, available in spray can and brush-on formulations. The spray formulation penetrates into crevices more thoroughly than brush application and is the preferred application method for complex step bracket geometry and chassis cross-member inside corners. Apply two coats with a 30-minute flash-off between coats.
POR-15 Metal Prep followed by POR-15 Rust Preventive Coating is the premium system used by serious RV and vehicle restorers for preventing rust on camper undercarriage and structural components. The POR-15 system uses a moisture-cured urethane coating that actually bonds more effectively in the presence of slight humidity, providing exceptional adhesion in the field conditions where most chassis coatings fail. POR-15 dries to a hard, impact-resistant finish that is significantly more abrasion-resistant than conventional primers.
The one limitation of POR-15 is its UV sensitivity: the black or silver finish will chalk and degrade with direct sun exposure. This is only relevant for visible exterior surfaces, as chassis components under the vehicle are protected from direct UV by the vehicle body. For exterior metal surfaces visible to sun exposure, topcoat POR-15 with a UV-stable enamel or apply a UV-stable topcoat over conventional zinc primer.
Topcoat Selection for Each Metal Location
The topcoat applied over primer for preventing rust on a camper determines the long-term durability, weather resistance, and visual appearance of the treated surface. Different topcoat types are appropriate for different metal locations based on their mechanical exposure, UV exposure, and visual accessibility.
Chassis and frame components are best topcoated with rubberized undercoat spray (3M Rubberized Undercoating, Rust-Oleum LeakSeal Rubberized) applied over zinc primer. Rubberized undercoat provides a thick, flexible, impact-absorbing layer that resists stone chips, abrasion from road debris, and moisture penetration. It can be applied in thick coats that flow into crevices and provides acoustic damping as a secondary benefit. Apply two to three coats, allowing 20 to 30 minutes between coats, to reach a minimum 20-mil film thickness.
Entry step assemblies require a topcoat that handles both rust prevention and foot traffic abrasion. Apply zinc primer followed by a hard-drying metal enamel (Rust-Oleum Protective Enamel or equivalent) in a color matching the RV exterior for a finished appearance, or in black for a maintenance-focused application. The enamel topcoat provides UV stability and a harder surface than rubberized undercoat for the mechanical wear the step surface experiences.
Exterior storage compartment hardware including hinges, door frames, and latches can be treated with a zinc-rich cold galvanizing compound (Rust-Oleum Cold Galvanizing Compound) that provides a metallic zinc finish with cathodic protection matching hot-dip galvanized coatings in salt spray testing. This is particularly appropriate for the bimetallic junction locations where aluminum compartment frames meet steel mounting hardware.
Roof-level hardware including ladder mounts and antenna brackets on stainless steel surfaces should be treated with a penetrating corrosion inhibitor (Boeshield T-9, Corrosion-X) rather than a topcoat. These penetrating inhibitors displace moisture from fastener threads and surface pores, providing corrosion protection without adding visible coating thickness that would affect hardware function or appearance.
Ongoing Prevention: Products That Work Between Annual Treatments
Annual mechanical preparation and coating application is the primary tool for preventing rust on a camper, but several ongoing maintenance products applied between annual treatments significantly extend the service life of the primary coatings and provide active protection at locations where annual coating application is impractical.
Fluid Film is a lanolin-based corrosion inhibitor and lubricant that penetrates into existing rust layers, displaces moisture from metal surfaces and crevices, and provides a soft, self-healing protective film that resists washing off in rain. Applied annually to chassis surfaces, inside C-channel frame rails (via spray nozzle extensions that reach into the interior), and at all hardware attachment points, Fluid Film is considered by many RV chassis preservation specialists to be the most effective single product for preventing rust on a camper in real-world field conditions. It is non-toxic, biodegradable, and compatible with all existing coatings.
WD-40 Specialist Long-Term Corrosion Inhibitor is a harder-drying alternative to Fluid Film that provides a more durable film in applications where the softer Fluid Film is too easily removed by contact. It is appropriate for entry step hardware, exterior latch mechanisms, and other handled metal components where a soft film would transfer to hands.
ACF-50 Anti-Corrosion Formula is the product choice for electrical hardware and connector prevention, used widely in aviation corrosion prevention and applicable to RV electrical panel enclosures, battery terminal areas, and connector junctions exposed to weather. It penetrates connector contacts without affecting electrical resistance while providing a corrosion-inhibiting barrier against moisture and electrochemical degradation.
The full tool kit for ongoing prevention between annual treatments, including application brushes, spray extensions, surface prep supplies, and monitoring records, is part of the complete maintenance toolkit covered in the tools and maintenance guide.
Protecting Specific High-Risk Locations
Underbelly and chassis treatment is the highest-priority rust prevention task for preventing rust on a camper and the one that delivers the highest return on maintenance investment. The chassis frame is the structural foundation of the entire vehicle, and frame rust that progresses to through-wall pitting or section loss creates repair scenarios that can total the vehicle economically.
After mechanical preparation and rust converter application on any active rust areas, apply two coats of POR-15 or zinc-rich primer to all frame surfaces, followed by two to three coats of rubberized undercoat. Pay specific attention to inside corners of C-channel frame sections, cross-member to rail junctions, and all welded connections where crevice geometry creates the highest-risk corrosion sites.
For preventing rust on a camper chassis in coastal or northern winter climates where salt exposure is highest, apply a Fluid Film or similar penetrating inhibitor over the completed coating system and repeat the penetrating inhibitor application annually even if the mechanical coating remains intact. The penetrating inhibitor fills micro-pores and edges of any coating damage before water reaches the substrate.
Entry step rust prevention requires disassembling the step assembly if possible to access the inside corner welds and internal structural members that hold water and are invisible during surface-only inspection. Clean with wire brush and rust converter, apply zinc primer to all surfaces including interior accessible faces, then topcoat with hard-drying metal enamel. Apply Fluid Film to hinge pivot points and mechanical connections.
Exterior compartment prevention focuses on the door bottom hinge area and the body-side frame lower corners. These two locations account for the majority of compartment rust failures. Clean, prime, topcoat, and apply a bead of exterior-grade sealant at the compartment frame-to-body junction to prevent water tracking behind the frame into the void space where rust develops invisibly.
This detailed attention to each specific metal location complements the systematic approach to all external RV systems covered in the annual RV roof maintenance guide, where the same location-by-location methodology drives the seam and penetration inspection protocol.
Seasonal and Climate-Specific Rust Prevention Strategies
Preventing rust on a camper requires calibrated intensity based on your operating environment. A camper used exclusively in the Arizona desert interior faces a fundamentally different corrosion risk than the same unit used along the Pacific Coast or operated through Midwest winters.
Coastal salt-air environments present the highest ongoing corrosion challenge for preventing rust on a camper. Sodium chloride aerosol settles on all exposed metal surfaces continuously, and the electrolyte concentration in the moisture film on metal surfaces drives galvanic and crevice corrosion at accelerated rates. In coastal environments, the Fluid Film penetrating inhibitor application interval should be reduced to every six months rather than annually, and all chassis hardware should be inspected after any period of coastal camping exceeding two weeks.
Northern winter road environments introduce chloride salts (sodium chloride and magnesium chloride) in concentrated quantities directly onto the undercarriage during travel. Magnesium chloride, now the most common winter road treatment in northern states, is significantly more corrosive than sodium chloride and more difficult to wash off because it is hygroscopic (absorbs and holds moisture). After any winter travel, wash the undercarriage thoroughly with a pressure washer before storing the vehicle. Preventing rust on a camper that operates in magnesium chloride road environments without post-trip washing is nearly impossible regardless of coating quality.
Humid subtropical environments (Southeast US, Gulf Coast) combine high humidity with elevated temperatures that accelerate the corrosion reaction rate. The primary concern here is crevice corrosion in enclosed spaces that never fully dry between rain events. Ensure all drainage holes in the chassis rail lower flanges are clear, all compartment frames have functional drainage, and penetrating inhibitor is applied to all enclosed crevice locations annually.
High-altitude desert environments present lower corrosion risk from moisture and salt but introduce UV degradation of topcoatings at elevated rates due to reduced atmospheric UV filtering. Topcoats on exterior visible metal surfaces need more frequent inspection and touch-up in high-altitude desert use than in lower-altitude or shaded storage environments.
Preventing Rust Camper: Maintenance Schedule at a Glance
| Maintenance Task | Frequency | Products Required | Time Required |
|---|---|---|---|
| Full chassis and metal inspection | Annually (spring) | Flashlight, camera, screwdriver | 1 to 1.5 hours |
| Wire brush, prep, and convert active rust | As needed at inspection | Wire brush, rust converter, acetone | 1 to 3 hours |
| Zinc primer application on bare/converted areas | After prep | Zinc-rich primer, brush or spray | 1 to 2 hours |
| Rubberized undercoat application on chassis | After primer | Rubberized undercoat spray | 1 to 2 hours |
| Fluid Film chassis application | Annually or semi-annually | Fluid Film, spray extensions | 1 to 1.5 hours |
| Entry step hardware lubrication and inspection | Every 3 months | WD-40 Specialist, zinc primer touch-up | 30 minutes |
| Compartment hinge and latch treatment | Every 3 months | Corrosion-X, touch-up paint | 30 minutes |
| Post-winter-travel undercarriage wash | After each winter trip | Pressure washer | 30 minutes |
| Pre-storage Fluid Film reapplication | Before long-term storage | Fluid Film | 1 hour |
| Annual total time investment | 6 to 10 hours |
Frequently Asked Questions About Preventing Rust on a Camper
Q: What is the single most important step in preventing rust on a camper?
Annual inspection to catch surface rust before it progresses to pitting corrosion. Surface rust on a well-cleaned and properly dried chassis area can be treated with wire brush preparation, rust converter, and a fresh primer coat in 2 to 3 hours with $30 in materials. The same area left untreated for two additional years of crevice and pitting progression may require professional media blasting, structural assessment, and weld repair at costs starting at $500 to $2,000 for a single frame section. Inspection is the leverage point that makes all subsequent treatment economically rational.
Q: Does Rust-Oleum actually work for preventing rust on a camper chassis?
Yes, with correct surface preparation and application sequence. Rust-Oleum Rusty Metal Primer followed by Rust-Oleum Protective Enamel or rubberized undercoat provides effective rust prevention in moderate-exposure environments when applied over properly prepared metal. In high-salt coastal and winter-road environments, the POR-15 system provides better long-term performance than standard Rust-Oleum due to its moisture-cured urethane chemistry and superior abrasion resistance. Rust-Oleum products are a reliable choice for budget-conscious maintenance in moderate-exposure conditions.
Q: Can I use WD-40 for preventing rust on my camper?
Standard WD-40 provides only short-term rust inhibition, typically 1 to 2 weeks, because its carrier oil evaporates rapidly and leaves a very thin residual film. For ongoing rust prevention between annual treatments, WD-40 Specialist Long-Term Corrosion Inhibitor or Fluid Film provides substantially longer protection (months rather than weeks) from the same application. Standard WD-40 is useful for displacing moisture immediately after wet exposure but is not a substitute for a long-term corrosion inhibitor in a preventing rust on a camper maintenance program.
Q: How do I prevent rust on the entry steps of my camper?
Disassemble if accessible, remove all loose rust with wire brush and sandpaper, apply phosphoric acid rust converter to any pitted areas, prime with zinc-rich primer in two coats, topcoat with hard-drying metal enamel. Apply Fluid Film to hinge points and interior structural members annually. The inside corner welds at the bracket-to-step junction are the highest-risk location: direct specific attention here during both preparation and primer application.
Q: What is Fluid Film and is it worth using for camper rust prevention?
Fluid Film is a lanolin-based penetrating corrosion inhibitor and lubricant made from wool wax (lanolin) in a petroleum carrier. It is non-toxic, biodegradable, and safe around pets and children after the carrier has evaporated. It penetrates into existing rust layers, displaces moisture, and leaves a soft corrosion-inhibiting film that is self-healing to minor damage. It is widely considered the most effective single annual treatment for preventing rust on a camper chassis in real-world conditions, particularly for inside-face frame rail protection where spray application reaches surfaces that mechanical coating methods cannot access.
Q: How do I prevent rust in coastal environments where my camper is exposed to salt air?
The core protocol for preventing rust on a camper in coastal environments is: complete annual mechanical prep and coating application on any active rust, Fluid Film chassis application every six months rather than annually, thorough fresh water rinse of the entire undercarriage after any extended coastal camping, and ACF-50 application to all electrical hardware and connectors. Chrome and stainless exterior hardware should be treated with a marine-grade stainless steel protectant (Star Brite Stainless Steel Polish and Protectant) that provides a wax barrier against salt aerosol deposition.
Q: Should I treat my camper chassis before long-term storage?
Yes, without exception. Long-term storage, particularly outdoors, combines moisture exposure from weather with no drying airflow from road travel, creating ideal crevice corrosion conditions. Before storage exceeding 30 days, apply a fresh coat of Fluid Film or equivalent penetrating inhibitor to all chassis surfaces. Wash and dry the undercarriage before application to prevent sealing road salt into contact with metal surfaces under the inhibitor film. This pre-storage treatment is the single action with the highest return on investment in a preventing rust on a camper maintenance program.