
Nobody tells you about the silence. Not the peaceful kind, the kind where you realize that if something goes wrong out here, the only person who can fix it is you. I’ve spent nights alone in the Patagonian steppe, on remote Norwegian fjord trails, and in desert canyons in Utah where my nearest neighbor was a day’s hike away. Solo camping safety is not about fear, it’s about converting that awareness of vulnerability into a concrete, practiced set of decisions and tools that let you enjoy the solitude without gambling with your life.
The difference between a solo camper who has an emergency and walks out fine and one who does not is rarely a matter of luck. It is almost always a matter of preparation. This checklist-style guide covers every dimension of solo camping safety, from the pre-trip communication protocols that serve as your invisible safety net to the behavioral strategies that keep you from creating the emergency in the first place.
Why Solo Camping Safety Requires a Different Standard
Group camping has a built-in safety buffer that solo camping completely removes. When you are with others, someone notices when you haven’t come back from a water collection trip. Someone else starts the fire while you set up the tent. A sprained ankle becomes a managed inconvenience rather than a survival scenario because there are hands to help and a voice to call for help.
Solo camping safety requires you to personally carry every function that a group distributes across multiple people. Your navigation errors have no one to catch them. Your weather judgment calls stand alone without a second opinion. Your medical emergencies require self-treatment until external help arrives, which in backcountry settings may be hours or days away.
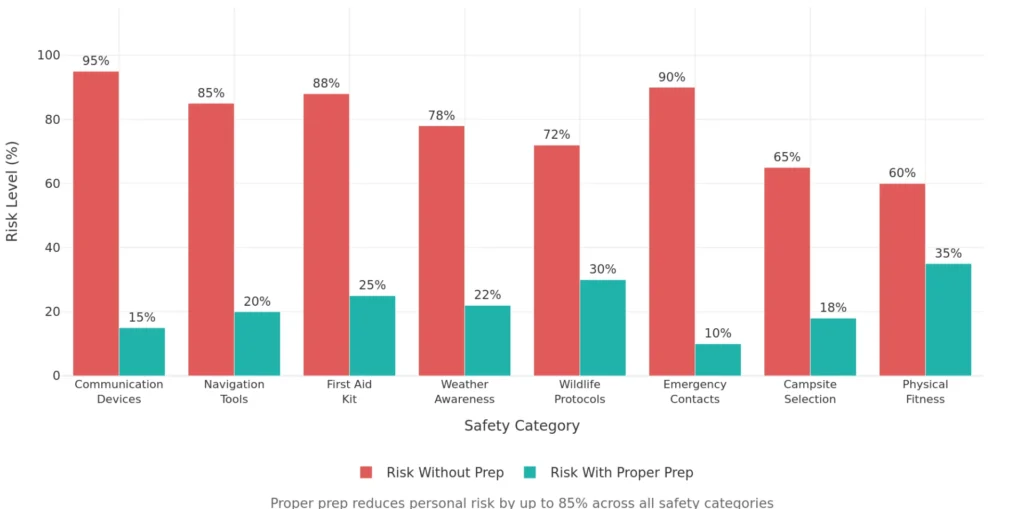
This is not an argument against solo camping. The freedom, the self-reliance, and the depth of experience that solo camping produces are genuinely different from anything group camping offers. It is, however, an argument for taking solo camping safety with a seriousness that matches the increased personal responsibility involved. The risk reduction that proper preparation delivers is dramatic and measurable.
Solo Camping Safety Risk Level With vs Without Preparation :
Phase 1: Pre-Trip Communication Protocols
The most important solo camping safety measure happens before you leave home, and it costs nothing except 20 minutes of your time.
Creating a trip notification document is the foundation of every professional wilderness guide’s pre-departure protocol, and it should be yours. This is not a vague “I’m going camping near the mountains” text message. It is a specific, detailed document shared with a trusted contact who has clear instructions on when and how to act if they do not hear from you.
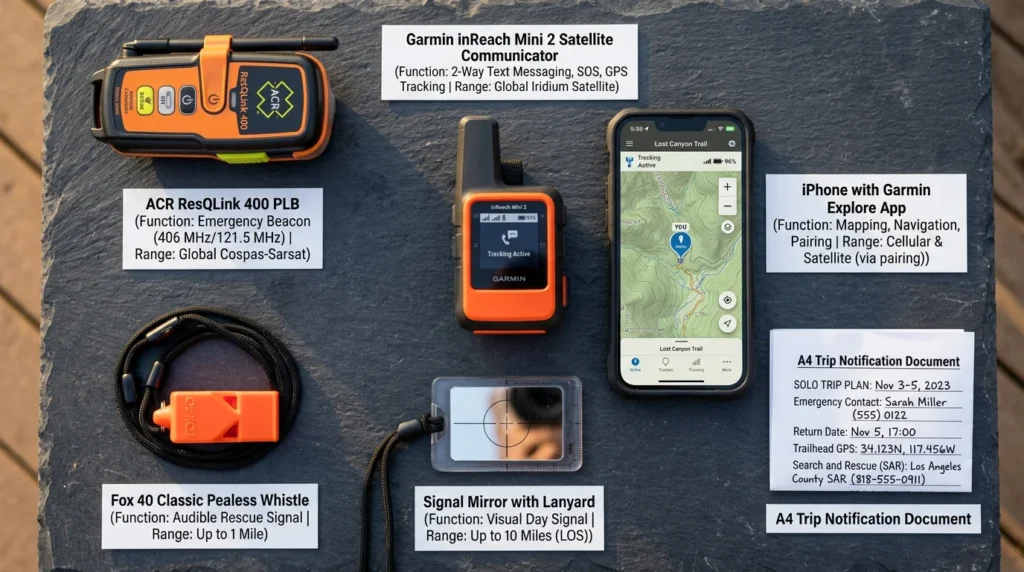
Your trip notification document for solo camping safety should include: your exact starting trailhead with GPS coordinates, a copy of your planned route with waypoints, your expected departure time and your expected return time, a description of your tent color and your clothing color so that search and rescue teams can locate you visually, the make, color, and license plate of your vehicle at the trailhead, a list of the communication devices you are carrying, and the specific instruction: “If you have not heard from me by [time and date], call [local search and rescue number] immediately.”
The “trusted contact” for this document must be someone who will actually act on these instructions rather than assume you are “just running late.” A close friend or family member who knows your outdoor activity level, understands the seriousness of the protocol, and has a track record of reliability is the correct choice. Your trip notification document is worthless if the person holding it waits three extra days before calling for help because they do not want to overreact.
Check-in schedule protocols supplement the trip notification document for multi-day trips. A daily check-in via satellite messenger at a predetermined time gives your trusted contact a real-time status update and narrows the search window significantly if something goes wrong. Agree on the exact time, the exact communication method, and the exact message format before you leave. “I’m fine at [location]” sent daily at 7 PM is the system. Missing that message triggers the response protocol, not a 24-hour wait.
The complete gear organization and pre-departure verification process for solo camping safety ties directly into the systematic equipment review framework in the camper maintenance checklist guide, where the pre-trip inspection covers every gear category before a single step is taken on the trail.
Phase 2: Emergency Communication Devices
Solo camping safety is fundamentally dependent on your ability to communicate your location and situation when something goes wrong, and in backcountry environments, a smartphone is not a communication device. It is a music player with occasional GPS functionality.
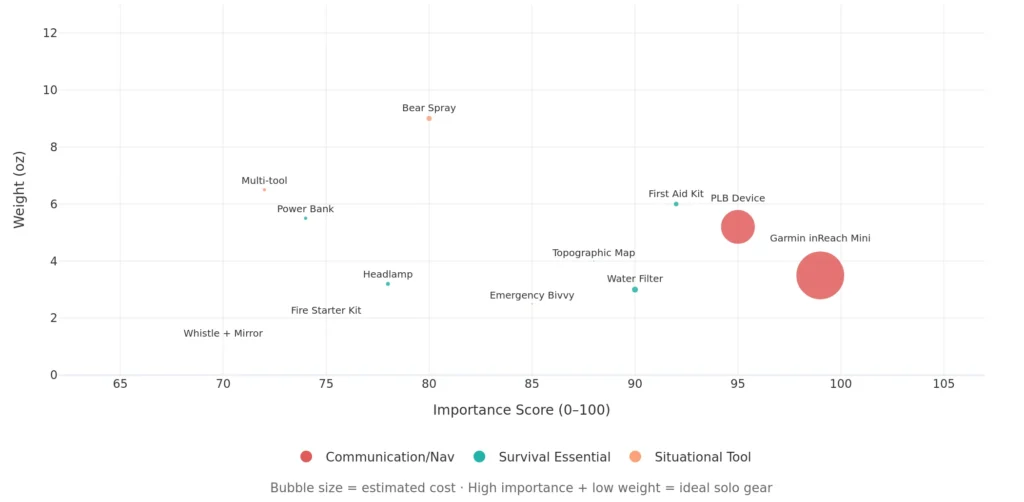
Satellite communicators are the non-negotiable communication tool for any solo camping safety protocol that extends beyond car camping within cell coverage. The Garmin inReach Mini 2 (approximately $350, plus a $15 to $65 monthly service plan) provides two-way text messaging via the Iridium satellite network from anywhere on Earth, real-time GPS tracking that your trusted contact can monitor via a web link, and an SOS button that connects directly to the GEOS International Emergency Response Center which coordinates search and rescue dispatch worldwide. The inReach Mini 2 weighs 3.5 ounces and has a 14-day battery life on the standard tracking interval.
The Garmin inReach Mini 2 is the device I recommend above all others for solo camping safety because it does something no other affordable device category does: it allows you to communicate the nature and severity of your emergency rather than simply triggering an undifferentiated SOS that dispatch must respond to with maximum resources regardless of whether you need a helicopter evacuation or just navigation assistance.
Personal Locator Beacons (PLBs) are the alternative communication device for solo camping safety at a lower ongoing cost. The ACR ResQLink 400 (approximately $250, no subscription fee) sends a one-way distress signal with GPS coordinates to COSPAS-SARSAT, the international satellite-based search and rescue system, when activated. Unlike the inReach, a PLB cannot send “I’m okay” check-ins or communicate the nature of your emergency, but its single-button simplicity and zero ongoing subscription cost makes it the right choice for occasional solo campers who want reliable emergency signaling without a monthly commitment.
A whistle and signal mirror belong in every solo camping safety kit regardless of what electronic communication you carry. Both are the lowest-tech and most reliable signaling tools available. A Fox 40 pealess whistle carries to 1.2 kilometers in still air, operates in any weather, and requires no battery, no satellite coverage, and no subscription. A signal mirror reflects sunlight to 16 kilometers under clear conditions. These two tools cost under $15 combined and address the scenario where your satellite communicator has failed, your battery is dead, and rescuers are in visual range but cannot locate you.
The importance of communication devices in solo camping safety cannot be overstated.
Phase 3: Navigation Redundancy System
Navigation failure is one of the most common triggers for solo camping safety emergencies. A hiker who is lost and disoriented in deteriorating weather is at the beginning of a rapidly compressing timeline where every decision matters more than the last.
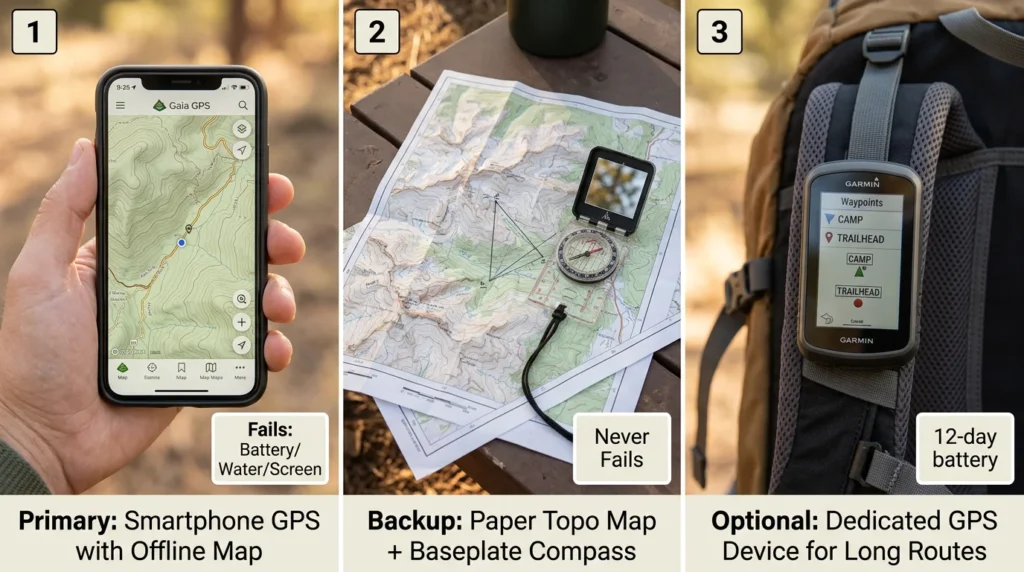
Solo camping safety requires navigation redundancy, meaning you carry at least two independent navigation systems that do not share failure modes. A smartphone GPS app (Gaia GPS, CalTopo, AllTrails) and a paper topographic map with a baseplate compass constitute the correct redundant pair. The phone can fail from battery depletion, water damage, or screen failure. The map and compass cannot.
Download offline maps to your phone before departure for every trail section you plan to cover. A downloaded map does not require cellular coverage and continues to show your GPS position as long as your phone has battery. Your paper topographic map is the emergency backup that works when the phone does not, provided you know how to use it. If your compass navigation skills are rusty, a pre-trip 30-minute review of triangulation and bearing techniques is a worthwhile solo camping safety investment.
Waypoint marking during travel is a solo camping safety habit that experienced backcountry travelers develop automatically and beginners underestimate consistently. Mark your campsite location as a GPS waypoint before leaving for a day hike. Mark the trailhead. Mark any significant landmarks along your route. These waypoints are the anchors you return to if weather closes in, light fails, or terrain looks different from the return direction than it did on the outbound journey.
Route pre-study of your planned trail from satellite imagery and topographic maps before departure identifies the terrain features, decision points, and potential bailout routes before you are standing in the field deciding under pressure. Thirty minutes of pre-trip map study reduces in-field navigation uncertainty dramatically and is standard practice in professional solo camping safety protocols.
The navigation tools and maintenance of GPS devices and digital mapping systems connect to the broader electronics care principles covered in the camp lighting and power gear guide, where battery management and charging infrastructure determine whether your navigation devices remain functional across multi-day solo trips.
Phase 4: The Solo Camping Safety Gear Checklist
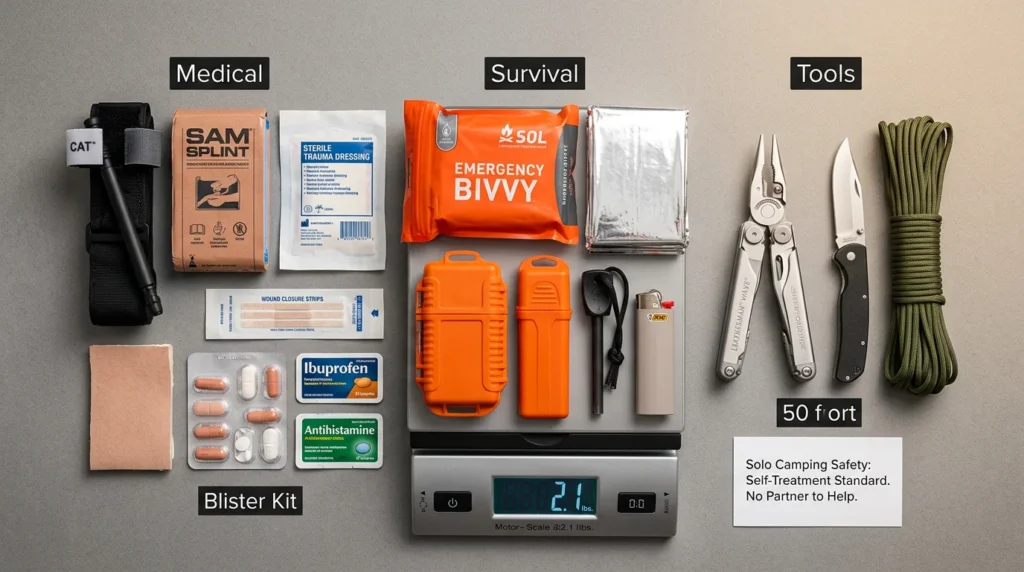
Solo camping safety gear requirements differ from group camping gear in two important ways: everything critical must be carried by one person with no distribution among teammates, and self-treatment capability for medical emergencies must exceed what a group traveler would carry because there is no partner to perform two-handed procedures.
Shelter and thermal protection:
- A three-season or four-season tent appropriate to the conditions you will encounter, with a footprint to extend floor life and reduce cold-ground conduction
- A sleeping bag rated 10 to 15°F below the expected overnight low for safety margin
- An emergency bivvy (SOL Escape Bivvy, approximately $20) as a secondary thermal backup that fits in a shirt pocket and can prevent hypothermia if you are unable to return to your tent
- A space blanket for signaling and additional thermal insulation
Water and food security:
- A primary water filter (Sawyer Squeeze, approximately $35) and a chemical backup (Aquatabs iodine tablets, approximately $8) for water purification redundancy
- A minimum of 2 liters of carry capacity plus the filter for multi-source water collection along the route
- A minimum of 2,400 calories per day of food with a one-day emergency surplus
- A JetBoil Flash or similar integrated canister stove for hot food and water in any weather condition
First aid and medical:
- A comprehensive first aid kit customized beyond standard retail kits to include: SAM splint, trauma dressing, compression wrap, wound closure strips, blister treatment, moleskin, antihistamine, ibuprofen, acetaminophen, and any personal medications in a 3-day surplus quantity
- A tourniquet (CAT Combat Application Tourniquet) for serious extremity bleeding
- Wilderness first aid training, specifically a NOLS Wilderness First Aid (WFA) certification, is the single most valuable solo camping safety investment that is not a product
Tools and navigation:
- Multi-tool (Leatherman Wave, approximately $100)
- A fixed-blade or folding knife as backup
- Headlamp (Petzl Actik Core, approximately $45) with fresh batteries and a spare set
- Fire starting kit: lighter, waterproof matches, and a ferrocerium rod as three independent fire-starting methods
- 50 feet of paracord for shelter rigging, food hanging, and emergency use
The complete tent and shelter setup that forms the base camp for any solo camping safety system is covered with specific gear recommendations in the tent accessories guide, where gear lofts, staking systems, and vestibule organization are evaluated for solo camper use specifically.
Phase 5: Campsite Selection for Solo Safety
Where you pitch your tent on a solo trip carries safety implications that group camping distributes across a more flexible set of scenarios. Solo camping safety campsite selection follows a set of criteria that balances visibility, defensibility, and weather protection.
Elevation and drainage are the first considerations. Never pitch in a drainage channel or a depression regardless of how flat and appealing the ground looks. A weather event 20 miles upstream can send water through a drainage at 3 AM without any rain falling at your campsite. Flat, slightly elevated ground with a gentle slope for water runoff is the correct terrain. Check for widow-maker branches overhead before pitching.
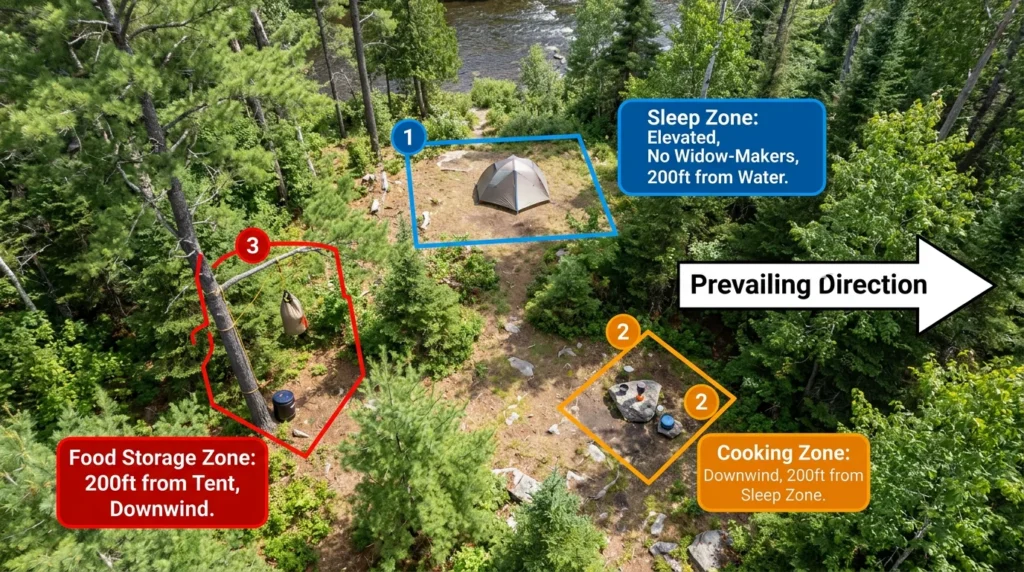
Distance from water sources for solo camping safety should be 200 feet minimum from any water body. This distance reduces wildlife encounter probability significantly, particularly for bears, which are habitual water source users at dawn and dusk. The same 200-foot rule applies for food preparation and food storage areas, which should be established downwind and as far from your sleeping area as the campsite geography allows.
Visibility and natural cover balance is a nuanced solo camping safety consideration. In established campgrounds and popular areas, pitch in a visible location that gives you line-of-sight to other camp areas. In remote backcountry where personal security is the concern, a slightly less obvious pitch location that gives you visual coverage of approaches without being immediately visible from the trail provides better situational awareness without announcing your exact position to every passerby.
Securing the tent for solo camping safety at night means locking your tent zipper from the inside with a small carabiner (a National Geographic recommendation for solo campers), keeping your headlamp, whistle, bear spray, and knife within immediate reach inside the tent, and keeping your satellite communicator charged and accessible without unzipping the tent door.
Properly staking your tent for solo camping safety in all weather conditions is addressed in detail in the instant setup tents guide and the tent accessories guide, where upgraded stake systems and guy line configurations are covered for the weather resistance that solo campers, who cannot share tent-stabilization duty with a partner, require.
Phase 6: Wildlife Safety Protocols
Wildlife encounters during solo camping are managed by behavioral protocols that reduce encounter probability, and by equipment and response strategies that manage the encounter if it occurs despite good prevention.
Bear country solo camping safety requires strict adherence to a three-zone camp architecture: sleeping zone, cooking zone, and food storage zone, each separated by a minimum of 200 feet in a triangle configuration. Cook and eat downwind from your sleeping area. Store all food, cookware, and any scented items (toothpaste, deodorant, sunscreen, lip balm) in a bear canister or a properly constructed bear hang, not inside your tent.
Bear spray is the most effective deterrent for bear encounters at close range, significantly more effective statistically than firearms in the peer-reviewed literature on bear attack outcomes. Carry it in a holster on your hip where it is accessible in under two seconds. A bear spray in your pack is not accessible in the 2 to 3 seconds between a charging bear and contact. The holster carry position is not optional for solo camping safety in bear country, it is the only carry position that provides usable emergency access.
Mountain lion awareness protocols for solo camping safety include making noise on the trail to avoid surprise encounters, maintaining strong body posture if you encounter one (stand tall, make yourself appear large, maintain eye contact, do not run), and carrying bear spray as an effective deterrent for mountain lion encounters as well as bear encounters.
Snake awareness in solo camping safety means watching where you step, using trekking poles to probe brush before stepping through it, never reaching under rocks or into holes, and wearing gaiters in snake habitat. Snakebite first aid for solo campers who cannot call for help within minutes means immobilizing the bitten limb below heart level, removing all jewelry and constrictive items from the bite area, marking the swelling boundary and time, and activating your satellite communicator for emergency evacuation immediately regardless of how mild the initial symptoms appear.
Phase 7: Weather Monitoring and Decision Protocols
Weather is the variable in solo camping safety that kills experienced campers who underestimate its speed of change and overestimate their ability to manage its worst expressions without shelter.
Check the National Weather Service mountain forecast (not the general area forecast, the specific mountain zone forecast that accounts for orographic effects on precipitation and wind) for your specific region for a 72-hour window before departure. Check it again the morning of departure. Check it at every point of cell coverage during the approach.
Solo camping safety weather abort criteria should be decided before you leave, not in the field when commitment bias and sunk cost thinking make you reluctant to turn back. The abort criteria most wilderness safety professionals use: any forecast for sustained winds above 40 mph, any forecast for lightning within 30 miles of above-treeline terrain you plan to camp in, and any forecast for precipitation in a canyon drainage system that would make crossing or travel through that drainage dangerous.
Lightning protocol for solo camping safety in alpine terrain: if you hear thunder, you are within striking range. Descend immediately to below treeline. If caught above treeline in active lightning, move away from summit and ridge features, crouch on the balls of your feet on your sleeping pad (insulation from ground current) with your feet together and hands off the ground, do not lie flat, and do not shelter under isolated trees.
Hypothermia prevention is the most important weather-related solo camping safety skill because hypothermia is the most common weather-related wilderness fatality and the most insidious. It develops before you recognize the symptoms clearly. Know the signs in yourself: confusion, lack of coordination, loss of fine motor control, inappropriate decision-making. If you notice any of these symptoms, treat for hypothermia immediately. Get into your sleeping bag, add layers, heat fluids if possible, and activate your communication device. Do not wait to see if you warm up on your own.
Shelter system performance under severe weather connects directly to the complete shelter maintenance and waterproofing protocols in the lifespan of camping tents guide, where seam sealing, DWR renewal, and stake system integrity determine whether your tent performs as a genuine weather shelter or fails at the moment you need it most.
Phase 8: Physical Conditioning and Trip Scaling
More solo camping safety incidents occur because the trip demanded more physical output than the camper had prepared for than for any other single reason. A physically exhausted solo camper makes worse navigation decisions, misjudges distances and weather, and has reduced injury recovery options.
Trip scaling for solo camping safety means matching the trip’s physical demand to your current, actual fitness level, not your remembered fitness level from last season or your aspirational fitness level for later this year. A solo trip that is 30% easier than you think you can handle is the correct calibration level for a first solo excursion in new terrain. You can always extend. You cannot undo an overcommitment 15 miles from the trailhead with a knee that is failing.
Daily mileage budgeting for solo camping safety should include a buffer for unexpected terrain, navigation detours, and the time cost of solo camp setup and breakdown that group camping distributes among multiple people. If group camping takes 45 minutes to set up a camp, solo camping takes 60 to 75 minutes. Build that into your daily timeline. Arriving at camp in fading light because you underestimated setup time is the beginning of a cascade of rushed, error-prone decisions that solo camping safety protocols exist to prevent.
Physical self-assessment throughout the trip is the discipline of honest evaluation: noticing that your pace is slower than planned, that a blister is developing before it becomes debilitating, that your water intake has been inadequate, that you are less clear-headed than you should be. Solo camping safety is, in significant part, the discipline of noticing small problems while they are still small rather than managing crises that small problems become when ignored.
Solo Camping Safety Quick Reference Checklist
| Category | Item | Priority | Notes |
|---|---|---|---|
| Communication | Garmin inReach Mini 2 | Critical | Two-way satellite messaging |
| Communication | PLB (ACR ResQLink) | Critical | Backup, no subscription |
| Communication | Fox 40 Whistle | Essential | Works without battery |
| Communication | Signal Mirror | Essential | 16km visibility range |
| Navigation | Phone + offline maps | Critical | Download before departure |
| Navigation | Paper topo map | Critical | Never rely on phone alone |
| Navigation | Baseplate compass | Critical | Backup when phone fails |
| Shelter | 3-season tent + footprint | Critical | Rate for actual conditions |
| Shelter | Emergency SOL bivvy | Essential | Pocket-size backup shelter |
| Medical | Comprehensive first aid kit | Critical | Include CAT tourniquet |
| Medical | Personal medications x3 | Critical | 3-day surplus minimum |
| Water | Sawyer Squeeze filter | Critical | Primary purification |
| Water | Aquatabs iodine backup | Essential | Chemical redundancy |
| Wildlife | Bear spray in hip holster | Critical | In bear country |
| Fire | Lighter + matches + ferro rod | Essential | Three independent methods |
| Power | Power bank 20,000 mAh | Essential | Keep devices charged |
| Trip Protocol | Notification document | Critical | Filed before departure |
| Trip Protocol | Daily check-in schedule | Critical | Agreed time and method |
Frequently Asked Questions About Solo Camping Safety
Q: What is the single most important solo camping safety item to carry?
A satellite communicator such as the Garmin inReach Mini 2 is the single most impactful solo camping safety item because it addresses the scenario that all other safety measures cannot fully prevent: an emergency in a location without cellular coverage where you need external help. Every other safety item on this checklist helps you manage problems independently. A satellite communicator ensures that problems you cannot manage independently can be escalated to people who can help, from any location on Earth.
Q: How do I find someone to be my trip contact for solo camping?
The trip contact role requires someone who (1) will take the responsibility seriously, (2) understands the specific trigger threshold (a missed check-in by a predetermined time means calling search and rescue immediately, not waiting 24 hours), and (3) has the phone numbers needed to act. A close friend or family member who camps or hikes themselves is ideal because they understand the context. Give them written instructions, not a verbal agreement, and confirm they have the specific search and rescue contact number for the region you are camping in, not just 911 (which may not dispatch the correct resource in wilderness areas).
Q: Is solo camping safe for beginners?
Solo camping safety for beginners is achievable with the right graduated approach. Start at established campgrounds within cell coverage, with neighbors in adjacent sites and a camp host on-site. Complete at minimum a Wilderness First Aid (WFA) course before venturing into remote terrain. Make your first several solo trips in familiar terrain that you have previously covered with a group. Build navigation, first aid, and weather assessment skills incrementally before camping in technical or genuinely remote terrain. Solo camping safety is a skill set developed progressively, not a binary capability you either have or do not have.
Q: What should I do if I encounter a bear while camping alone?
Remain calm and do not run, as running triggers pursuit instinct in bears. Identify yourself as human by speaking in a calm, clear voice. Back away slowly while facing the bear. Have your bear spray unholstered and ready. If the bear charges, stand your ground until the bear is within 20 to 30 feet, then deploy a 1 to 2 second burst of bear spray at the bear’s face. For a contact attack (bear makes physical contact), fight back aggressively with any available implement for black bears. For grizzly bear contact attack, play dead face-down with hands clasped behind your neck and remain motionless until the bear leaves the area. Solo camping safety in bear country requires rehearsing this protocol mentally before you need it, because in the moment it happens too fast for first-time decision-making.
Q: How do I handle a medical emergency when camping alone?
Solo camping safety medical emergency protocol has three phases: treat what you can treat with your first aid kit and training (clean and dress wounds, splint fractures, treat for hypothermia, manage anaphylaxis with an EpiPen if you carry one), activate your satellite communicator SOS function to alert search and rescue, and prepare to self-rescue to a location accessible to emergency responders if your condition allows movement. The specific self-treatment protocols for solo campers, including wound closure, splinting, and blister management, are the practical content of a Wilderness First Aid certification, which is the most important investment in solo camping safety that does not appear on any gear list.
Q: What are the best apps for solo camping safety?
Gaia GPS for offline topographic maps and route tracking (approximately $40 annually) is the most widely used and most comprehensively tested navigation app for backcountry solo camping safety. CalTopo is the preferred app among search and rescue professionals for its precise topographic detail and map layer flexibility. AllTrails provides trail condition reports and community-logged hazard information that help you make go/no-go decisions before departure. PeakFinder AR identifies surrounding peaks by pointing your phone at them, which is a useful triangulation verification tool in unfamiliar terrain. None of these apps replaces a paper map and compass as a redundant navigation backup.
Q: How early should I start planning for solo camping safety?
A minimum 72-hour pre-trip window is the professional standard for solo camping safety planning: weather forecast monitoring begins 72 hours out, trip notification document is filed 24 hours before departure, gear is laid out and checked against the full checklist 48 hours before departure (not the morning of, when discovery of a missing item cannot be resolved). First-time solo campers should plan for a 2-week pre-trip preparation window that includes a gear shakedown, skill review, physical conditioning, and route study. Rushed preparation is directly correlated with the improvised in-field decisions that generate solo camping safety incidents.