

Let me tell you about the most expensive ice I ever bought. It was a 20-pound bag that lasted exactly 18 hours in a premium rotomolded cooler that should have kept it frozen for four days. I’d been using that cooler for three seasons, opening it dozens of times per trip, tossing it in a truck bed, pulling it across gravel, and never once cleaning the gasket or checking whether the lid seal was still making contact along its full perimeter.
The gasket had developed a flat section where the lid compressed it against the body rail, a section maybe four inches long where warm air was moving in and cold air was moving out continuously. Eighteen hours of ice life. The same cooler, after a $15 gasket cleaning and conditioning session, went back to holding ice for 72-plus hours in similar conditions.
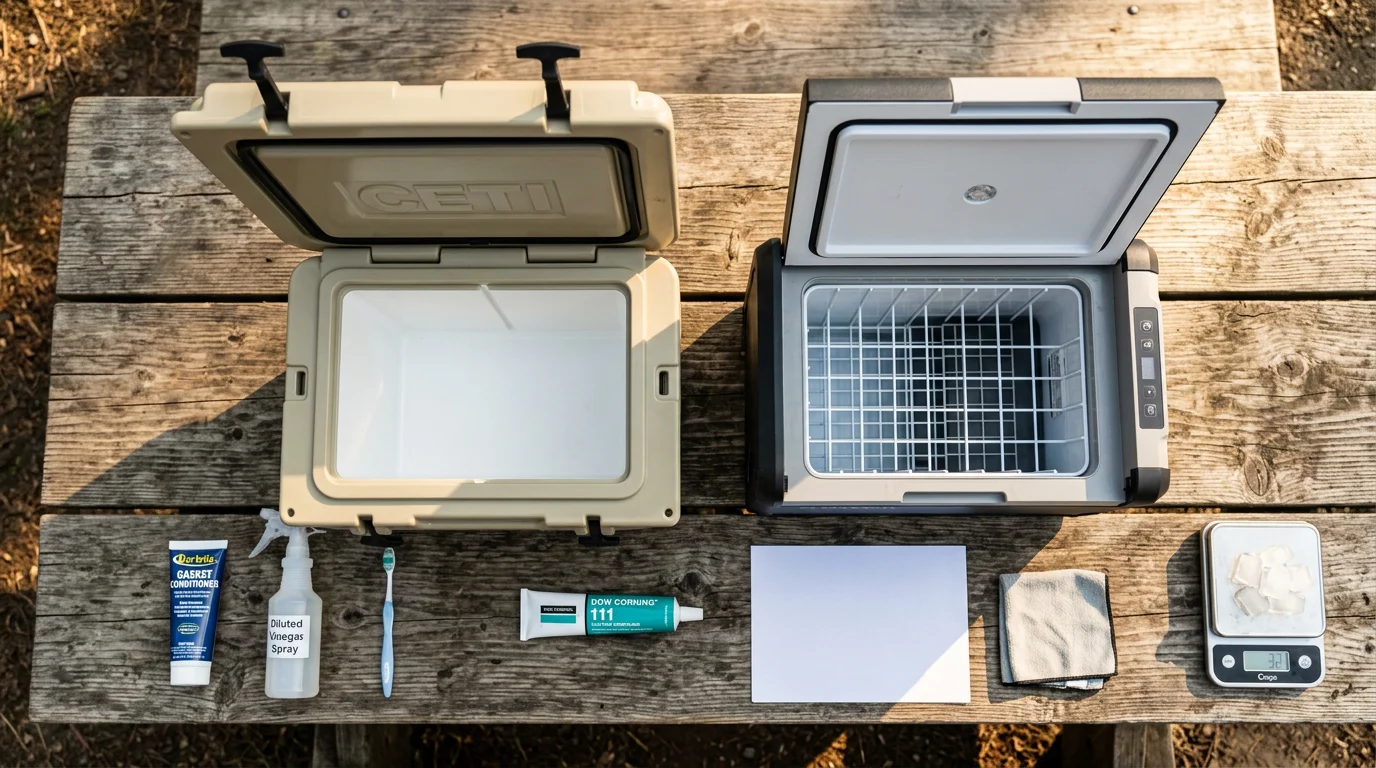
Camper cooler fridge gasket care is the single most neglected maintenance task in camp kitchen management, and it is also the one with the most direct and measurable payoff in food safety, ice longevity, and 12V compressor efficiency. This guide covers every aspect of gasket maintenance, condensation management, and thermal efficiency optimization for both passive coolers and 12V compressor refrigerators used in camping, van life, and RV applications.
Why Gaskets Determine Everything
The thermal performance of any insulated container, whether a $30 soft cooler or a $1,200 ARB fridge, is fundamentally limited by its weakest thermal pathway. Insulation panels can achieve R-values that would make a building contractor envious, but all of that insulation performance is irrelevant if warm ambient air has a direct route past a compromised lid seal into the cold interior.
A gasket performs two simultaneous functions: it creates a physical barrier against air exchange between the interior and exterior, and it creates a moisture seal that prevents condensation from forming in the gasket channel and degrading the seal surface. Both functions degrade through the same mechanism: physical compression set, dirt accumulation, UV and chemical degradation of the gasket rubber, and the mechanical wear of repeated opening and closing cycles.
Understanding camper cooler fridge gasket care begins with understanding the gasket’s failure modes. Compression set occurs when rubber or foam gaskets are held in their compressed state for extended periods and the material takes a permanent deformation, losing its ability to rebound and fill the gap between lid and body. Dirt accumulation in the gasket channel holds moisture against the seal surface, accelerating microbial growth and chemical degradation of the rubber chemistry. UV exposure hardens and embrittles gasket material from the exterior face, while the oils and fats present in typical cooler contents degrade the rubber from the interior face.
None of these failure modes are dramatic or sudden. Camper cooler fridge gasket care is a slow degradation problem that responds well to regular maintenance and responds very poorly to being ignored until performance fails noticeably.
The same systematic approach to maintaining all camp equipment components that governs a thorough pre-trip preparation covers gasket care as part of the broader maintenance philosophy in the camper maintenance checklist guide, where cooler and refrigeration systems are among the food-safety-critical items requiring regular inspection.
The Paper Test: Diagnosing Your Gasket Right Now
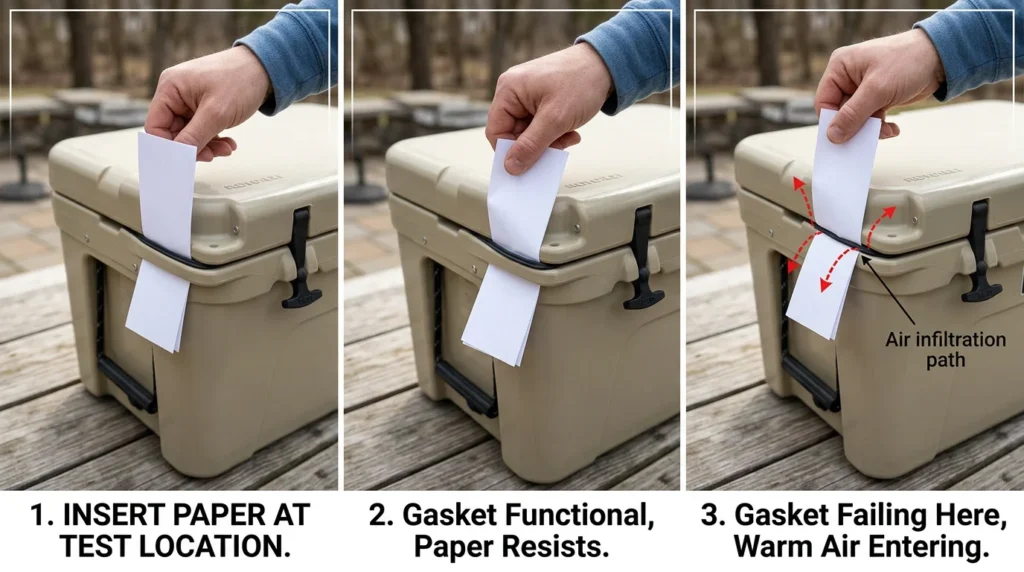
Before discussing camper cooler fridge gasket care protocols in detail, there is a 60-second diagnostic test that tells you immediately whether your cooler or 12V fridge gasket is performing or failing.
Take a standard piece of copy paper and close it in the lid of your cooler or fridge at various points around the full perimeter of the seal. At each position, try to pull the paper out with steady, moderate tension. A gasket in good condition grips the paper firmly enough that pulling it requires noticeable resistance. You should feel the paper dragging against the seal rather than sliding freely.
A gasket that allows the paper to slide out with minimal resistance at any point along the perimeter has lost its sealing function at that location. Cold air is exchanging with warm air through that gap every minute the container is in use. Map the failing sections around the full perimeter, the paper test identifies not just whether the gasket is failing but exactly where.
For 12V compressor fridges, a failing gasket has a second diagnostic symptom: the compressor runs more frequently and for longer cycles than it did when new. If you notice your ARB, Dometic, BioLite, or Engel fridge compressor cycling on more than three to four times per hour in a stable ambient temperature, the first thing to check before assuming refrigerant or compressor issues is the door gasket integrity.
Run the paper test at every point around the full door perimeter, including the corners where gasket material is under the highest bending stress and where failures initiate first. A 12V compressor running continuously or near-continuously in mild ambient temperatures almost always has a gasket issue rather than a compressor issue, and camper cooler fridge gasket care addresses it for a few dollars rather than the hundreds that compressor service costs.
Gasket Cleaning: The Foundation of Camper Cooler Fridge Gasket Care
Gasket cleaning is the most frequently required task in camper cooler fridge gasket care and the one most commonly performed incorrectly, with products that damage the gasket while appearing to clean it.
The gasket channel (the groove in which the gasket sits) accumulates a combination of food debris, condensation residue, mold growth, and mineral deposits from repeated moisture exposure. This accumulation holds moisture against the gasket rubber continuously, providing the water and nutrients that mold and mildew colonies need to establish in the porous surface structure of the seal material.
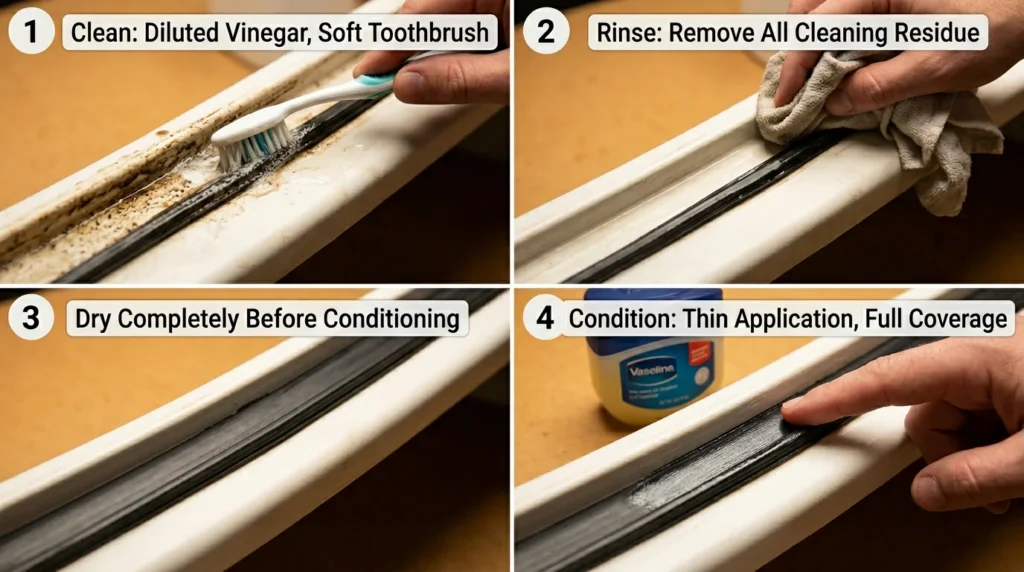
The correct cleaning agent is a diluted solution of white vinegar or a purpose-made gasket cleaner like Dometic Fridge Cleaner. Diluted white vinegar at a 1:3 ratio with water is mildly acidic, kills mold and bacteria effectively, dissolves mineral deposits, and is completely safe for rubber gasket chemistry. Apply with a soft toothbrush to work the cleaning solution into the gasket surface pores and into the gasket channel behind the seal.
What not to use for camper cooler fridge gasket care cleaning: bleach solutions, alcohol-based cleaners, acetone, petroleum-based degreasers, and any cleaner with aggressive surfactants. Bleach oxidizes rubber polymer chains and accelerates the hardening and cracking that causes gasket failure. Alcohol desiccates rubber, removing the plasticizer content that keeps the material flexible and compressible. Both products clean effectively in the short term while accelerating gasket failure over the medium term.
After cleaning, rinse thoroughly with clean water on a damp cloth to remove all cleaning solution residue. Allow the gasket surface to dry completely before conditioning, because conditioning products applied to wet surfaces dilute unevenly and provide inconsistent protection.
Clean the gasket and gasket channel after every multi-day camping trip where food and drink condensation has accumulated in the seal area. For 12V fridges in permanent van or RV installations, a monthly gasket cleaning during active camping use is the correct interval.
Gasket Conditioning: The Step That Extends Service Life
Cleaning removes contaminants from the gasket surface. Conditioning restores the physical properties of the gasket material that cleaning and aging gradually deplete. Camper cooler fridge gasket care that includes regular conditioning rather than cleaning alone doubles or triples the gasket’s functional service life in real-world field conditions.
Gasket conditioning products restore plasticizer content to rubber that has been depleted by UV exposure, ozone, and the oxidizing effects of cleaning agents. They also provide a thin protective film that reduces friction during opening and closing cycles, which reduces the mechanical wear rate on the gasket surface, and slightly increases gasket compliance, improving the contact pressure of a slightly compressed gasket against the opposing seal surface.
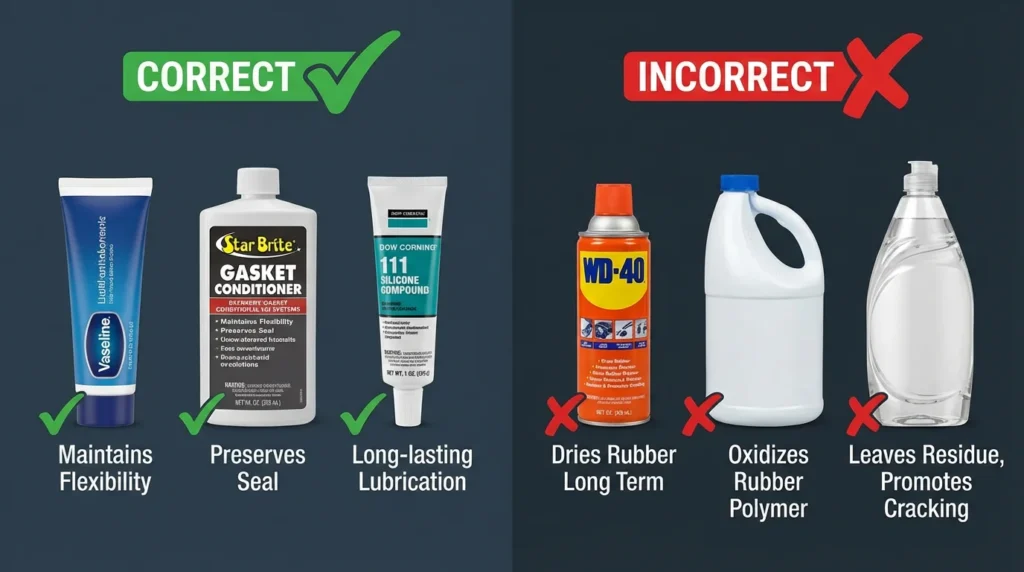
Vaseline (petroleum jelly) is the most widely accessible gasket conditioner for rubber seals. Apply a very thin coat to the gasket surface with a finger or cloth, working it into the rubber surface rather than leaving a thick film. Vaseline is effective at restoring surface flexibility and reducing friction, but it does not penetrate deeply into the rubber structure and requires reapplication every 4 to 6 weeks during active use.
Camper cooler fridge gasket care dedicated products including Star Brite Gasket Conditioner and Gasoila Soft-Set provide deeper penetration into the rubber matrix than Vaseline and maintain conditioning effects for 2 to 3 months per application. These are the preferred products for 12V compressor fridge gaskets where the seal is critical to compressor efficiency and consistent door closure matters more than in a passive cooler.
Silicone-based gasket conditioners (3M Silicone Paste, Dow Corning 111 Compound) provide the most durable film of any conditioning product and are the correct choice for gaskets showing early compression set, where the added silicone creates a slight additional sealing layer that compensates for minor loss of gasket height. Apply sparingly: excessive silicone paste creates a sticky residue that accumulates grit from the camping environment and can paradoxically reduce gasket sealing performance if over-applied.
Never use WD-40 as a gasket conditioner for camper cooler fridge gasket care. WD-40 is a water displacement agent with a petroleum carrier that initially softens rubber but subsequently dries out and leaves the rubber in a more brittle condition than before treatment, accelerating the cracking and compression set it appeared to address.
Condensation Management: The Efficiency Multiplier
Condensation management is the aspect of camper cooler fridge gasket care that most directly affects the practical thermal efficiency of both passive coolers and 12V fridges, and it is the aspect that receives the least attention in standard maintenance guidance.
Condensation forms inside any cold container when warm humid air enters, contacts a cold surface, and releases its moisture content as liquid water. In a passive cooler, this condensation falls to the bottom and mixes with meltwater, contributing to the soggy food and premature ice melt that define poorly managed cooler use. In a 12V compressor fridge, condensation on evaporator surfaces reduces heat transfer efficiency and can eventually cause frost buildup that blocks airflow through the evaporator coils.
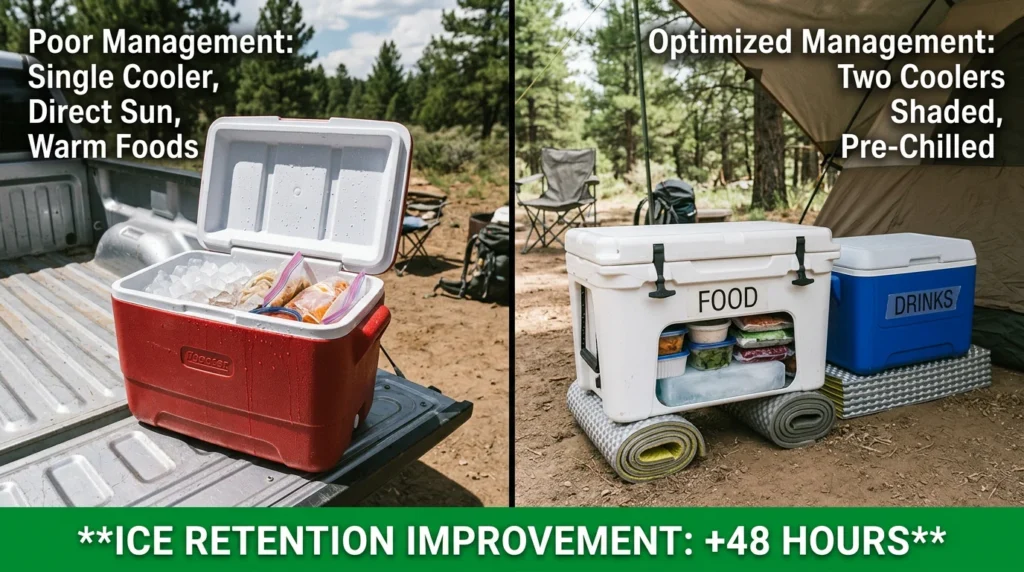
Managing condensation in passive coolers starts with air exchange minimization. Every time you open a cooler in humid conditions, warm moist air enters the interior. Minimizing opening frequency is the single most effective condensation reduction strategy: designate a specific cooler for drinks (opened frequently) and a separate cooler for food (opened only for meal preparation). This separation strategy, common knowledge among backcountry guides and serious overlanders, keeps food-cooler condensation dramatically lower than single-cooler management.
Pre-cooling the cooler interior before packing extends ice life and reduces condensation formation by reducing the temperature differential between cooler interior and incoming warm air. Fill the empty cooler with ice and close it for 30 to 60 minutes before loading food. The pre-cooled interior surfaces produce significantly less condensation from the warm food loaded at packing than an ambient-temperature interior would.
Drain plug management directly affects ice longevity in passive coolers. Many campers leave the drain plug closed to retain meltwater, operating under the assumption that cold meltwater helps preserve remaining ice. This is partially correct: cold water does provide some thermal mass. However, water conducts heat into your cooler contents far more efficiently than air does. Once ice melt water reaches temperatures above 34 to 35°F (close to freezing), draining and repacking with fresh ice provides better thermal performance than retaining the water. Drain when the water is noticeably cool rather than cold, and drain completely rather than partially.
Managing condensation in 12V compressor fridges requires correct temperature settings and attention to the door seal integrity that camper cooler fridge gasket care directly addresses. Set the fridge to 37 to 38°F rather than the minimum setting. Lower temperatures cause the evaporator to run colder and condense more moisture from each air exchange when the door opens. The modest temperature difference between 37°F and a lower setting provides negligible additional food safety benefit while significantly increasing both condensation rate and compressor workload.
Allow hot foods to cool to room temperature before loading them into a 12V fridge. A warm casserole or freshly cooked meal placed directly into the fridge produces a large condensation event as the warm moisture-laden air from the food encounters the cold surfaces, temporarily raising interior temperature and making the compressor run a longer cycle to recover. A 20-minute pre-cooling on the counter before loading reduces both condensation and compressor load simultaneously.
The complete power management principles that govern 12V fridge compressor efficiency are covered in depth in the camp lighting and power gear guide, where fridge compressor load is one of the primary variables in a camp power budget calculation.
12V Compressor Fridge Maintenance: Beyond the Gasket
While camper cooler fridge gasket care is the primary maintenance focus for maximizing 12V fridge efficiency, several additional maintenance tasks maintain peak performance of the compressor and cooling system between major service intervals.
Ventilation clearance maintenance is critical for 12V fridges with external condenser coils. Most portable compressor fridges require a minimum airspace around the condenser (typically 3 to 4 inches on all sides and above) for the heat rejected from the refrigeration cycle to dissipate. Fridges installed in van cabinets or RV compartments without adequate ventilation run at elevated condenser temperatures that reduce efficiency and shorten compressor life. Check and clear ventilation pathways as part of regular camper cooler fridge gasket care inspections.
Condenser coil cleaning on fridges with accessible exterior condenser surfaces removes dust, debris, and insect accumulation that reduces heat transfer efficiency. A compressed air can or soft brush cleans condenser fins without bending them. Bent condenser fins reduce airflow through the coil and raise condenser operating temperature. Clean the condenser annually or whenever dust accumulation is visible.
Drain hole inspection in 12V fridges that have an interior drain hole (not all models do) ensures the hole remains clear and unobstructed. A blocked drain hole causes meltwater and condensation to accumulate in the interior, providing a mold growth substrate and eventually damaging interior components through prolonged water contact.
Interior cleaning of the 12V fridge interior uses the same diluted white vinegar or dedicated fridge cleaner used for gasket care. Wipe all interior surfaces including the door interior, shelf supports, and interior walls. Pay specific attention to the gasket channel on the fridge body side, where debris accumulation is highest and least visible during routine opening.
Power cable and connector inspection on 12V fridges subject to vehicle vibration are prone to developing intermittent connection failures at the fridge’s power pigtail connector and at the cigarette lighter or Anderson connector at the power source. A fridge that operates intermittently or fails to start reliably should have its power cable connections checked before assuming compressor failure. Clean connectors with contact cleaner and apply ACF-50 or equivalent corrosion inhibitor to the connector surfaces. The full electrical connector maintenance protocol is covered in the camper battery health maintenance guide, where power system integrity at every connection point determines how reliably 12V equipment performs.
Passive Cooler Efficiency: Maximizing What Your Ice Does
Camper cooler fridge gasket care contributes directly to passive cooler ice life by ensuring warm air cannot infiltrate through a compromised lid seal. But several additional efficiency techniques operate independently of gasket condition and together produce performance that approaches the premium claims made by high-end cooler brands.
Ice type and packing sequence affect ice life more than most buyers realize. Block ice lasts significantly longer than cubed ice because it presents less total surface area for heat transfer: a single 10-pound block of ice has approximately 1/6th the surface area of an equivalent weight in standard ice cubes. For the longest ice life, pack with a block ice foundation topped with cubed ice to fill gaps around food items.
Pre-chilled food packing reduces the thermal load the ice must manage from the moment of packing. Every warm item placed in the cooler is a heat source that the ice must absorb before that item reaches the cooler’s target temperature. Refrigerate all food items to below 40°F before packing them into the cooler. Pre-chill beverages overnight. The difference in ice life between loading a fully pre-chilled cooler versus loading ambient-temperature items into an equally well-sealed cooler can be 24 to 36 hours on a three-day trip.
Cooler placement in ambient conditions significantly affects ice life. A cooler in direct sun on a hot day absorbs radiant heat through its exterior shell regardless of how well the lid is sealed. In a vehicle, direct sun on a dark cooler exterior can raise the exterior shell temperature by 30 to 40°F above ambient, dramatically increasing the thermal load the insulation must handle. Place coolers in shade, elevate off hot vehicle floors (a sleeping pad or folded towel underneath reduces conductive heat transfer from a hot metal truck bed), and cover with a reflective tarp in high-sun conditions.
Minimizing air space in a packed cooler improves ice efficiency by reducing the volume of air that warms up and circulates in the unpacked space. A tightly packed cooler loses ice more slowly than the same cooler half-full because there is less air volume to heat up and drive convective heat transfer into the ice mass. Fill empty spaces with additional ice, wadded newspaper, or a folded towel.
Storing Coolers and 12V Fridges at Season End
End-of-season storage is the final component of a complete camper cooler fridge gasket care program and the maintenance step that determines what condition both passive coolers and 12V fridges are in when the next camping season begins.
For passive coolers, the end-of-season protocol begins with a thorough cleaning of the entire interior, gasket, and gasket channel with diluted white vinegar. After rinsing and drying completely (allow 24 hours of open-air drying to ensure no moisture remains in the gasket channel or drain plug assembly), apply a fresh coat of gasket conditioner and store with the lid slightly open or with a folded cloth propped in the lid to prevent the gasket from being held in full compression against the body rail during storage. Extended compression in the fully closed position accelerates compression set, the primary gasket failure mode in passive coolers stored between seasons.
For 12V compressor fridges, defrost and clean the interior completely before storage. Turn the unit off, leave the door propped open with a small cloth to allow complete interior drying, and ensure no moisture remains on the gasket or interior surfaces before closing for storage. Store in a location protected from freezing temperatures if possible: extremely cold storage temperatures do not directly damage the compressor but can cause lubricant viscosity issues on startup in very cold conditions. Leave the power cable connected loosely rather than coiled tightly under tension, as cable insulation under tension develops micro-cracks in the insulation at stress points during temperature cycling.
Apply a fresh application of gasket conditioner to the door seal before the first use of the next season, and run the paper test before loading food for the first trip to confirm gasket integrity after the storage period.
The parallel end-of-season storage protocols that apply to all camp power systems, including the 12V power source that runs your compressor fridge, are covered comprehensively in the camper battery health maintenance guide.
Camper Cooler and Fridge Gasket Care: Quick Reference
| Task | Frequency | Products | Time |
|---|---|---|---|
| Gasket cleaning (passive cooler) | After every multi-day trip | Diluted white vinegar, soft toothbrush | 10 to 15 min |
| Gasket cleaning (12V fridge) | Monthly during active use | Dometic cleaner or diluted vinegar | 15 to 20 min |
| Gasket conditioning (passive cooler) | Every 4 to 6 weeks active use | Vaseline or Star Brite Gasket Conditioner | 5 min |
| Gasket conditioning (12V fridge) | Every 2 to 3 months | Silicone paste or dedicated conditioner | 5 to 10 min |
| Paper test seal check | Before each trip | Copy paper | 2 min |
| Condenser coil cleaning (12V fridge) | Annually | Compressed air, soft brush | 10 to 15 min |
| Interior cleaning (both types) | After every trip | Diluted vinegar or fridge cleaner | 10 to 20 min |
| End-of-season storage prep | Annually | Conditioner, cloth prop for lid | 30 to 45 min |
| Annual time investment total | 4 to 6 hours |
Frequently Asked Questions About Camper Cooler Fridge Gasket Care
Q: How do I know if my cooler gasket needs replacement rather than just conditioning?
A gasket that fails the paper test after cleaning and conditioning, or one that shows visible cracking, tearing, deformation along more than 20% of its length, or sections that have pulled away from the gasket channel, needs replacement rather than maintenance. Gasket replacement on most premium cooler brands (Yeti, RTIC, Pelican) is a straightforward DIY process using a manufacturer replacement gasket and a plastic spudger tool. Replacement gaskets typically cost $15 to $40 and restore full lid seal performance. On most 12V fridges, gasket replacement requires ordering from the manufacturer’s aftermarket parts system and is also a DIY-accessible repair.
Q: What is the best product for camper cooler fridge gasket care conditioning?
Dow Corning 111 Silicone Compound for 12V fridge gaskets where long-term conditioning durability is the priority. Vaseline (petroleum jelly) for passive cooler gaskets where cost and accessibility are priorities and reapplication every 4 to 6 weeks is acceptable. Star Brite Gasket Conditioner for a middle-ground option that works well on both types with 2 to 3 month application intervals.
Q: Why is my 12V fridge compressor running constantly?
Three primary causes in order of frequency: failed door gasket allowing warm air infiltration (check with the paper test immediately), inadequate ventilation clearance around the condenser causing the system to run inefficiently, and ambient temperature above the fridge’s rated operating range. A door gasket failure is the most common cause and the one addressed directly by camper cooler fridge gasket care. Check the gasket before calling for compressor service.
Q: How long should ice last in a well-maintained premium cooler?
A rotomolded premium cooler (Yeti, RTIC, Orca, Pelican) with an intact gasket, properly pre-cooled, packed with block ice and pre-chilled food, kept out of direct sun, and opened no more than twice daily should achieve 3 to 5 days of ice retention in ambient temperatures up to 90°F. The same cooler with a failing gasket, warm food, and frequent opening in direct sun may achieve 1 to 2 days. The gasket condition and usage habits together determine whether a premium cooler earns its price or performs like a $30 alternative.
Q: Can I use bleach to clean mold out of my cooler gasket?
No. Bleach effectively kills mold on contact but accelerates rubber degradation through oxidative chemistry that hardens and cracks the gasket material. Diluted white vinegar (1:3 with water) kills mold equally effectively, dissolves mineral deposits, and is completely safe for rubber gasket chemistry. For severe mold infestations, a second vinegar treatment after the first has dried provides more complete mold elimination without the gasket damage risk that bleach creates.
Q: How often should I clean my 12V fridge interior and gasket?
Monthly during active camping use, and after any trip involving spills, raw meat storage, or produce that releases moisture significantly into the interior. The gasket channel on a 12V fridge accumulates condensation residue and food particles more gradually than a passive cooler but provides a more critical seal function because compressor efficiency depends on it. Monthly cleaning with diluted vinegar and a soft toothbrush at the gasket channel, combined with conditioning every 2 to 3 months, maintains both hygiene and seal performance across the full camping season.
Q: Should I leave my cooler open or closed between camping trips?
Store passive coolers with the lid slightly open or propped with a folded cloth to allow air circulation, prevent gasket compression set, and prevent mold growth from any residual moisture. A completely closed cooler stored for weeks with any residual moisture in the gasket channel develops mold colonies that are difficult to fully eliminate. The cloth-propped lid allows the interior to remain dry while preventing the gasket from sitting in full compression, addressing both the biological and mechanical failure modes simultaneously.